Ableton has announced Live 11 coming next year. It has new features including comping, improved clips view, more Macros, new devices and finally MIDI Polyphonic Expression (MPE) support. This is good news for AudioSwift users and other MPE controllers because we don’t need to have five separated tracks for MPE and edit the MIDI in different clips. Just one track and a single MIDI clip to edit the performance.
I downloaded the Ableton Live 11 Beta to test my Magic Trackpad in Trigger Mode (you can also join the beta program here). They updated Wavetable, Sampler and Arpeggiator to support MPE and we can use third-party MPE compatible plugins. It also comes with a new Max For Live device dedicated for MPE control.
AudioSwift Configuration
To set AudioSwift for MPE in Live, go to Live > Preferences > Link-Tempo-MIDI. There is a new MPE column to enable the AudioSwift 3 input port. Inside the Live’s MPE device, there is also a section where you can set the MPE settings like velocity, pitch bend, pressure and slide, which is control change 74 (CC74). They are per note and they’re transmitted using different MIDI channels.
AudioSwift uses MIDI channels 2, 3, and 4 for this, and it sends global aftertouch (channel pressure) messages using Force Touch on channel 1.
AudioSwift in Trigger Mode (Keys type) sends pitch bend when moving the finger horizontally and CC74 moving vertically. These MPE settings can be changed in AudioSwift > Preferences > Trigger tab. Here is a video demo using Wavetable:
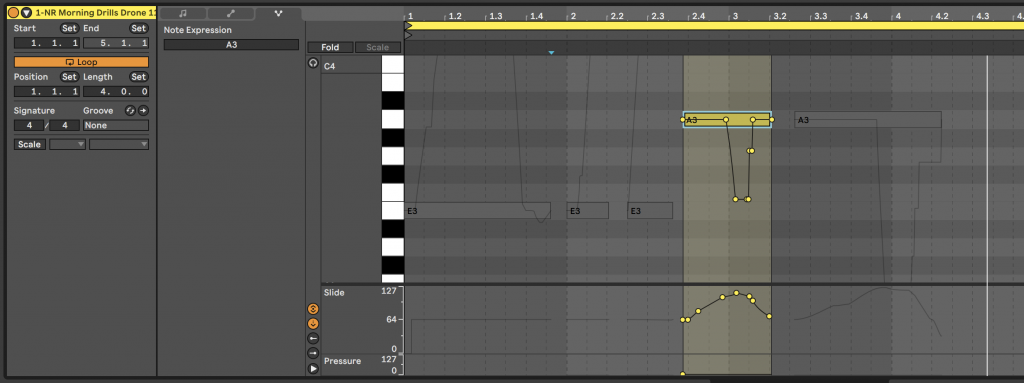
In the Clip Editor there are now three tabs: Notes, Envelopes and Note Expression. We can edit the MPE parameters in the Note Expression tab. Ableton added special lanes to edit the velocity, pitch, slide and pressure envelopes of each note. When using AudioSwift, the pressure information won’t appear here because the trackpad doesn’t send it per note. It will be in the Envelopes tab > MIDI Ctrl > Channel Pressure.
Note Expression View
One thing I found different from using MPE in other DAWs, is that in Ableton Live 11 the pitch bend and slide don’t return to its default value when the finger release the note. The MPE controller will continue sending the values but Live will ignore them after the note-off, which is good depending on the situation.
Third-Party MPE Plugins
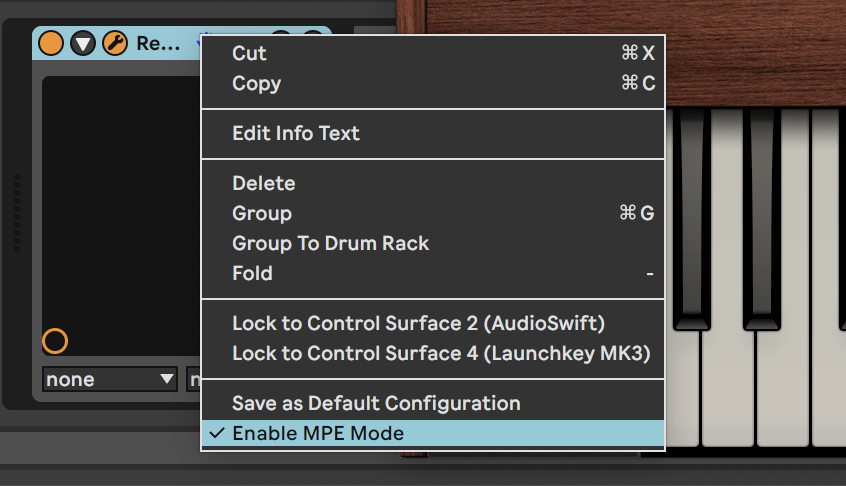
After inserting the third-party MPE compatible plugin into a track, go to the device header, right click and choose Enable MPE Mode.
Enable MPE Mode
I tested Audio Damage’s Continua and u-he’s Repro 5. U-he plugins in particular don’t use CC74 as a default parameter control — they use CC1 or Modulation as the polyphonic expression control. This became an issue when trying to edit a MIDI take in the Clip Editor, because I couldn’t find the CC1 envelopes for each note. Although the clip plays well in playback, the CC1 is not under the Note Expression tab or the Envelopes tab. The Envelopes tab will only shows global Modulation on MIDI channel 1. I hope this could be addressed in coming Live 11 beta versions.
In a previous post, I showed you how to set up a trackpad with AudioSwift and MIDI2LR to edit photos faster in Adobe Lightroom. Now, we’re going to apply the same concept with Final Cut Pro X (FCPX) to color grade videos with simple touch gestures in our trackpads, instead of clicking each individual parameter with the mouse pointer. We’ll be using virtual MIDI sliders and XY pads with AudioSwift and a free macOS application called CommandPost.
This is how it works— we call AudioSwift with a four or five finger tap. The mouse pointer freezes and a small Console window appears on screen. The trackpad is transformed into a MIDI touch controller with different sliders and XY pads. Using keyboard shortcuts, we choose a Color Wheel or Color Board and start touching the trackpad to change a FCPX parameter like saturation, brightness, temperature, etc. AudioSwift sends MIDI messages that CommandPost translates into FCPX actions. Once we finish, we press the Esc key to turn AudioSwift off and unfreeze the mouse pointer.
You can either use a Magic Trackpad 1 or 2, or the built-in trackpad in MacBooks for a portable solution. AudioSwift works from macOS 10.11.6 and up, however, CommandPost needs a higher macOS version to work with FCPX.
Just to let you know, my background is in music and I developed AudioSwift for music production. I’m not a FCPX, CommandPost or color grading professional. What we’re going to do here is to get you started, by showing you how to set up everything using configuration files, that you can tweak later to your preferred workflow. So let’s start…
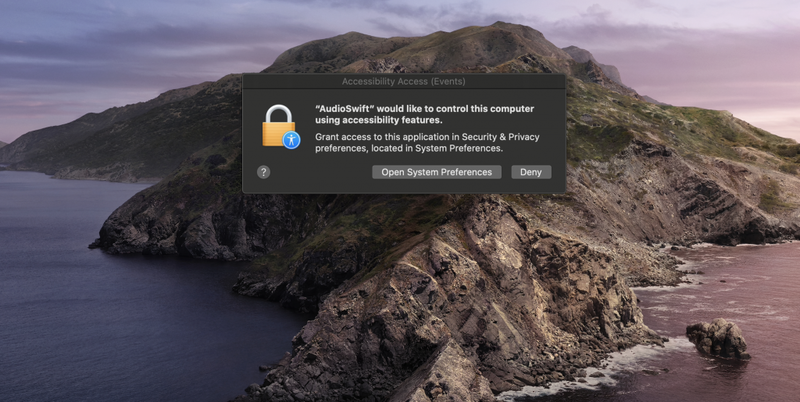
Download AudioSwift from here. Open the installer and move the application to the Application folder as it says. Launch AudioSwift and if you’re on Mojave or Catalina, it will show you the following message. Click Open System Preferences. NOTE: if this message window doesn’t appear automatically, go to the Privacy tab under System Preferences > Security & Privacy > Privacy Tab.
Accessibility Access
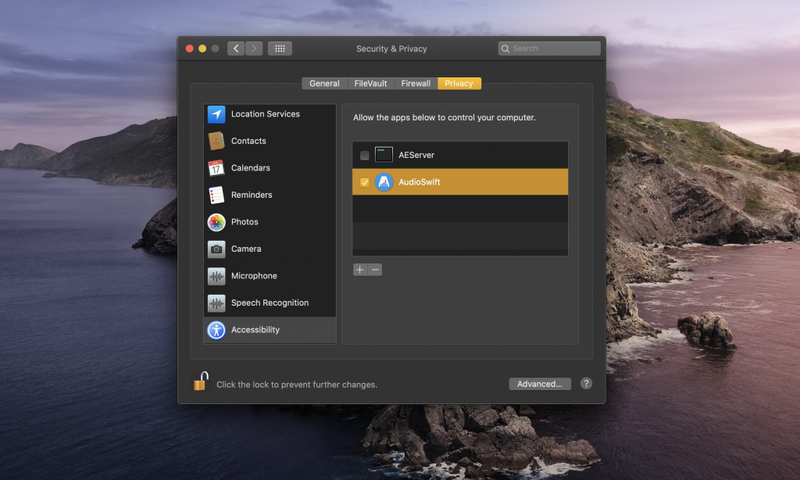
In the left column, go to Accessibility and add AudioSwift to the list by clicking the plus sign. You’ll need an administrator password to do it. Once AudioSwift is added to the right column, close the window and open the app again. The app icon will appear in the top menu bar.
Security & Privacy
If you’re new to AudioSwift or MIDI, let me give you a quick overview. AudioSwift transforms the trackpad into a MIDI controller and it’s an app that works in the top menu bar waiting to be called. With a four or five fingers tap, AudioSwift is turned on and the Console window appears. We touch the trackpad to send MIDI messages and hit the Esc key when we finish. AudioSwift comes in five controller modes, but we’re going to only use two: the XY mode and the Slider mode.
AudioSwift Preferences Window
MIDI stands for Musical Instrument Digital Interface and it’s a communication protocol that connects electronic musical instruments and computers for making music. The MIDI messages are transmitted from AudioSwift via three virtual MIDI ports, and each port has 16 MIDI channels. The ports are then connected to CommandPost that translates the messages to FCPX actions. There are different MIDI messages and we’re going to use two of them: the trackpad will send Control Change (CC) messages and the keyboard will send Note On messages.
IMPORTANT: if you’re already an AudioSwift user, save your current settings before we continue or otherwise they will be lost!
Let’s import one of the configuration files we downloaded before. Go to the AudioSwift icon in the top menu bar and click Preferences > General Tab. At the bottom under General Settings click the Load button, look for the file AudioSwift.plist where you saved it and select it. AudioSwift will restart.
The main window in AudioSwift is the Console, which appears every time we tap the trackpad with a four or five finger tap and disappears when you hit Esc. Go to AudioSwift and click Show Console. If you want the console to be always on screen, click the top right star.
AudioSwift also has a utility window to learn the different MIDI zones in the trackpad. To open it, go to AudioSwift > Show Trackpad. Place both windows in your screen where they won’t interfere.
Let’s check out the CommandPost setup.
CommandPost Configuration & Overview
CommandPost is a free macOS application that allows you to speed up the workflow in FCPX with customizable tools. You can read some of the professional features it has in its website. One of them, is control surface support for many devices including MIDI controllers.
Download the latest CommandPost beta version for this tutorial (1.0.7 beta 22) instead of the official download file from their website, because it has the MIDI enhancements needed for AudioSwift. When you run the installer, it will ask first for your permission to let CommandPost control your computer. Just like you did with AudioSwift, it’s the same process as before. If for some reason it shows you an error message, click continue, close the debug window that appears and proceed with the permissions process. Then restart your computer.
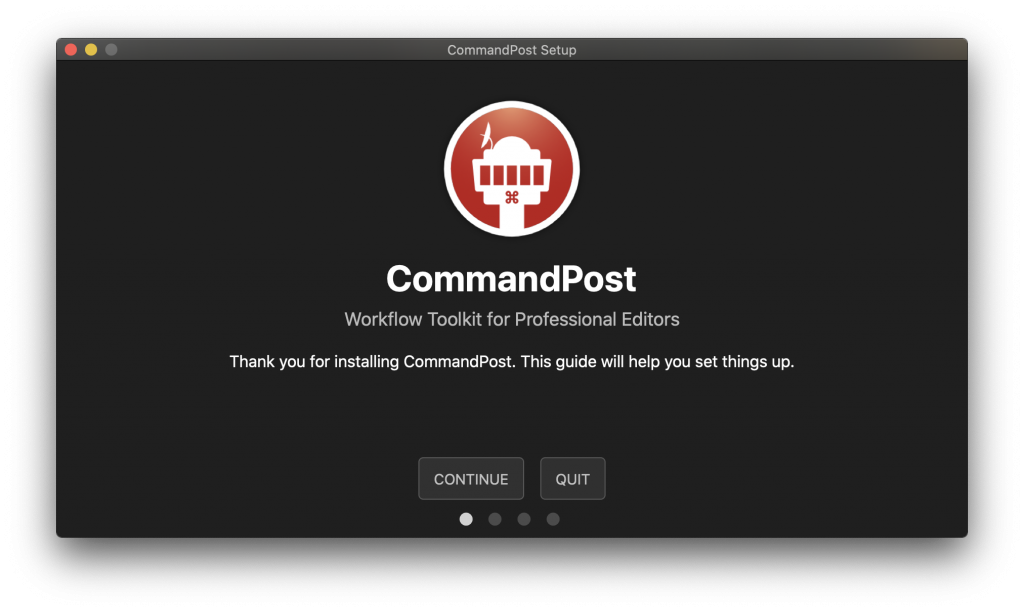
Once the computer restarts, launch CommandPost. A setup window appears with a couple of more instructions to follow. When you finish, close the window and restart the computer one last time.
CommandPost Setup Window
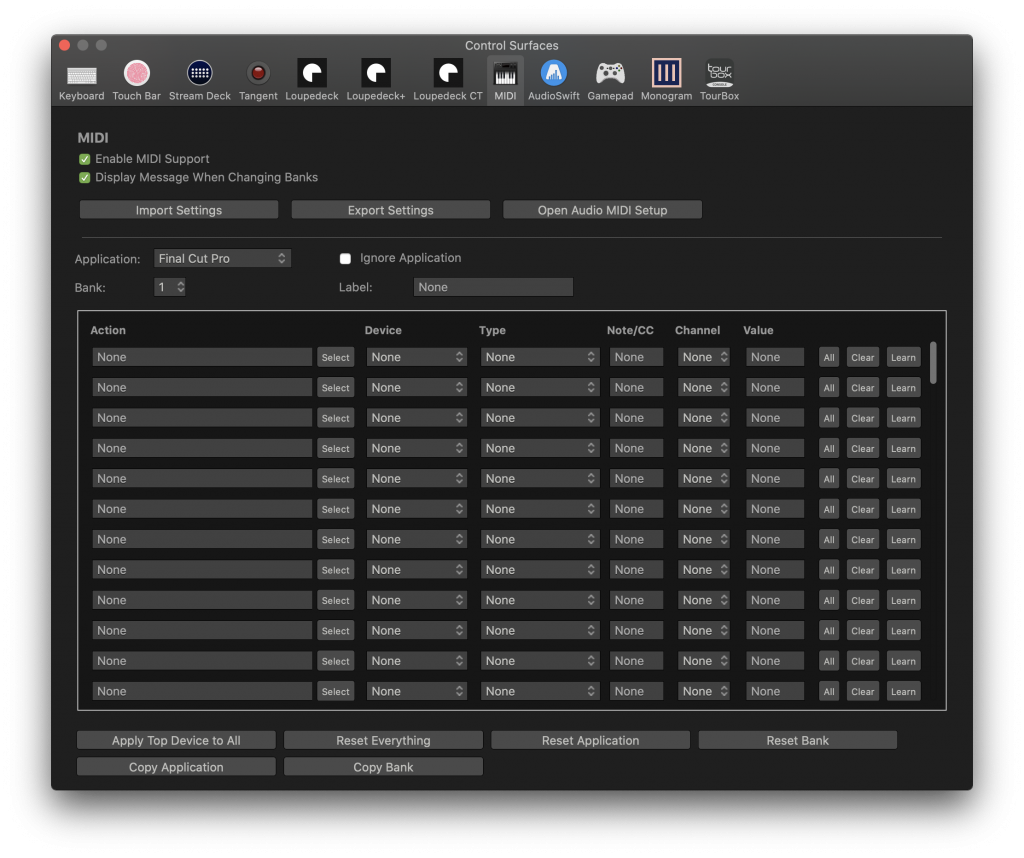
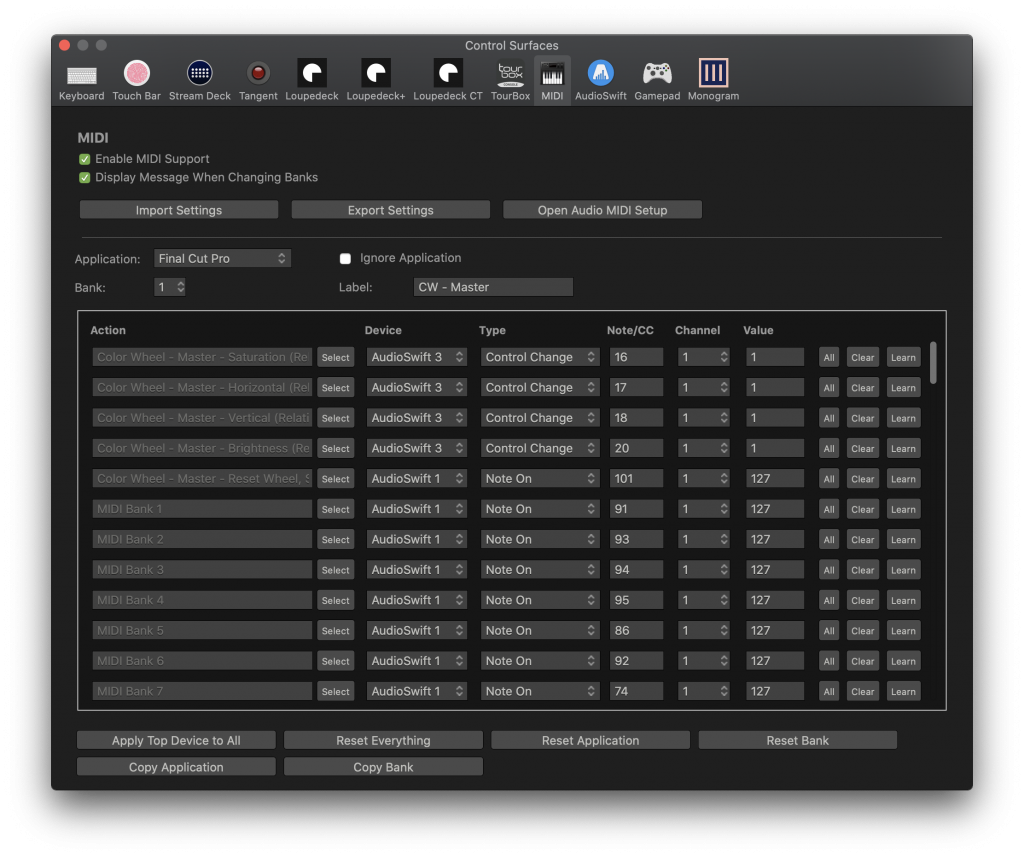
When CommandPost is launched, there is one icon in the Dock and one in the top menu bar. If you click the one in a Dock it will only show you a Debug window. We won’t use it, just close it. Click the icon in the menu bar and go to Control Surfaces > MIDI tab. Although there is a dedicated AudioSwift tab, it’s only for information purposes; all the settings will be made in the MIDI panel.
CommandPost > Control Surfaces > MIDI Tab
Make sure to check the Enable MIDI Support box. Then, under Application choose Final Cut Pro. Click Import Settings, select Replace or Merge and look for the configuration file CommandPost.cpMIDI you downloaded before. Close the window.
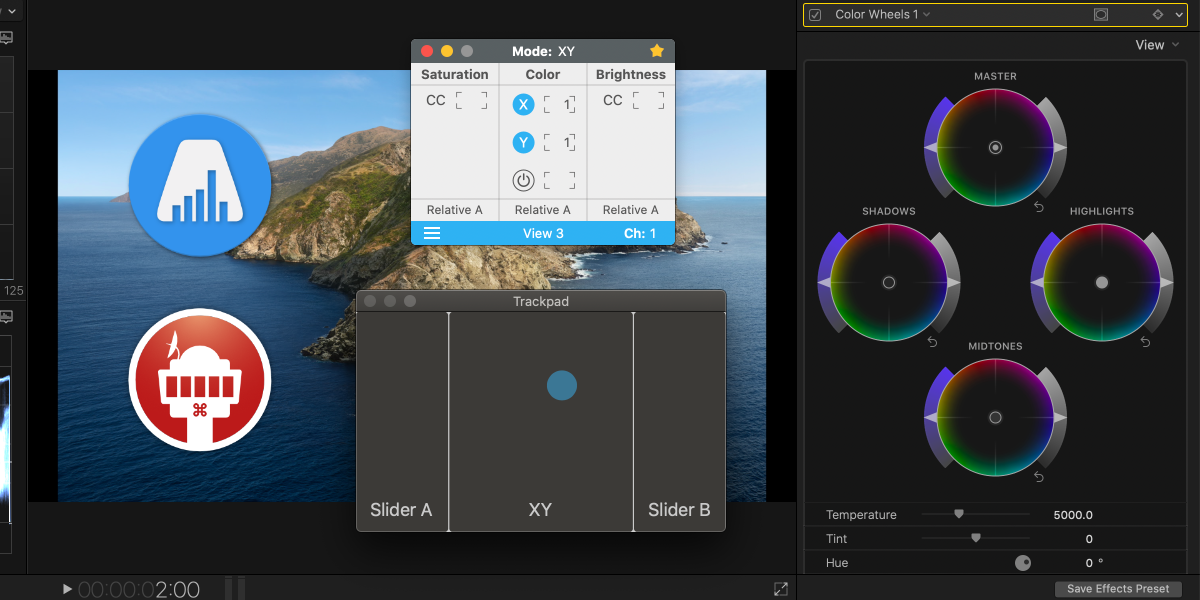
Color Wheels
Launch Final Cut Pro X, AudioSwift and CommandPost in that order. NOTE: in the top menu bar, the CommandPost icon should always be first before AudioSwift. If it’s not, click CommandPost, select Restart and wait until it relaunches. Click FCPX anywhere in the workspace and add a Color Wheel to the project.
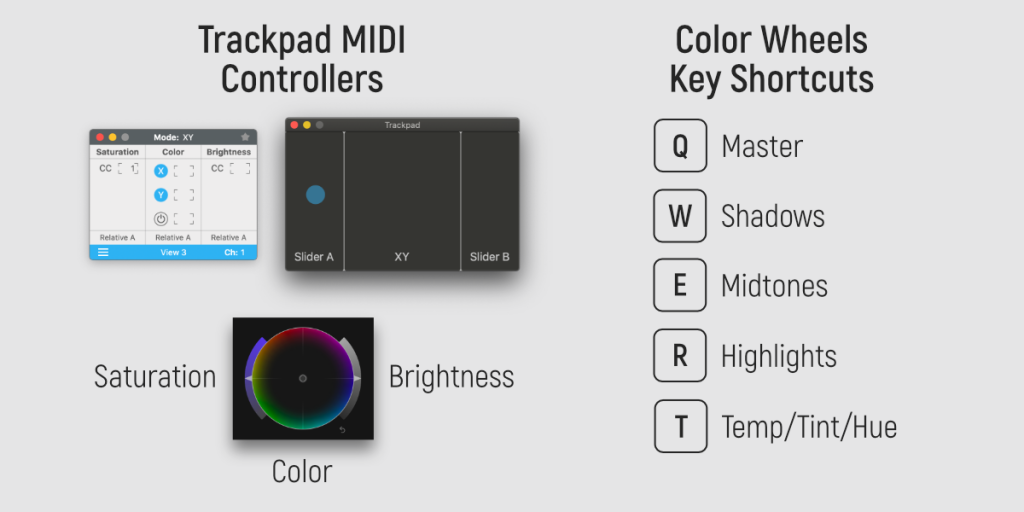
For the Color Wheels, we’re going to use AudioSwift in XY Mode and View 3. We can see the current mode in the top of the Console window and the view in the bottom. With our configuration files, it’s already set by default but both can be changed by clicking the menu or with keyboard shortcuts when AudioSwift is on. Press 4 for the mode and Z, X, period or comma for the view.
AudioSwift Console, Trackpad Layout & Color Wheels Key Shortcuts.
Tap the trackpad with a four finger tap to turn AudioSwift on. Select a Color Wheel by pressing one of the key shortcuts shown in the image above and start touching one of the sliders or the XY pad with only one finger. The desired parameter will move in FCPX. Press the SHIFT key while touching the trackpad to move in small changes. To reset the parameter, move the slider or XY pad just a little bit while pressing OPTION—the parameter will return to its default value. Press de S key to reset the all settings of the current color wheel.
Change to another color wheel with the key shortcut and now the trackpad will control those parameters. Once you finished color grading your clip, hit the Esc key to turn AudioSwift off and unfreeze the mouse pointer. It’s a good practice to turn AudioSwift off when you are not using the MIDI controller, to avoid changing a color wheel parameter accidentally when you really want to do is move the mouse pointer.
Color Boards
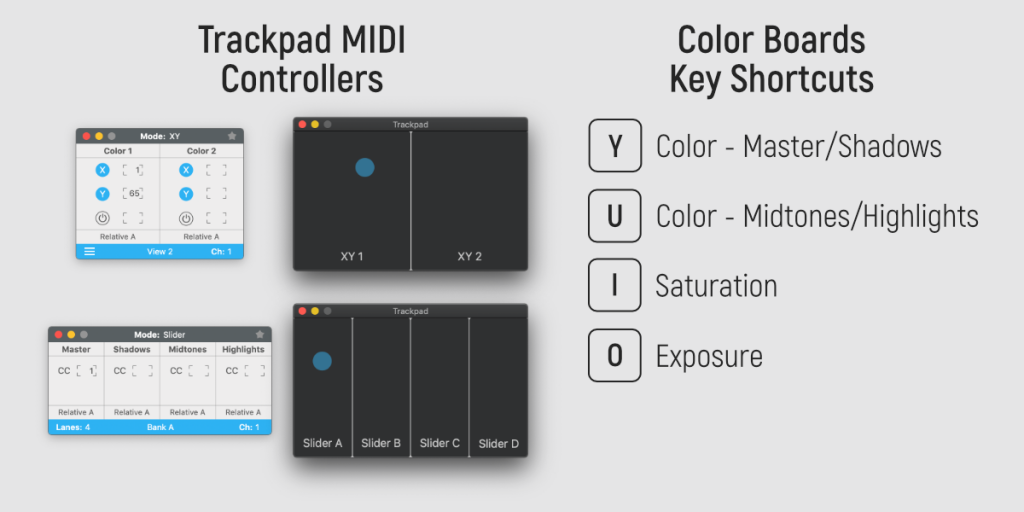
For the Color Board, we’re using AudioSwift in XY Mode View 2 for the Color section and in Slider Mode Bank A for the Saturation and Exposure. To change quickly between modes when AudioSwift is on press 4 for XY and 5 for Slider. To change the view or bank, press Z, X, period or comma.
Console, Trackpad Layout and Color Board Key Shorcuts
Add a Color Board to your project and tap the trackpad with a four finger tap to turn AudioSwift on. Press 4 to use the XY mode and then Z or X to select View 2. Press Y to select the first two pucks of the Colors section.
Start touching the left XY pad; horizontal movements change the percentage and vertical movements change the angle. Use SHIFT for fine tuning and OPTION to reset the puck. Repeat the process with the right XY pad and then press U to control the next pair of the Color section. When you finish, press the Esc key to turn AudioSwift off.
For Saturation and Exposure, we’re going to use AudioSwift in Slider Mode Bank A. Tap the trackpad again with four fingers to turn it on. Press 5 to change to Slider Mode. By default, it’s already on Bank A.
Press I for Saturation or O for Exposure. AudioSwift has 4 Sliders for each parameter. Move your fingers to change them. Use SHIFT for fine tuning and OPTION to reset the parameter. Press Esc to turn AudioSwift off.
Customizing AudioSwift & CommandPost
The XY Mode and Slider Mode in AudioSwift allows different MIDI configuration setups. You can read the user guide for more details. What is important to know, is that each MIDI controller has a CC number that is shown in the AudioSwift Console. This number is assigned to each action in the CommandPost MIDI panel and cannot be repeated in the same CommandPost Bank.
Also important is that the sliders and XY pads can work with Absolute MIDI or Relative A MIDI. Without going too much into details, with Absolute, when you touch the trackpad the FCPX parameter will jump to the corresponding value. With Relative A, the movements are relative to the current FCPX value on screen. This can be changed in the Console window, but not all the actions in CommandPost support Relative A.
AudioSwift can also be activated by taping the trackpad with five finger or using a key command. You can set this in AudioSwift > Preferences > General tab.
In CommandPost, I separated the FCPX parameters in different banks. Each bank has a group of Color Wheels or Color Board actions, plus a group of actions to change from one MIDI bank to the other using key shortcuts. This last group is repeated in all banks.
CommandPost > Control Surfaces > MIDI Tab
To add a new action, press the Select bottom. A window appears with a search box to type the command and select it. To map the MIDI to that action, click the Learn button, and tap the trackpad with a four finger tap to turn AudioSwift on. Move the slider, one of the XY axis or press a key to send a MIDI command and then press Esc to turn AudioSwift off. The controller will be mapped in CommandPost.
The only keys that can send MIDI commands with AudioSwift are from the letter Q to P, S, F and the Space Bar which has the same MIDI command as Q.
Troubleshooting
In case something is not working, check the following:
Always click FCPX anywhere in the workspace before trying to control anything from AudioSwift.
Remember that CommandPost should be the last app to launch. Restart it if it’s not the first icon in the top menu bar before AudioSwift.
AudioSwift restarts every time the computer comes back from sleep mode. If this happens, restart CommandPost.
When AudioSwift is on, it becomes the key app on screen. This means that any regular keyboard shortcut for FCPX won’t work.
Make sure that you’re using the right view or bank in XY mode or Slider mode.
Make sure AudioSwift is working in MIDI channel 1. You can check this in the bottom right corner of the Console window.
Try it for free!
CommandPost is free to use. If you find it useful in your workflow, I exhort you to sponsor the developers via GitHub and help them improve and maintain the app with your contributions.
A special thanks to Chris Hocking for developing the MIDI improvements in CommandPost that makes this tutorial possible. If you have questions about AudioSwift, please let me know via our support page, Facebook, Instagram or Twitter.
In this article, I’ll show you two different ways to use the trackpad with AudioSwift for articulation switching in an orchestral library. For this tutorial, I’ll be working with the recently released BBC Symphony Orchestra Discover by Spitfire Audio, but you can use any other virtual instrument that has articulations.
The first method works on any DAW; it uses the Trigger Mode to send MIDI notes for key switching. The second method is by sending control change messages (CC) with the Slider Mode and works for Logic Pro X users via Articulation Sets. This way you can have two sliders for controlling expression (CC#11) and dynamics (CC#1), and a third one for switching articulations.
Triggering MIDI notes
The most common way to change articulations in a virtual instrument is triggering a MIDI Note On message. Each articulation is assigned to a MIDI note and they usually start in the lowest range of the keyboard, from C-2 and up. If you have as small keyboard, this range isn’t easy to access and if there are too many articulations for the instrument, it becomes a problem to remember the MIDI note that triggers the one you want.
With AudioSwift in Trigger Mode, the trackpad can be divided into different pads, each one with its MIDI note and a label to identify the articulation. In the library I’m using, there are two to four different techniques for each group of instruments. I divided the trackpad into 8 pads, changed the type to Drums and used two different banks to fill all the articulations needed.
AudioSwift in Trigger Mode
In Bank A, the bottom pads trigger the strings articulations which are the same for the violins, violas, cellos and double basses (except the basses don’t have tremolo). The top row only triggers two articulations for the brasses and woodwinds. In Bank B, I put the rest of articulations for the percussion instruments of the library. Use the keyboard shortcuts Z, X, comma and period to change between banks. Save the AudioSwift settings in Preferences > General tab for later recall.
If your orchestral library uses control change messages instead of MIDI notes for articulation switching, you can still use the Trigger Mode if you’re on Logic Pro X or Cubase. Logic Pro has the Articulation Sets and Cubase the Expression Maps, which are two features for receiving any MIDI message (a MIDI Note On in our case) and sending control change messages that the sample library can respond to. Check out each DAW or library user guide to set it up.
CC messages with the Slider Mode & Logic Pro X
Orchestra libraries accept two or three CC messages to control the sounds for expressiveness using sliders. With AudioSwift in Slider Mode, we can use a third or fourth slider in AudioSwift to trigger articulations right from the trackpad.
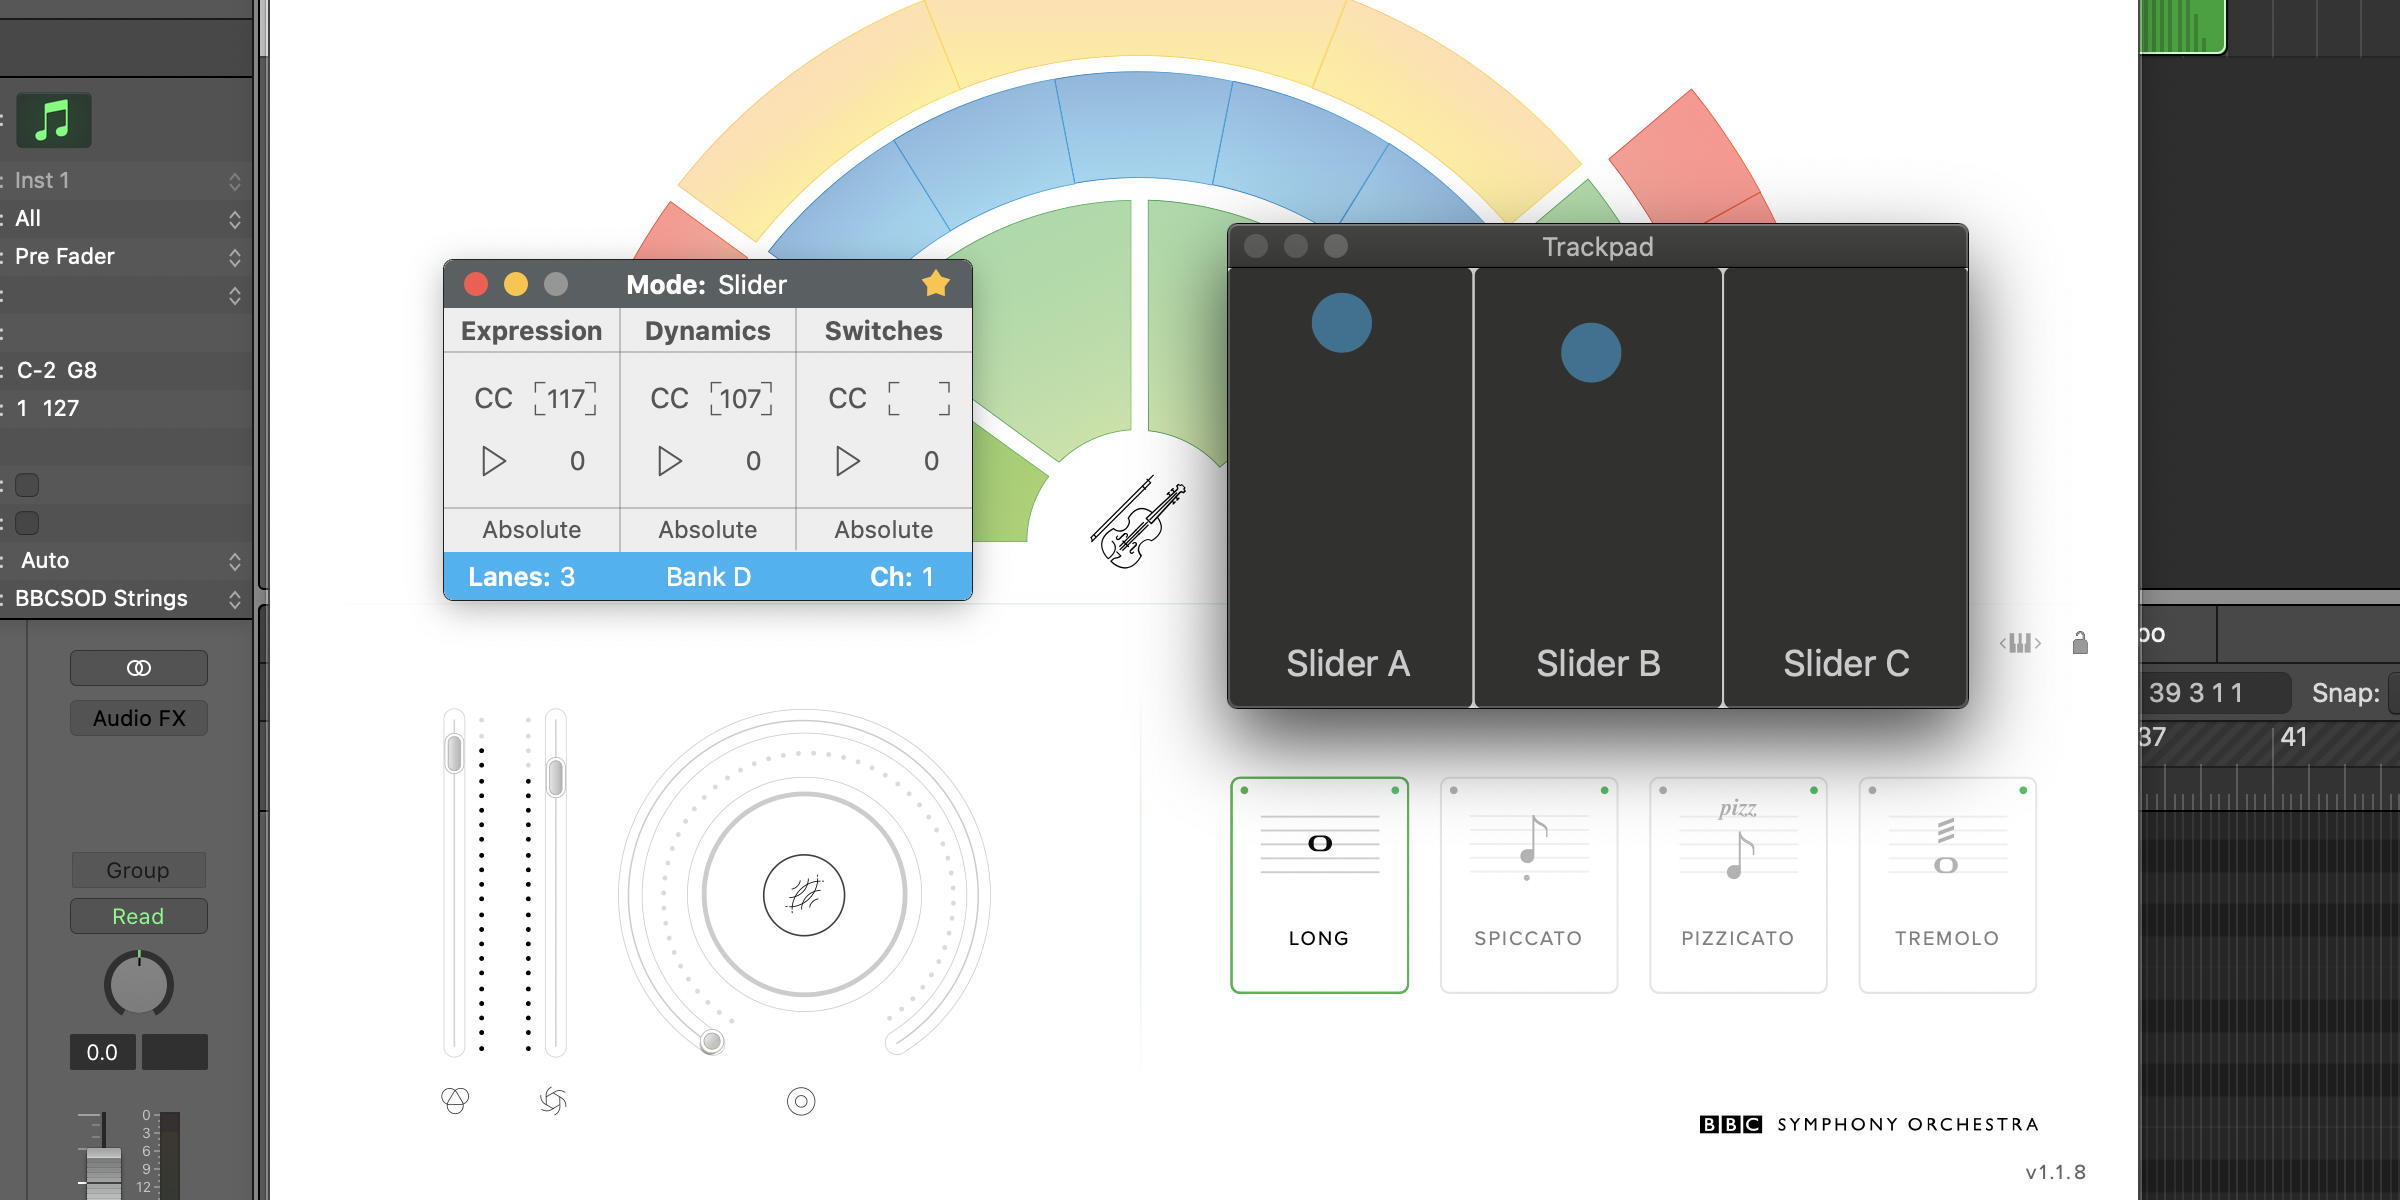
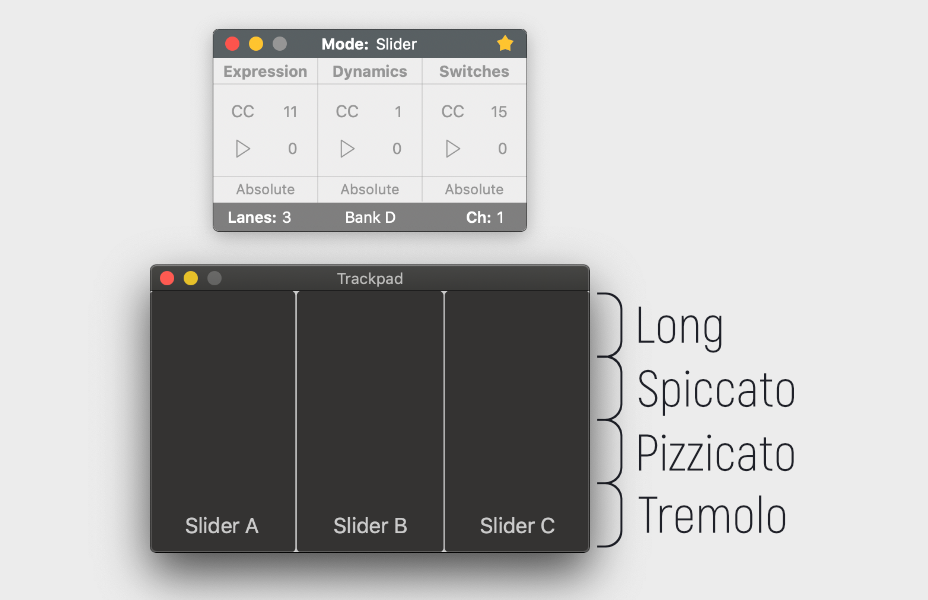
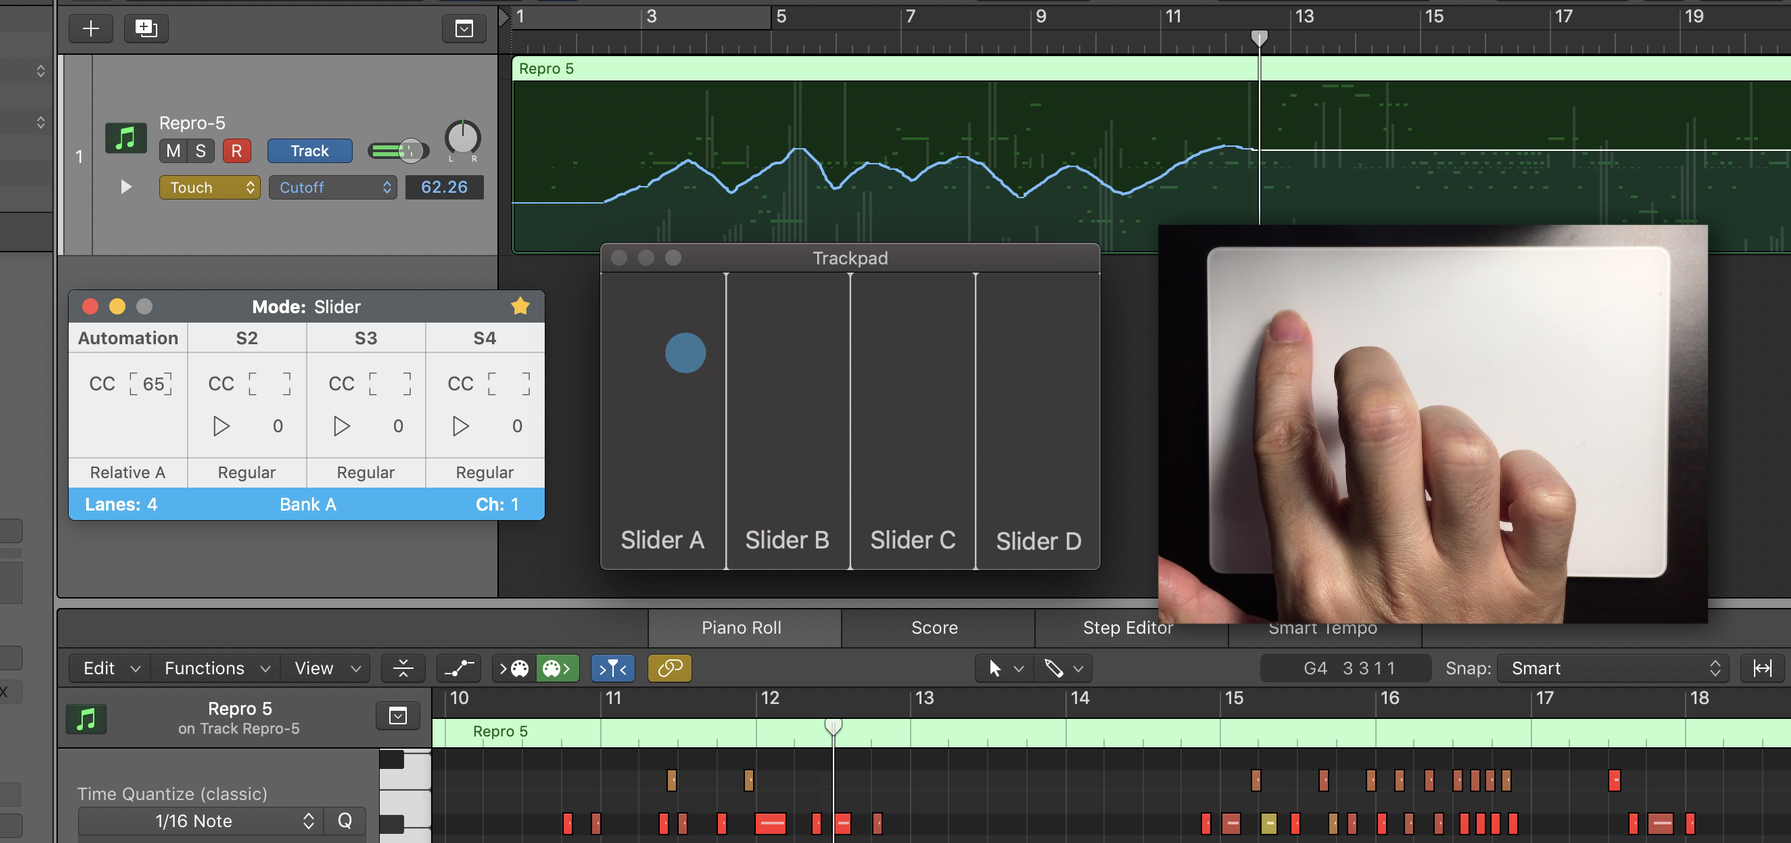
I set AudioSwift in Slider Mode to three sliders and changed the controller formats to Absolute. The first two send CC#11 and CC#1 for Expression and Dynamics. The third slider sends CC#15 and depending on where I touch the finger vertically, it will switch a specific articulation in the plugin.
AudioSwift Console & Trackpad
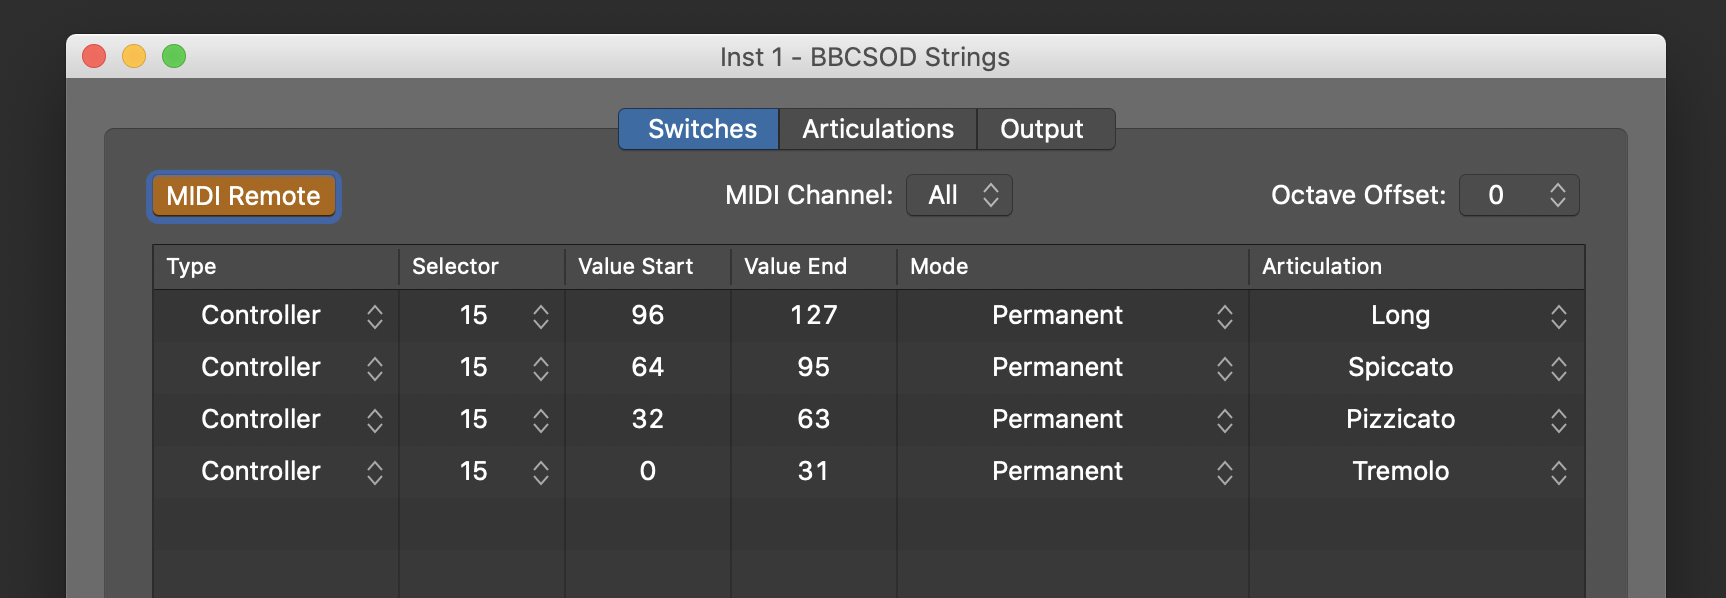
Since this library only accepts MIDI notes for key switching, we will use the Articulation Sets feature in Logic Pro to make it work. I set up four articulation zones for the slider. Each articulation will be triggered if it receives a CC#15 value that is inside the range specified in the articulation set. For example, with all strings instruments, the Long technique will be triggered with any CC#15 value from 96 to 127, Spiccato from 64 to 95 and so on. Check out the video demo below.
Logic Pro X Articulation Set for Strings
If you have the BBC Symphony Orchestra Discover and want to try this articulation sets for yourself, you can download the files from here. There are two different folders in the zip file, one using regular MIDI notes for key switching with the Trigger Mode and the other using CC for the Slider Mode. To save it, open Finder, press CMD + SHIFT + G, copy/paste this location ~/Music/Audio Music Apps/Articulation Settings and click Go. Copy the folder here and restart Logic Pro.
Learn how to control Live macros with the trackpad and AudioSwift in Slider Mode.
In the last blog post, I talked about using Automation Quick Access in Logic Pro for mapping one single slider in AudioSwift to multiple parameters on a track. Now for Ableton Live, I’ll show you a way to automatically assign the eight macros knobs on a rack to virtual sliders on the trackpad. We’re going to use a feature called Instant Mappings, which consists on changing a remote script text file with the control change (CC) numbers of the sliders, so Live can read it and make the connection instantly when you select the rack. You can use this for writing automation or quickly change the settings of an instrument/effects rack while you’re looking for the right sound. Let’s start…
AudioSwift in Slider Mode
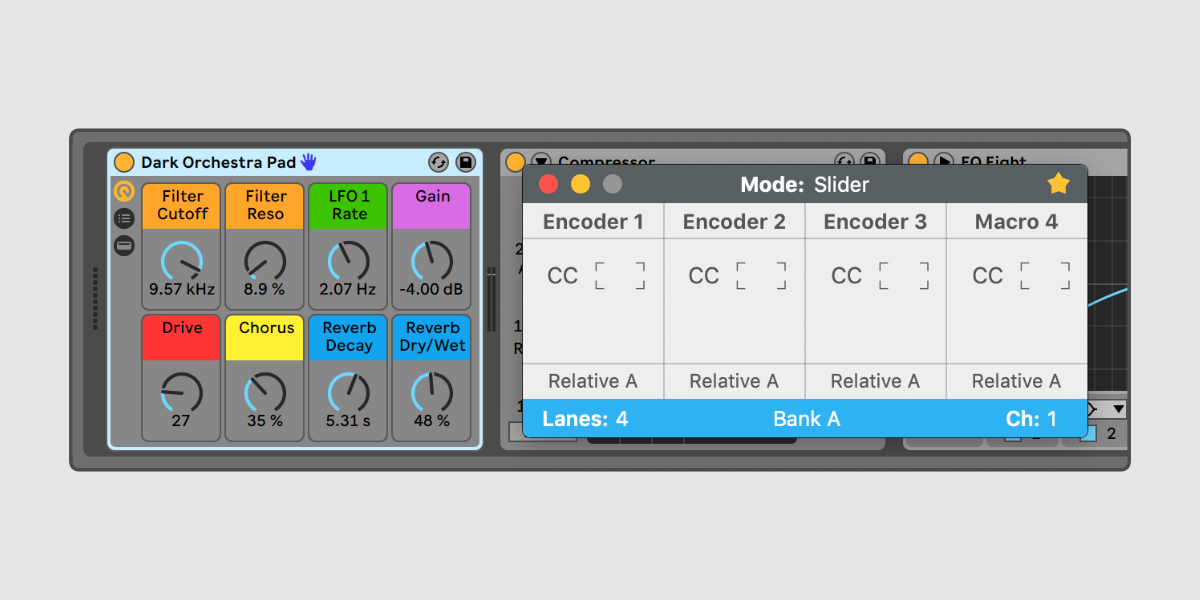
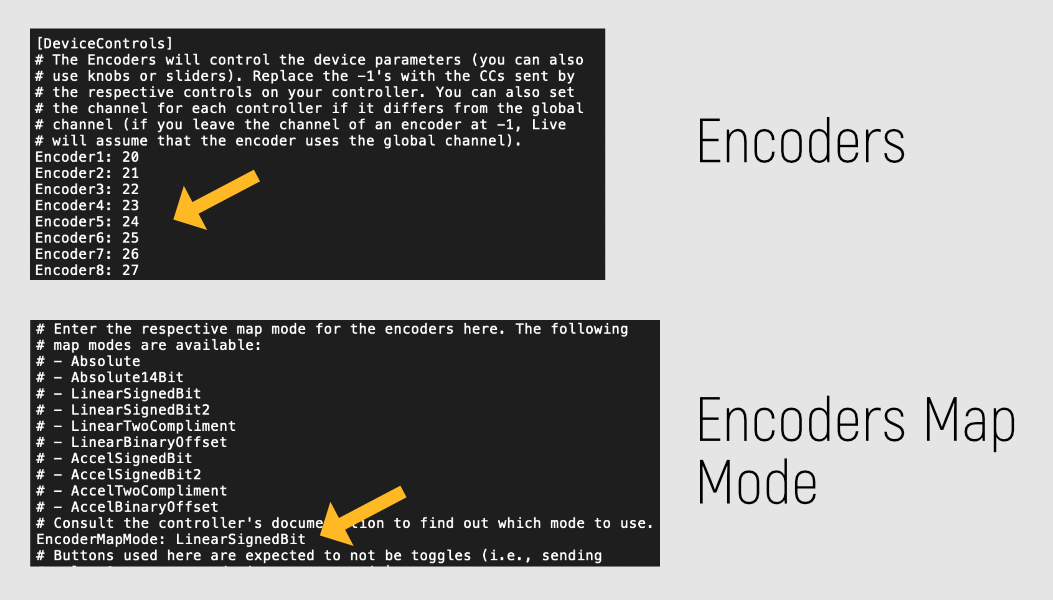
Go to the AudioSwift Console and change the controller mode to Slider. For this tutorial, I’m going to use Bank A for the first four sliders, Bank B for the other four and MIDI channel 1. I changed the labels from Encoder 1 to Encoder 8, and assigned a CC number to each one from 20 to 27 (choose CC numbers that aren’t used anywhere in your project). I also changed the format of all sliders to Relative A. This is how it looks:
AudioSwift Console Configuration
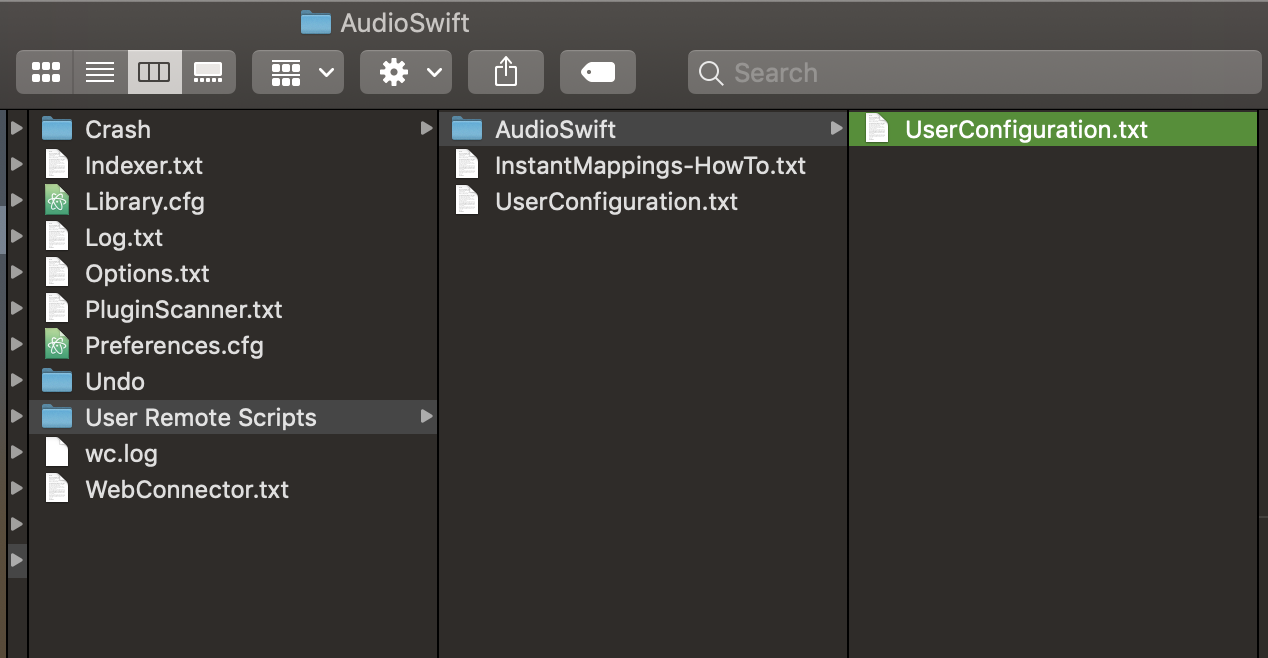
The UserConfiguration.txt File
We are going to look for the UserConfiguration.txt file and modify the remote script. With Ableton Live closed, go to Finder and press CMD+SHIFT+G. In Go To the Folder, paste this address ~/Library/Preferences/Ableton and click Go. Look for your current Live version and then click the User Remote Scripts folder. Create a new folder called AudioSwift. Copy the file UserConfiguration.txt and paste it inside the AudioSwift folder or download the one I made for this tutorial.
Open the text file to make the changes. You’re going to see a lot of lines but don’t worry, it’s really easy to get through it. All lines that have # are comments. The text is divided into sections and we’re going to check only two. The first one at the top is [Globals]. Look for the line GlobalChannel. By default it’s set to 0 which is MIDI channel 1 (it goes from 0 to 15), so we are OK here, since the AudioSwift Console is also using channel 1.
The second section is [Device Controls]. Here we type the same CC numbers used in the AudioSwift Console to the eight encoders. Some more lines below, change the EncoderMapMode to LinearSignedBit. Save the file and close the window.
Device Controls Section in UserConfiguration.txt
Ableton Live Configuration
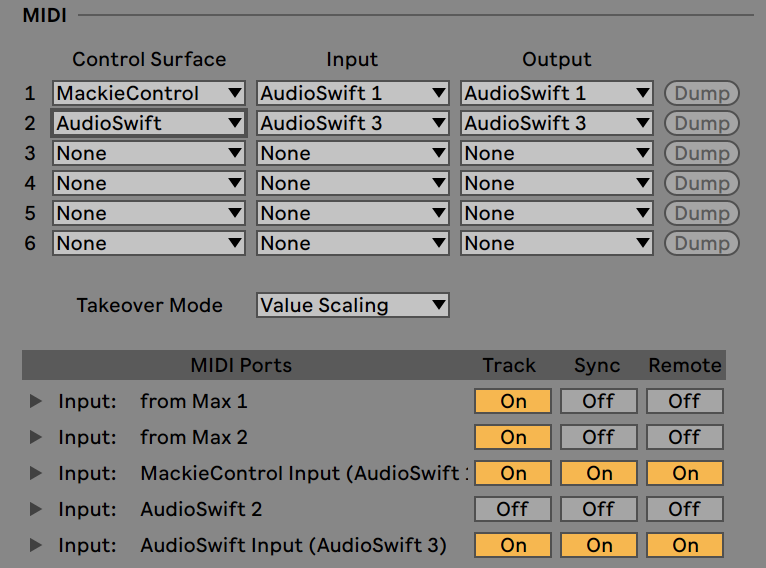
Open Live and go to Preferences > Link MIDI. Make sure AudioSwift 3 input port is turned on in the MIDI Ports section. Under Control Surface, choose AudioSwift and select AudioSwift 3 as Input and Output. Close the window.
Live > Preferences > Link MIDI
Now let’s test it. Select the instrument or effect rack. You’ll see a blue hand icon next to the title of the device, meaning that it’s been controlled by AudioSwift. Turn on AudioSwift with a four or five finger tap and start moving the sliders. To change between banks A and B use the key shortcuts Z, X, comma or period. Press Escape when you finish.
Ableton Live Macros Control
More tips
I showed you how to use AudioSwift with macro controls, but you can also select any Live device and AudioSwift can handle the first 8 parameters. What parameters will control depends on the device itself and your memory to remember. For example, the first two sliders can control the frequency cutoff and resonance in the Auto Filter device. In Live’s Compressor, the first four handle the threshold, ratio, attack and release in that order.
Maybe you want to use one of the slider to map something different on the fly using CMD+M on Ableton Live. You can use the sliders in Bank C of AudioSwift for this, or since we used MIDI channel 1 for the remote script with AudioSwift, change to another channel in the AudioSwift Console with key shortcuts Right or Left arrows.
If you’re looking to control volume and pan, I recommend using AudioSwift in Mixer Mode. It’s specially designed for this purpose. Learn how to use it with Ableton Live in our tutorials section. Once it’s configured, switch between Mixer and Slider Mode with key shortcuts 1 and 5.
We used relative MIDI for this particular configuration. If you feel the sensitivity of the slider is not what are you looking for, we can set it up to use absolute MIDI. Change the EncoderMapMode in the UserConfiguration.txt file to Absolute instead of LinearSignedBit, and change each slider in AudioSwift to Regular format. Then go to Ableton > Preferences > Link MIDI and try one of the Takeover Modes: None, Pick up or Value Scaling. Also, try another sensitivity for the controllers in AudioSwift > Preferences > Slider & XY tab.
For really complex automation, try assigning the same CC numbers of the Slider Mode to one or two XY pads in the XY Mode View 2, and experiment controlling up to four macros at the same time in all directions. Use the Return to Default setting in the AudioSwift Console to return to the original position of the knobs.
Logic Pro has a feature called Automation Quick Access that allows a single MIDI slider or knob to be mapped automatically to any automation parameter of a track. In the next video, I show you how to set up this feature with AudioSwift in Slider Mode, and have a handy virtual slider on the trackpad for any automation task in Logic Pro.
The idea of using XY MIDI controllers for sound design is really interesting—multiple parameters in a virtual instrument can be assigned to one controller that works in two or three dimensions, bringing the opportunity to change the sound creatively. Of course, someone can say a simple knob or slider can do something similar, but there are physical limitations moving many controllers in different directions at the same time, specially if you want to add expression to a sound with one hand while playing notes with the other.
AudioSwift for macOS lets you use the smooth glass surface of a trackpad as an ultra-portable and multipurpose XY pad MIDI controller. With one, two or three fingers gestures, the sound designer controls up to three XY pads on a single trackpad. If the device has Force Touch support, a third dimension is available by pressing the surface, sending continuous aftertouch MIDI messages. In this article, I’m going to show you three examples using well known virtual instruments with AudioSwift in XY Mode.
Deep Real-Time Control in Zebra
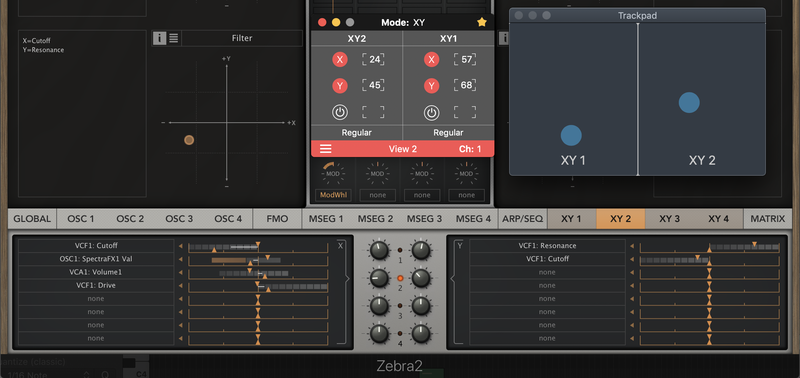
The workhorse synth from u-he, Zebra is widely used by soundtrack composers and music producers. It’s a modular synthesizer with numerous sculpting tools to create a variety of sound textures. Some of these tools are four XY pads with a deep matrix section, where each X or Y axis can control up to eight Zebra parameters, each one with its own range control.
Zebra was recently updated to version 2.9 and one of its new features is that now all factory presets have XY pad control assignments already patched, making it easier for the user to play with the sounds. We just need to map each XY pad to AudioSwift using Zebra’s MIDI Learn built-in function and the trackpad becomes a performance controller.
Zebra X/Y Controls Settings
AudioSwift can divide the trackpad into two XY pads, independent from each other. These will control the first pair of XY pads in Zebra but we can use a different MIDI channel to assign the other pair without changing the CC numbers. In AudioSwift, to change the MIDI channel just press the right and left keys.
In the following demo, one XY pad controls the filter’s cutoff and resonance, and the other the oscillator’s settings. Both controllers have the Return to Default feature enabled in AudioSwift—the XY pads return automatically to a default value set by the user when the fingers are lifted.
For the next demo, we are going to use The Dark Zebra version. This time we have configured three XY pads so each one will be controlled depending if one, two or three fingers are touching the surface at the same time.
Cinematic Tension with Thrill
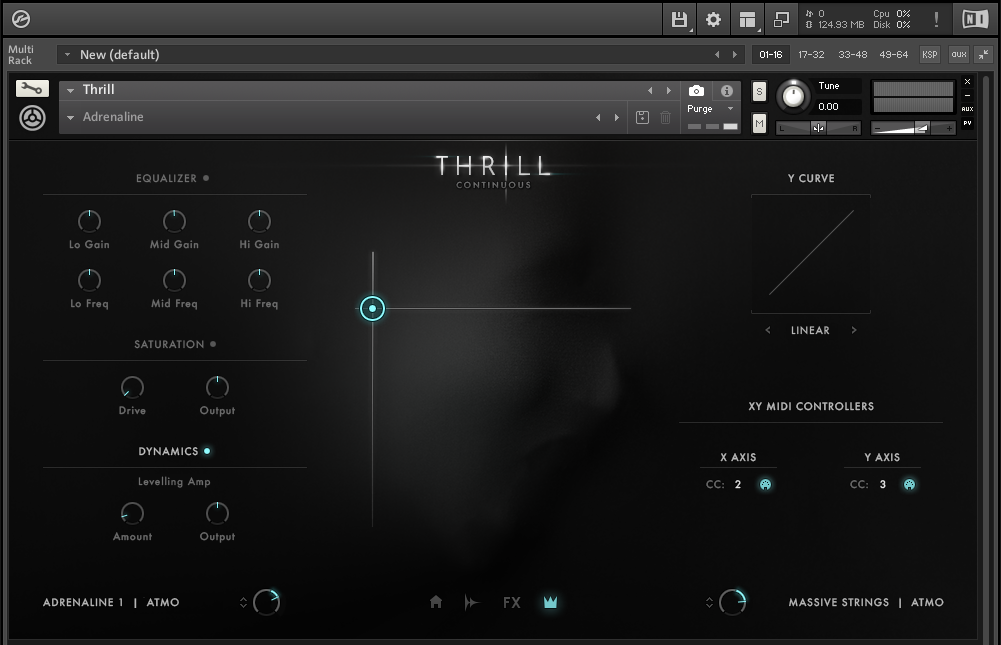
Thrill is a Kontakt toolbox from Native Instruments for cinematic atmospheres, built around a large library of eclectic source recordings featuring orchestral sections, percussion, vocals and synthesized samples. Thrill’s easy to use interface consists of a powerful XY control to sweep between different sounds and intensities, creating sonic tensions that build up with the controller’s movements.
Thrill by Native Instruments
Mapping AudioSwift to Thrill is quite easy. Set a control change (CC) number for each axis in the plugin’s settings and then type the same numbers in the AudioSwift Console window. Here is a quick demo by film and media composer Steve Lehmann controlling Thrill and also Native Instruments Absynth with a Magic Trackpad 2.
Soundscapes for TV, Films and Video Games
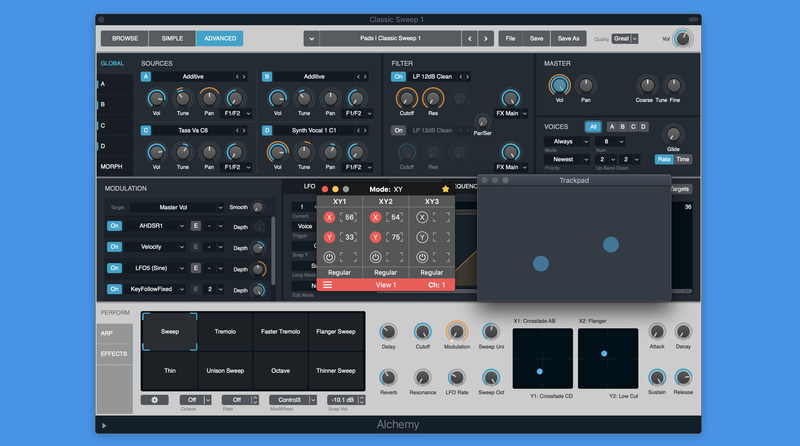
Logic Pro’s Alchemy
Alchemy is a powerful synthesizer bundled with Logic Pro X. It features additive, spectral and granular synthesis plus sampling, and it comes with a great selection of presets for creating evolving soundscapes. The two included XY pads at the bottom section of the plugin are useful to morph between sounds and create interest through movement. Using Logic Pro X built-in MIDI Learn Assignments (shortcut CMD + L), the XY parameters can be mapped to AudioSwift. The next video shows the first XY pad in Alchemy being controlled using a one finger gesture and the second XY pad with two fingers. Applying pressure to the surface controls the tuning of one of the synth’s sources.
As you can see, a trackpad with AudioSwift opens up endless sonic possibilities that otherwise will be hard to achieve with knobs. I showed you three virtual instruments that have XY pads in their user interfaces, but the same idea can be applied to any plugin you have; just map the parameters you want to control with AudioSwift. And also, the MIDI from the trackpad can be rerouted out of your DAW and sent to your favorite hardware synthesizers. To learn more about setting up AudioSwift as XY pads, make sure to check out the XY Mode tutorial or download the user guide.
When AudioSwift is on, it becomes the key app on screen, freezing the mouse pointer and receiving all keyboard inputs. The default keyboard commands used on a DAW won’t work because the DAW isn’t in front. AudioSwift comes with a couple of shortcuts as a workaround, to trigger basic commands in a DAW like record, play and set automation modes when the Console is activated. These shortcuts work with all controller modes, but in order to use them, AudioSwift should be configured first in Mixer Mode within your DAW.
Transport Controls
The Mixer Mode lets the user control faders, panning and sends when it’s time to mix a project. It uses the Mackie MCU and the HUI protocols to communicate with the DAW. AudioSwift sends the respective MIDI messages that the DAW transforms into commands. The steps to configure the DAW are explained in the User Guide on page 12 that you can download in our tutorial section.
Once AudioSwift is properly set up, the following key shortcuts will work for transport control when the Console is on. If users have a MacBook Pro with Touch Bar the transport controls will be also displayed on it.
Key Shortcuts for Transport Control
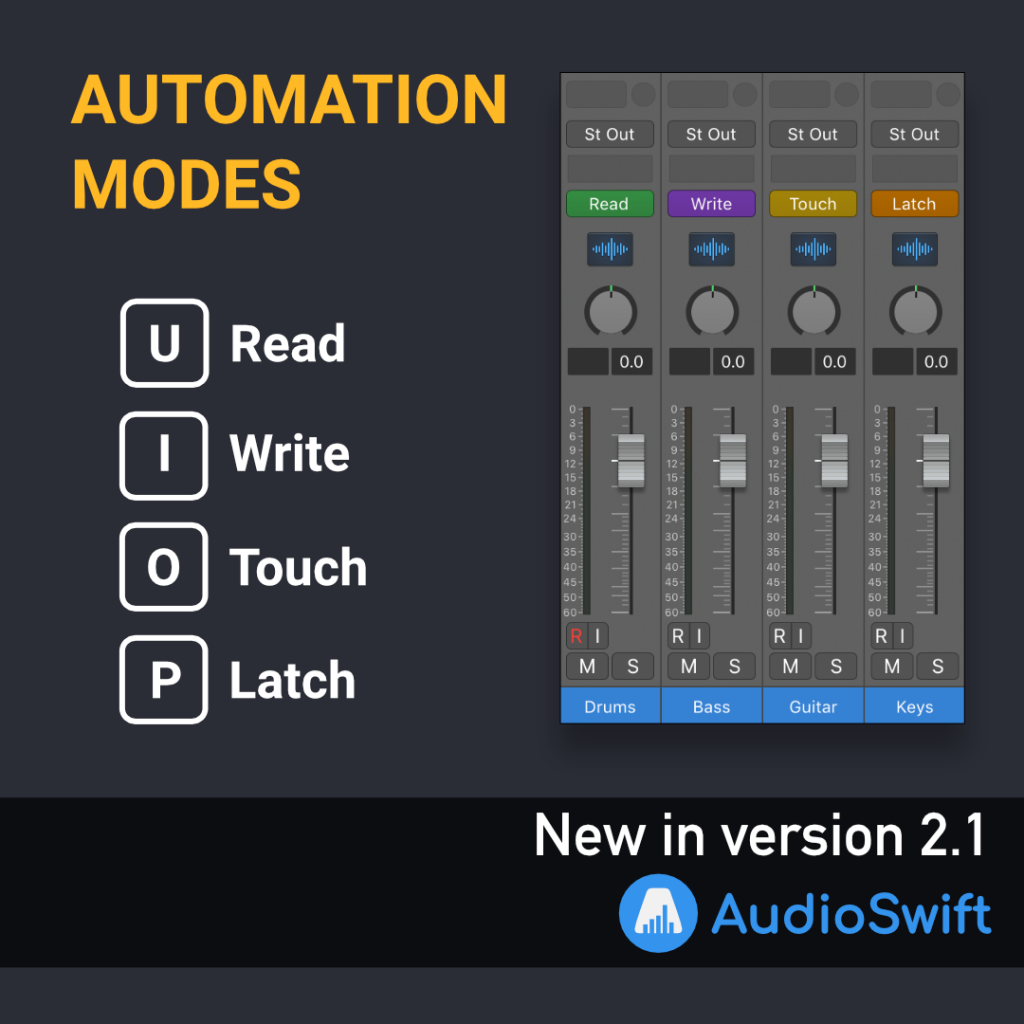
Automation Modes
When writing automation on a track you can set a different mode by clicking each track to Read, Write, Touch and Latch, or you can also use the keys U, I, O and P when the Console is on. However, these shortcuts are only available in Logic Pro, Studio One and Reaper.
Automation Modes Key Shortcuts
New in AudioSwift 2.1
The recent AudioSwift update comes with two new ways to turn off AudioSwift automatically without the need of using the ESC key. One of them reads the playhead state to turn off the Console. Go to Preferences > Mixer Tab and enable Turn AudioSwift off when play head stops.
The other way is to turn off the Console when no fingers are touching the trackpad within a second. Enable this feature in Preferences > General Tab > Turn AudioSwift off automatically.
Maybe you work with a lot of external synthesizers and want to explore new sounds. Or you miss a particular ribbon controller or X/Y pad from an old synth that you don’t have anymore. Well, with AudioSwift you can be as creative as you want with your sound designs, using simple gestures over a Mac trackpad to also control your hardware synths and modules.
When AudioSwift is running on macOS, it creates three virtual MIDI ports. AudioSwift 3 port sends Note On/Off, Control Change, Pitch Bend, and After Touch via four controller modes. This virtual port can be reroute out of the computer to an external MIDI output if we want to. I’m going to show you two methods: using a standalone MIDI router app, and by configuring it through a DAW, so we can record and edit the performance later.
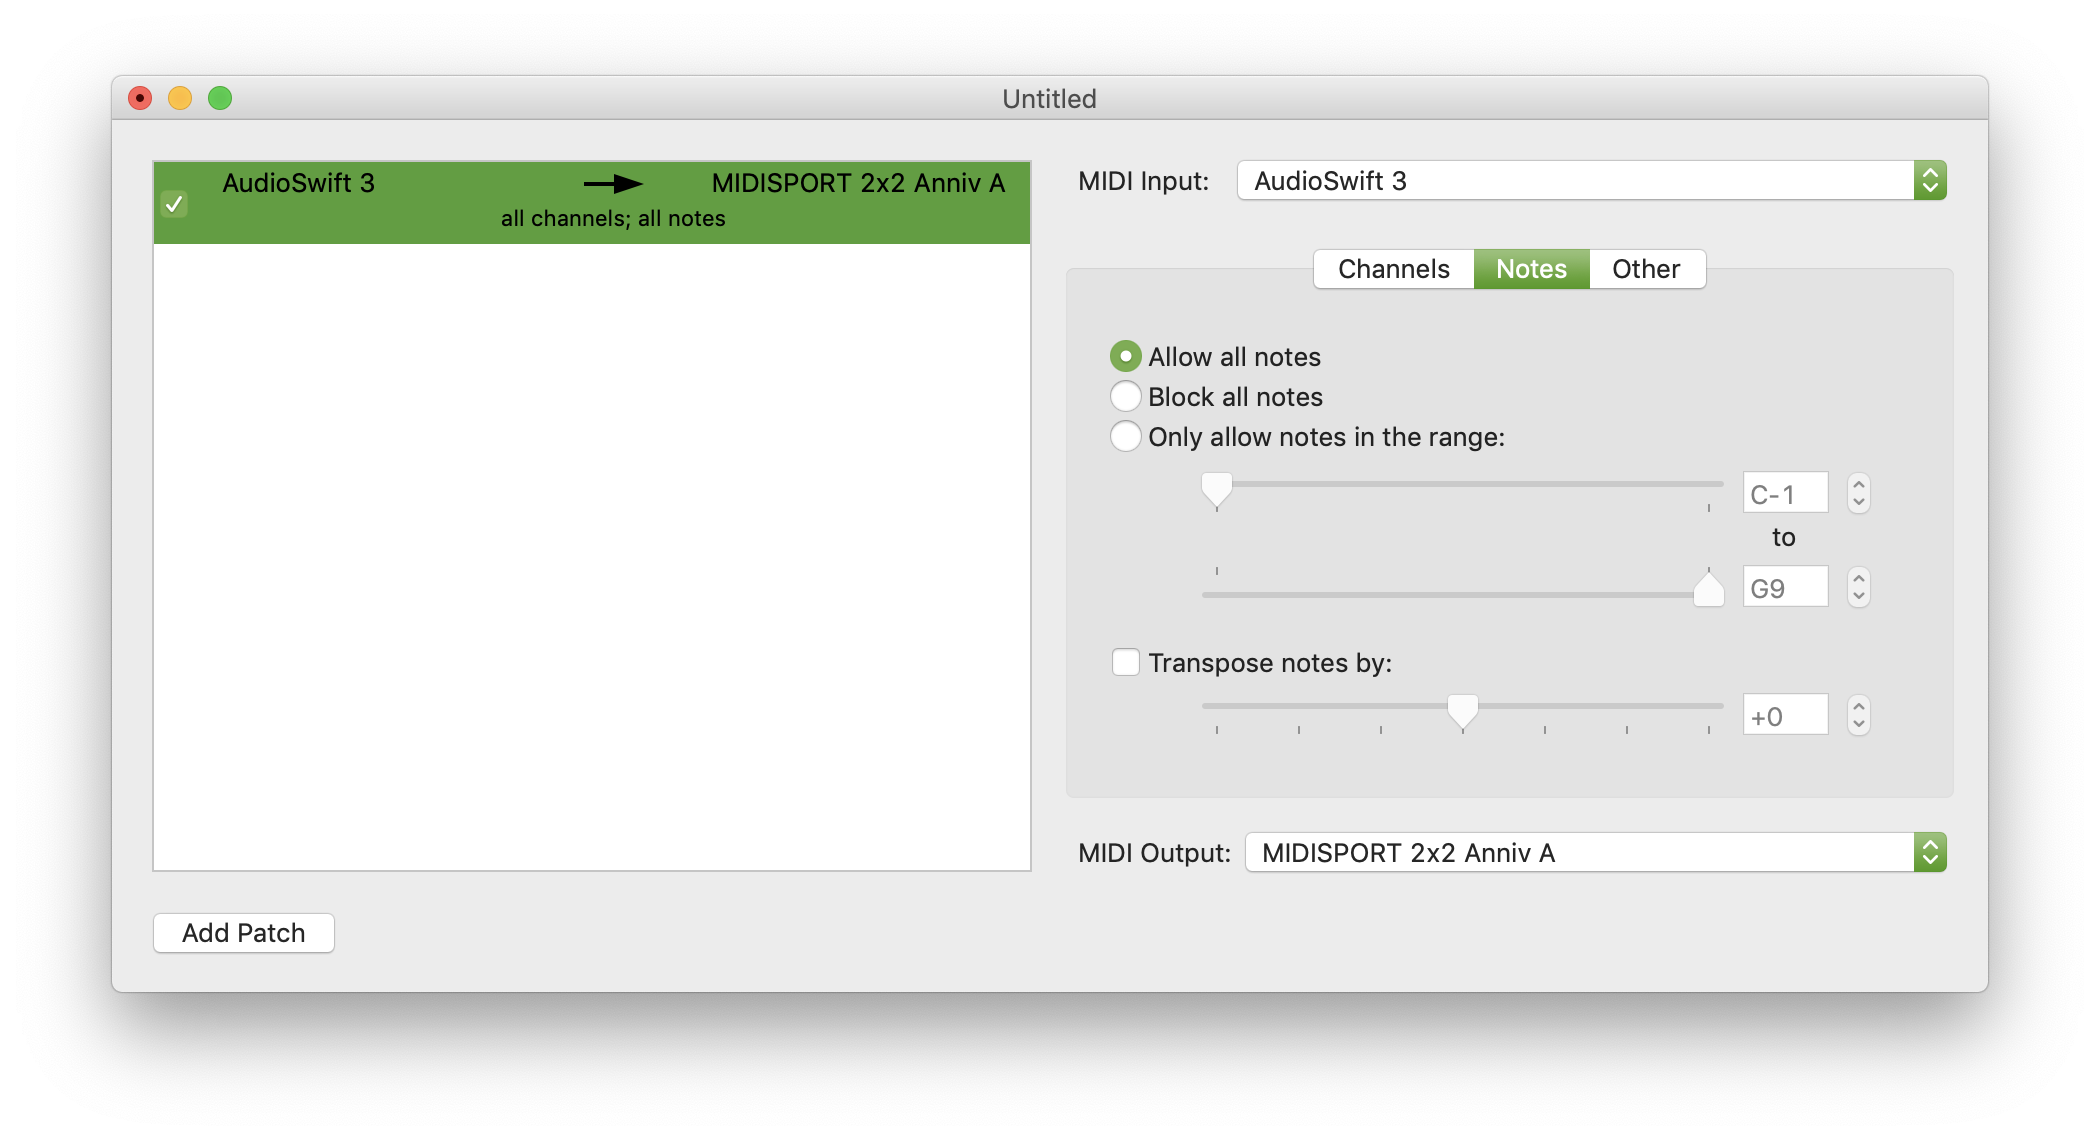
Via a Virtual MIDI Patchbay
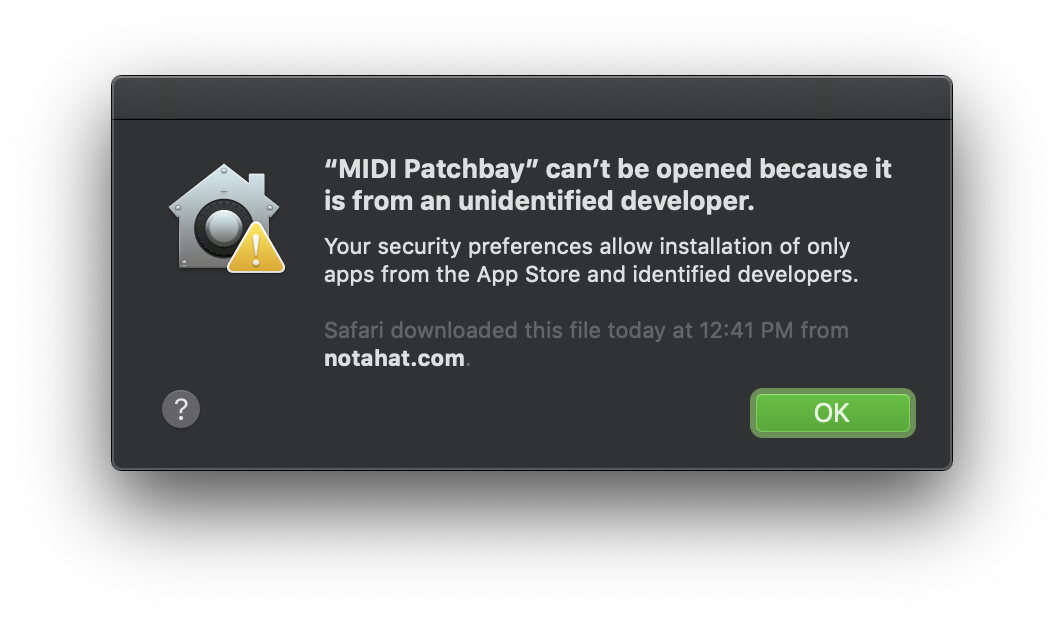
There are couple of apps that can do this. I chose MIDI Patchbay by Pete Yandell. It’s free, easy to use and it was released in 2008, but it still works even in Mojave 10.14. Another one is MIDIPipe by Nico Wald which has more features to play with.
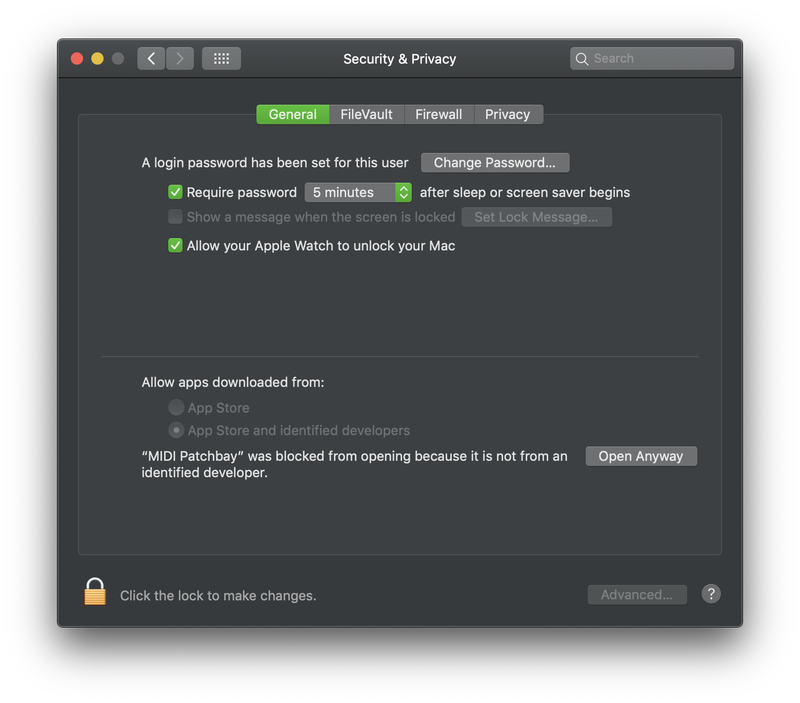
When you download the file and click on it, it will probably show you the left message. Since it’s an old app it won’t open right away, so you’ll need to go to System Preferences > Security & Privacy > General and click Open Anyway.
System Preferences > Security & Privacy
Once it’s running, MIDI Patchbay is simple. At the bottom left corner, click Add Patch to create a new patch. When it’s selected in the table, at your right side will appear the MIDI input port. Select AudioSwift 3. At the bottom will be our external MIDI output, which in my case is a M-Audio Midisport device connected to my Macbook Pro via USB. This MIDI output will send the messages out of the computer via a MIDI cable to an external synth.
And that’s it. Select the X/Y or Slider Mode in AudioSwift, turn it on with a four or five fingers tap, play your synth with one hand while the other controls your CC messages with the trackpad. Now let’s look how to do this inside a DAW.
Via Logic Pro X
Since we probably want to record our performance, we’ll need to configure it inside our DAW. All DAWs have different ways to do this and some are similar. I’m going to use Logic Pro for this example.
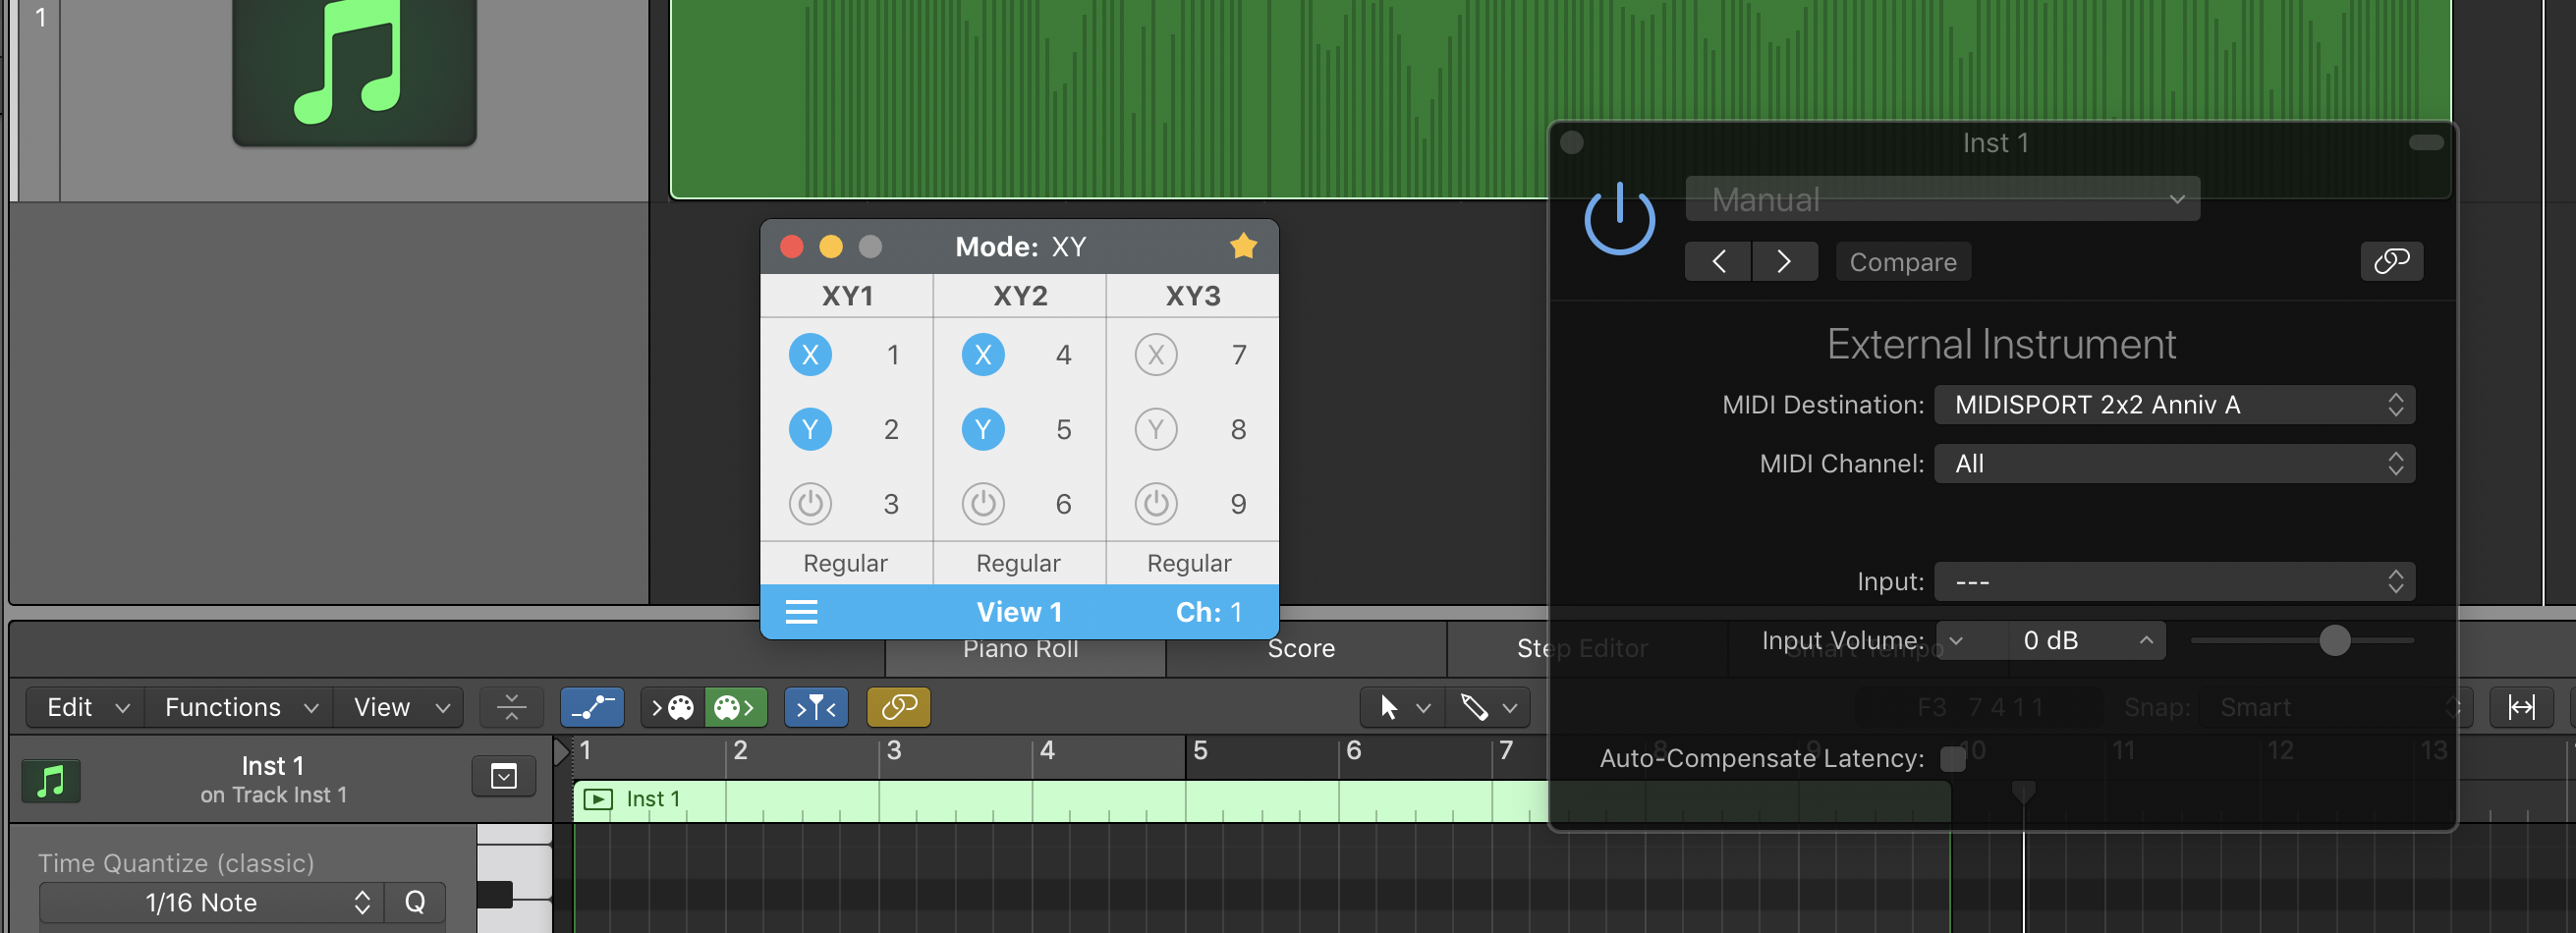
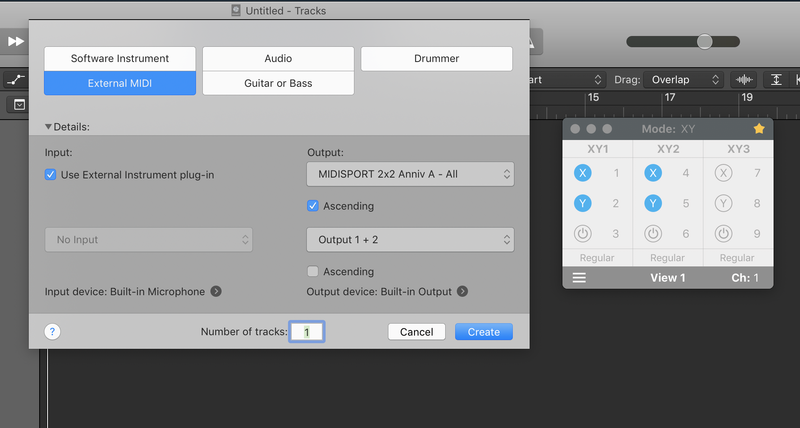
New External MIDI Track
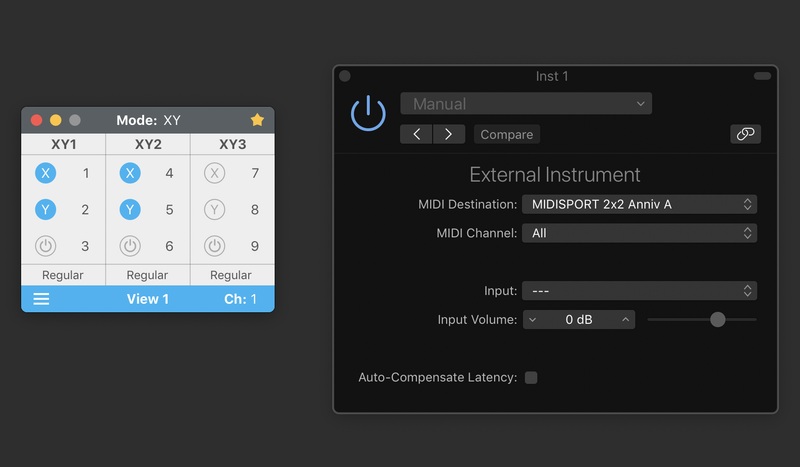
First, create an External MIDI track and click the box Use External Instrument plug-in. In Output select your external MIDI device port (Midisport 2×2 Anniv A in my case). When the track is created, open the External Instrument plugin and you’ll see the MIDI destination selected. You can then send the audio from the synth back into your DAW’s mixer, trim the volume and record it. Read more about recording audio.
New External MIDI Track
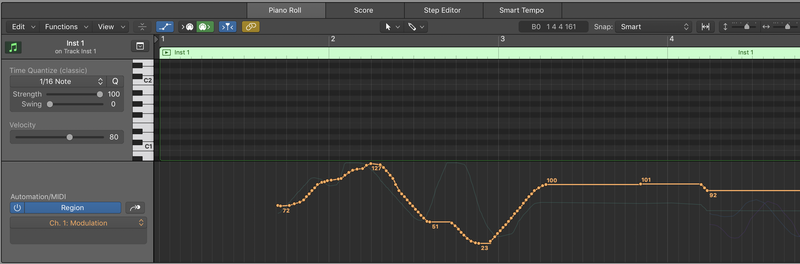
Now every time we hit record and start using the trackpad as a MIDI controller with AudioSwift, our performance will be recorded in the DAW and also will play our external synth. As you can see, all CC messages are recorded in the MIDI region for further editing.
The most used input device in computer based music production is definitely the mouse. However, for Mac users a trackpad can also be a valuable tool, either by using the built-in trackpad on a MacBook or adding a Magic Trackpad to a desktop setup. I’ll be showing different ways to use a trackpad in your workflow with some tips and tricks. We’ll start with the most common macOS multi-touch gestures and then we’ll check out two apps that expand the trackpad’s functionalities: AudioSwift and BetterTouchTool.
Swipes, taps and the three finger drag
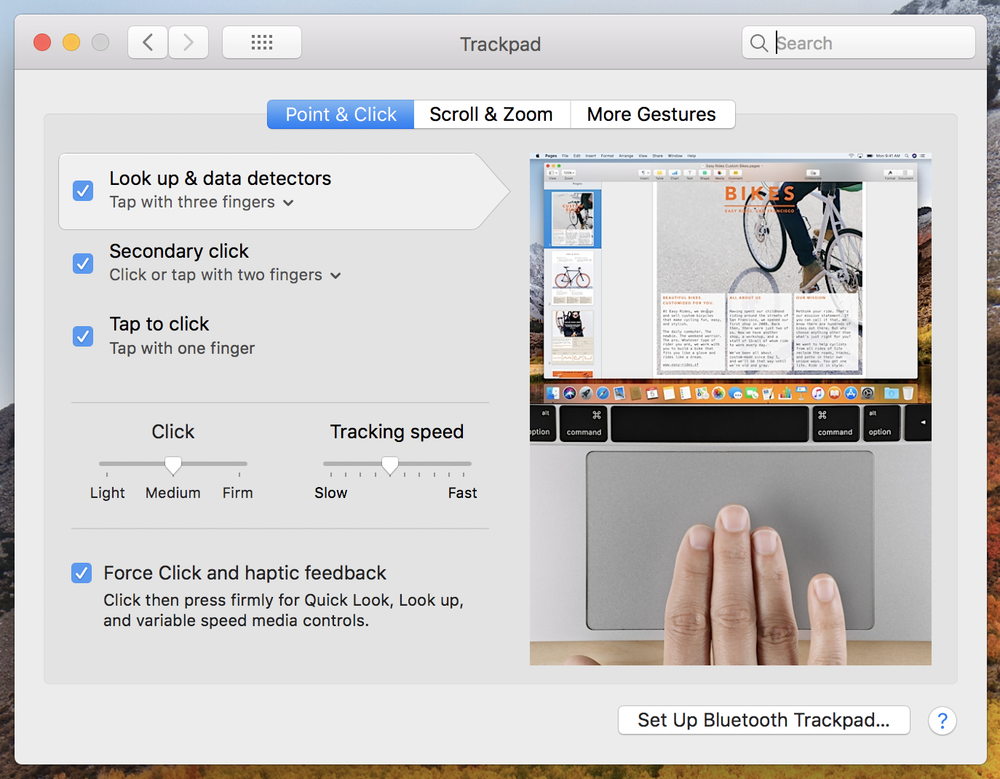
The Trackpad Preferences window shows all available gestures. By default, the trackpad is configured to allow a click by pressing its surface with one finger. But it’s better to tap the trackpad to click by going into System Preferences>Trackpad>Point & Click and enable Tap to click. When I started working with a trackpad I was only using one finger to move the pointer and click. With this setting enabled, I use the middle finger for moving and then without lifting it, I tap with the index just like working with a mouse. A two finger tap is a regular right click.
Trackpad preferences window
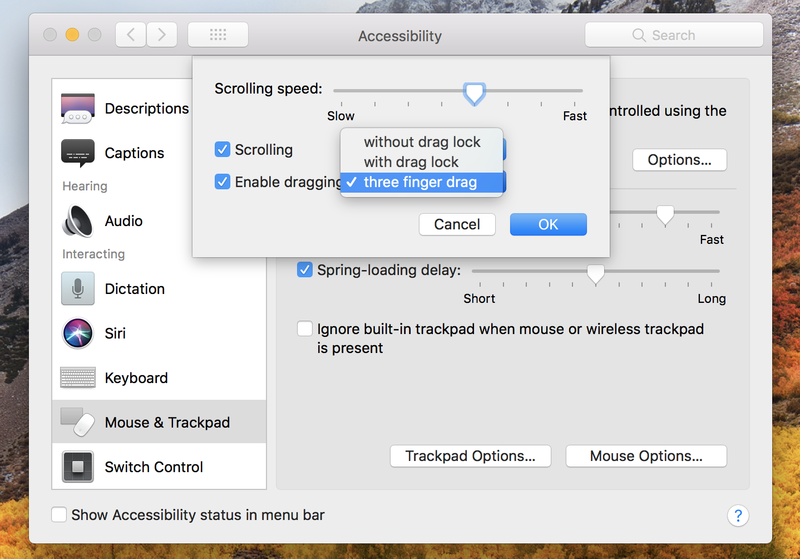
The other feature that helped me a lot was the three fingers drag. On macOS, to select or drag an object you’d normally need to click and drag — a simple tap won’t work. To change this, go to System Preferences>Accessibility>Mouse & Trackpad>Trackpad Options and enable dragging with a three finger drag. Now we can drag the objects easily.
Three fingers drag setup
Swipes and pinch gestures with two, three or four fingers can also be configured at System Preferences> Trackpad>More Gestures. They are helpful for things such as scrolling or showing the Desktop, Launchpad and Mission Control. I avoid using three finger swipes because they cause conflicts with AudioSwift. (More on this later.)
Besides scrolling, a two finger swipe while pressing ⌥ or ⌘ lets you zoom in and out depending on the DAW. Pro Tools uses ⌥ but only for horizontal zoom. Cubase does it with the ⌘ key. Logic Pro zooms both vertically and horizontally with the ⌥ key and Studio One with ⌘. We can also zoom in Logic Pro and Studio One with a pinch gesture after enable it at System Preferences> Trackpad>Scroll & Zoom.
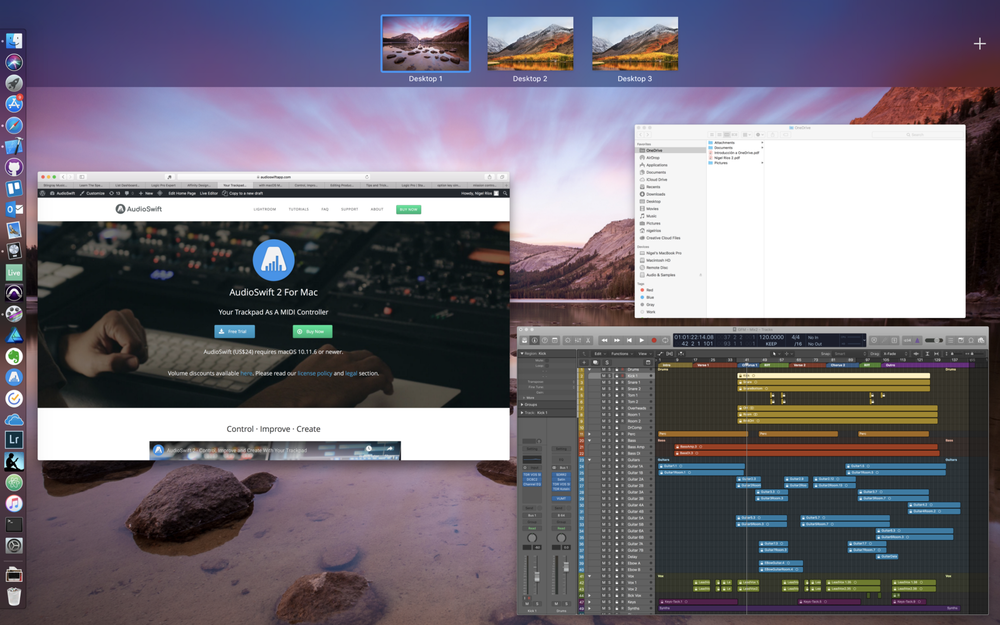
I swipe up with four fingers to open Mission Control and see all my active windows. Here I can move certain windows to a second virtual worskspace at the top and switch between workspaces by using a four finger swipe to the left or right. If you work on a MacBook, you’ll find this useful — you could for example, have the arrangement window in your main workspace and the mixer window in another one, saving space in your laptop screen.
Mission Control
Logic Pro users
Since Logic Pro is from Apple, it’s obvious that the trackpad integration with the software is better than with other DAWs. There are more functions available by using a three finger tap or the Force Touch feature with compatible trackpads. (For other DAWs, check BetterTouchTool below.)
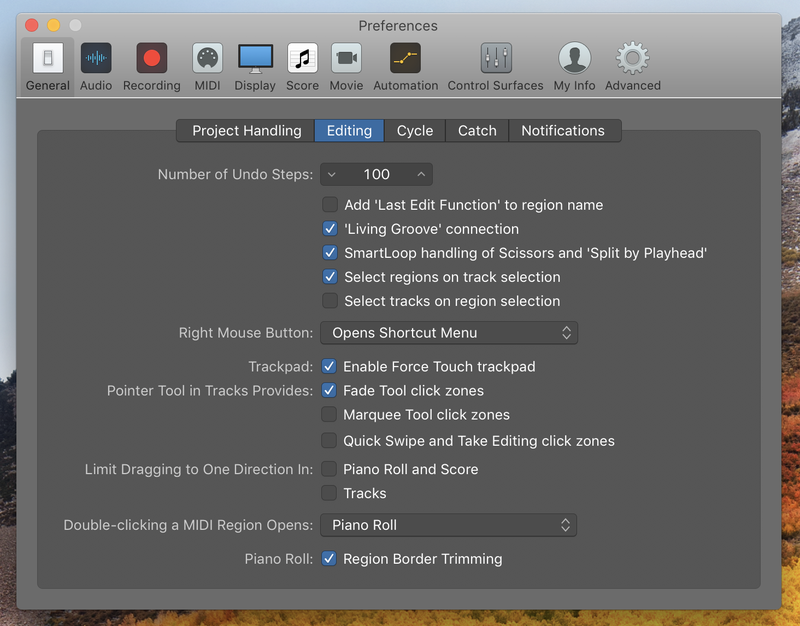
First, we need to go to System Preferences> Trackpad>Point & Click and make sure that Look up & data detectors is enabled. I prefer a three finger tap instead of the force click because it’s easier for my hand. If you choose force click, make sure to also enable it in Logic Pro>Preferences>General>Editing>Enable Force Touch Trackpad.
Enable Force Touch trackpad in Logic Pro
With a three finger tap or force click we can do the following:
Create a MIDI region in an empty part of a MIDI track, or import an audio file in an audio track.
Create (or delete) notes in Piano Roll/Score and also markers in the time ruler.
Create two automation nodes around a region.
Toggle Zoom Focused Track on a track header. Below the header, it creates a new track.
AudioSwift — Your trackpad as a MIDI controller
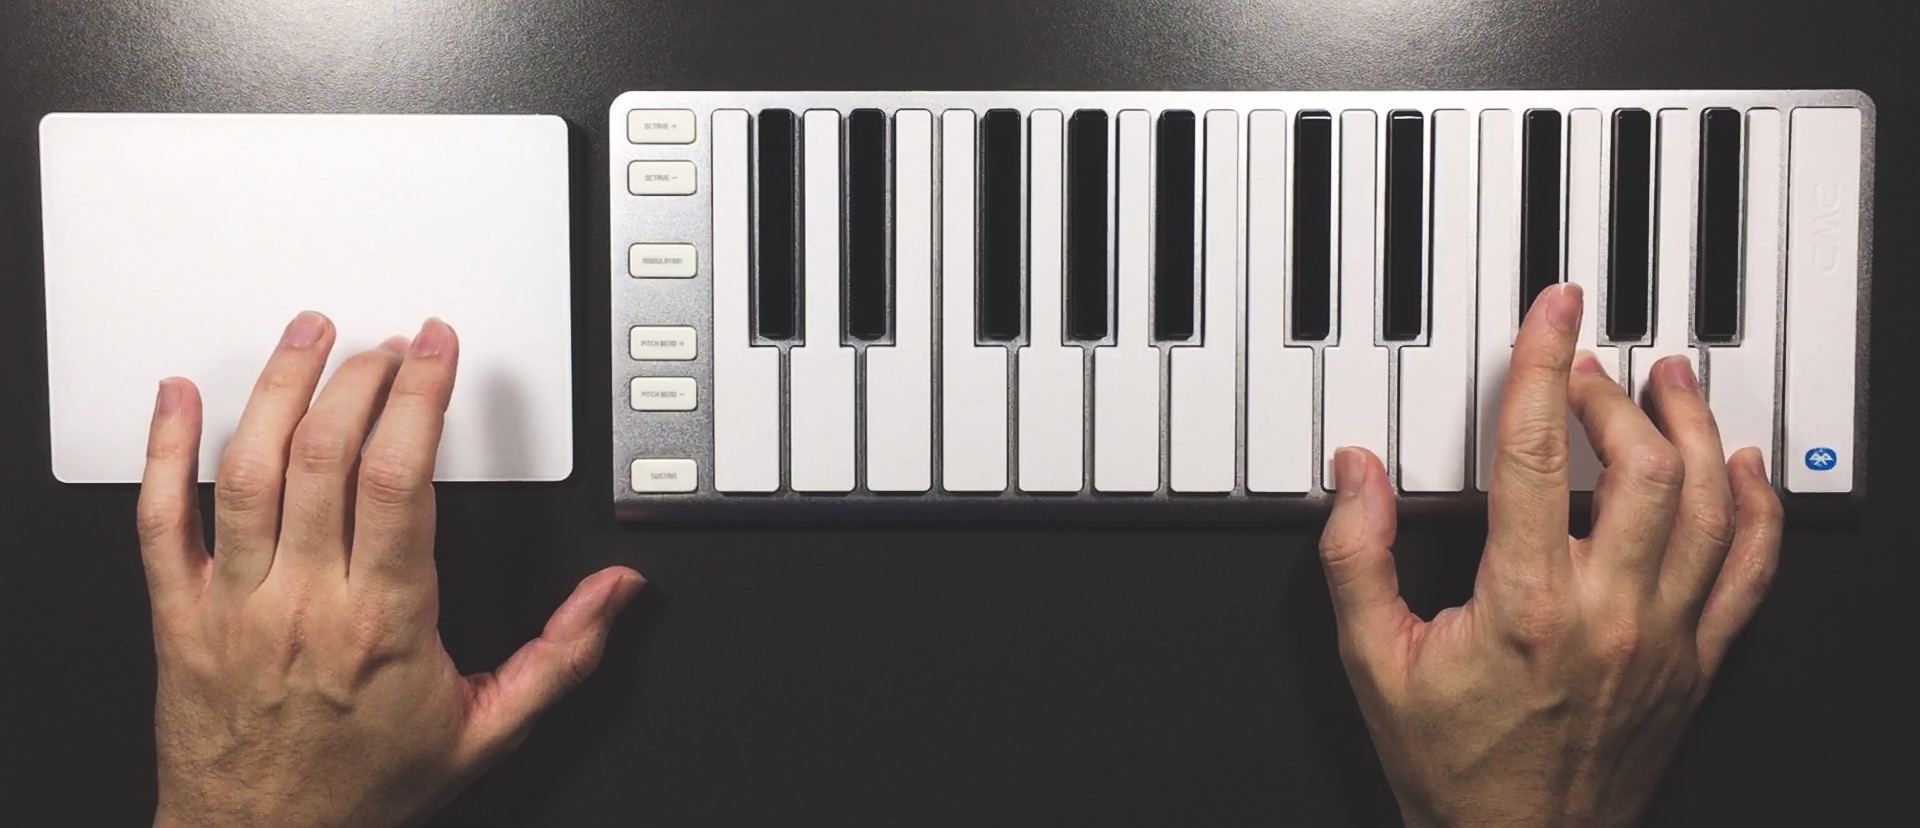
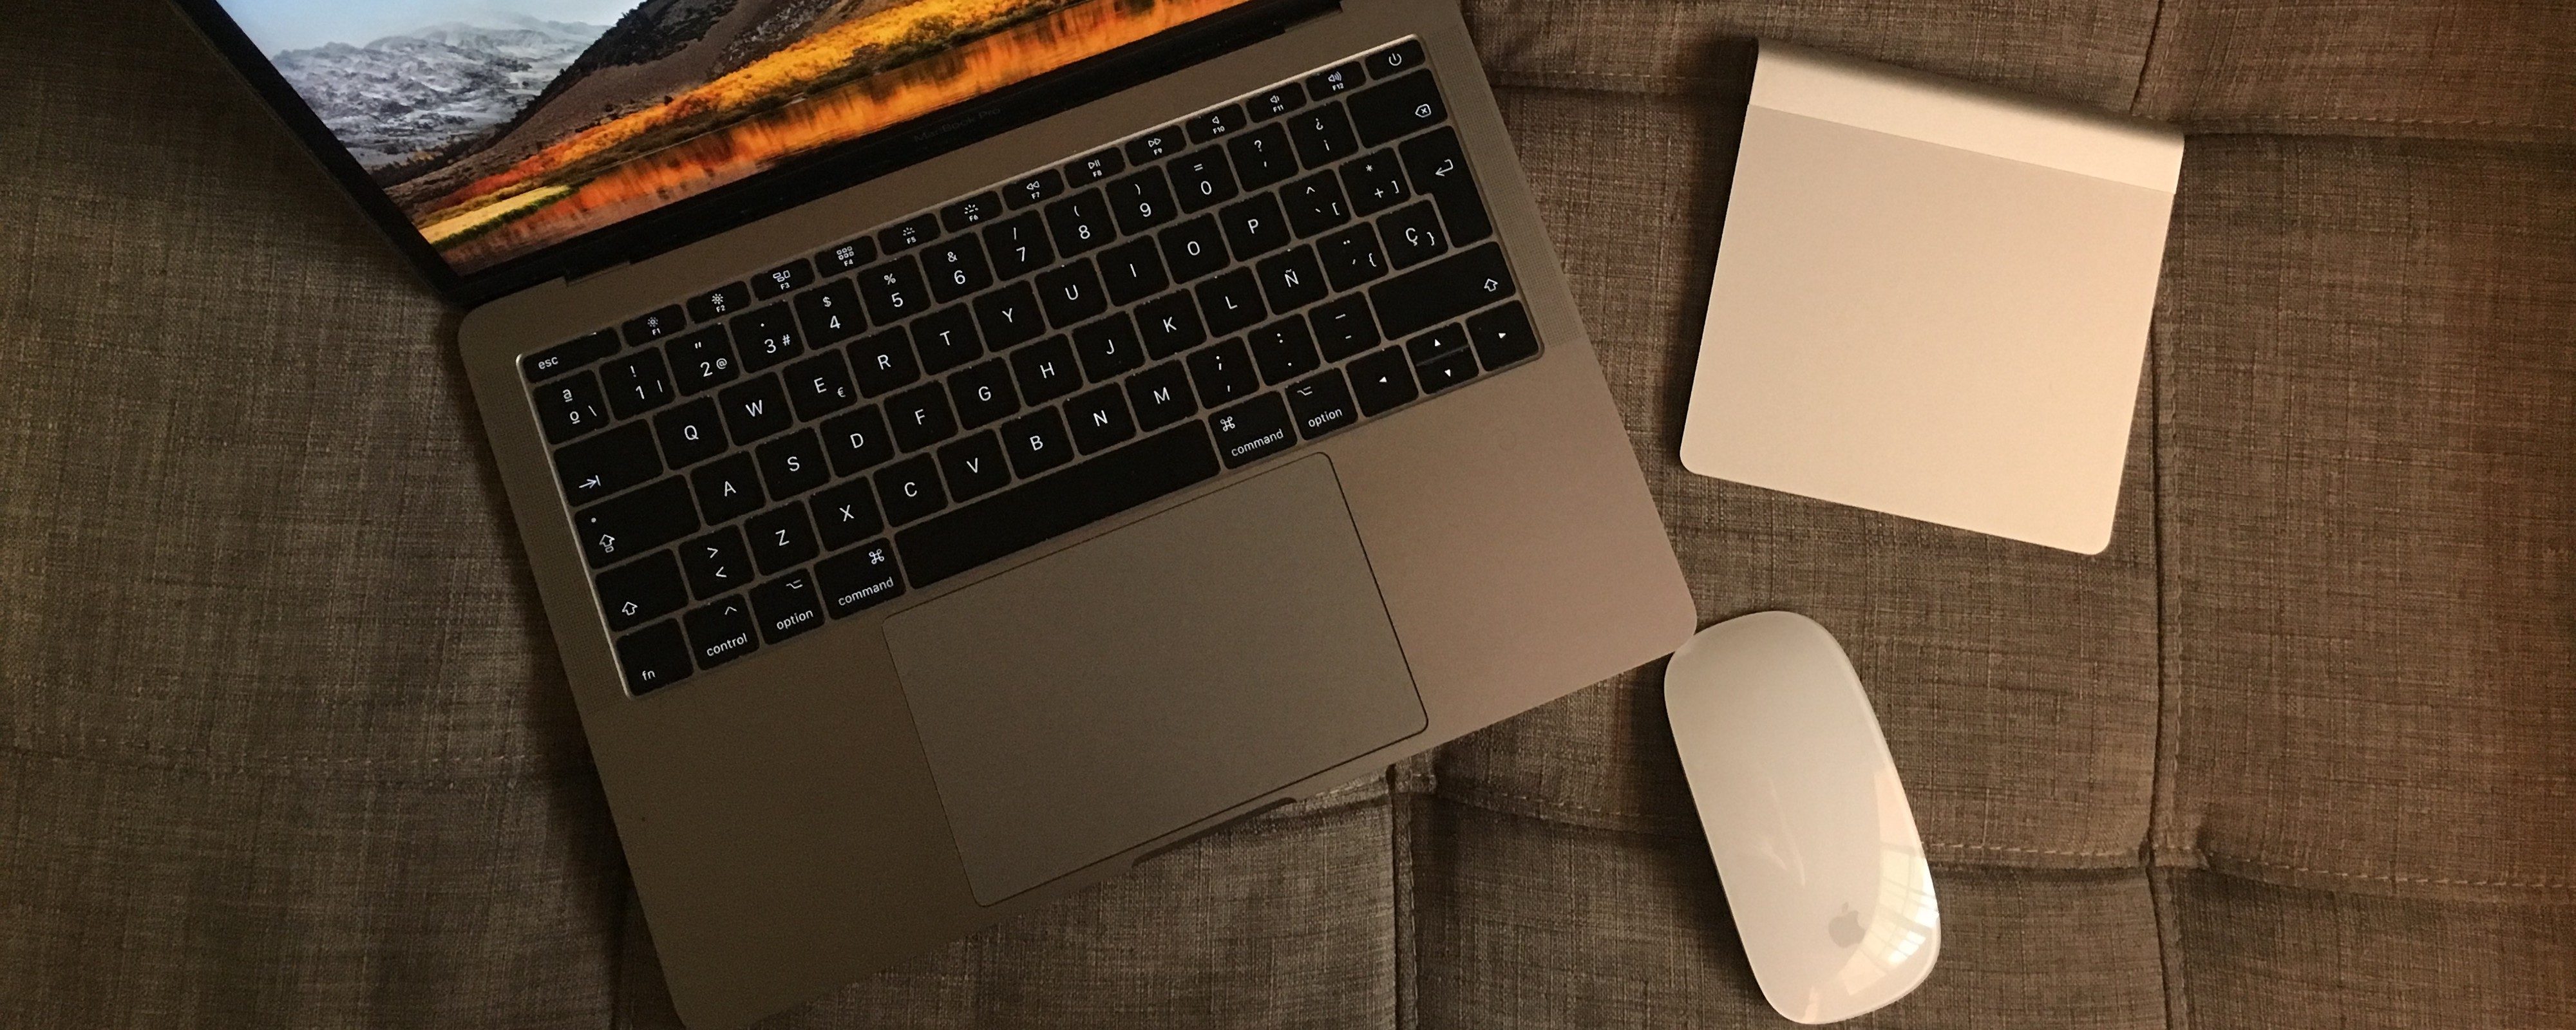
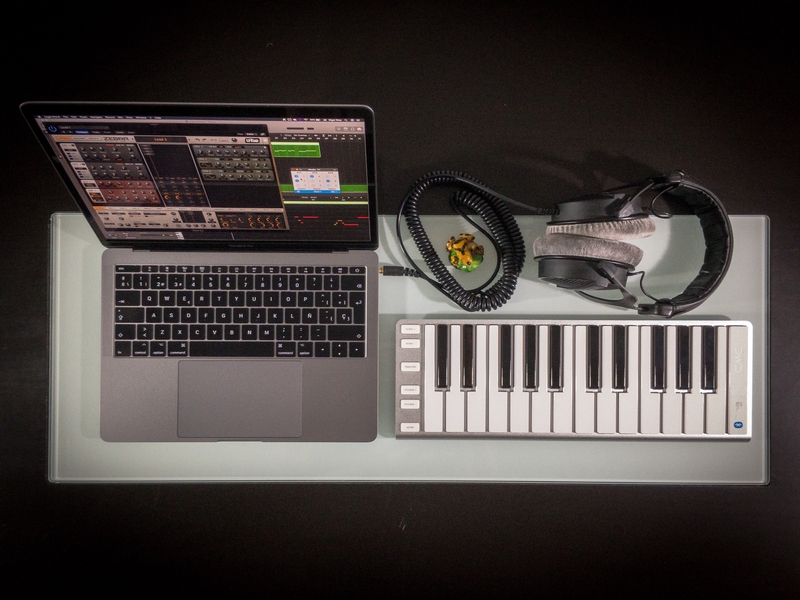
Mobile rig — MacBook Pro with a CME Xkey 25 Air
With lots of music-makers working on MacBooks, using the multitouch trackpad as a MIDI control surface is an advantage. This could mean less equipment to carry for the mobile composer working at the coffee shop, or the producer tweaking a mix in a 7 hours flight.
AudioSwift is an app I developed that transforms the touches into MIDI commands, making the trackpad an expressive tool for virtual instruments and a control surface for mixing and automation. It works through five controller modes. Do you design sounds with Serum, u-he Zebra or Native Instruments Thrill? Great! Control multiple performance parameters in real time with the X/Y mode. Want to create a quick beat? Tap the trackpad as trigger pads. Need to compose a string section? Play your MIDI keyboard with one hand while the other controls CC1 and CC11 with the trackpad working as virtual sliders. Set the controllers to return to a default value after lifting the fingers.
AudioSwift also has the Scale mode for playing notes in a chosen key and the Mixer mode for quick access to two faders at the same time, panning, or a handy jog wheel for navigating through the timeline. Desktop producers can also benefit by adding a Magic Trackpad to their setup. Use one hand for editing with the mouse and the other for controlling the faders with a trackpad.
Controlling multiple faders with AudioSwift
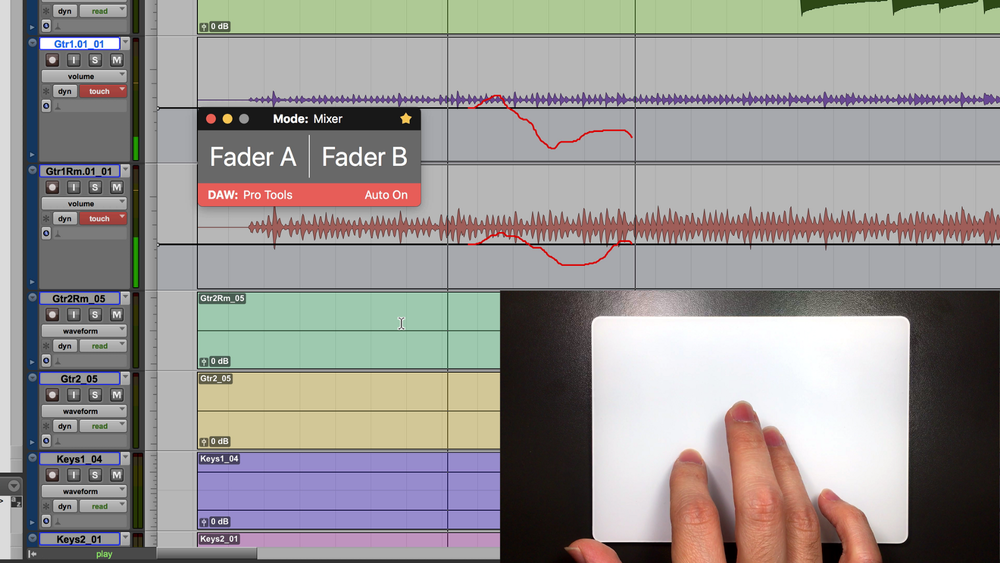
A four or five finger tap activates AudioSwift; pressing the Esc key turns it off. Press ⇧ immediately after tapping the trackpad and AudioSwift will be active until you release the ⇧ key. This way you could be editing a track or tweaking a plug-in, and then turn on AudioSwift temporarily to quickly move the fader, or put the track in solo without the need of reaching out each parameter on screen with the pointer.
Writing automation on two tracks in Pro Tools
With a Magic Trackpad and a mouse combo (or using two trackpads), AudioSwift can also be configured in order to be automatically activated by just touching the trackpad, and turned off by moving the mouse again. Since a Magic Trackpad is small and wireless, it can be placed anywhere on the desktop or close to the main MIDI keyboard — a great tactile setup for the home producer!
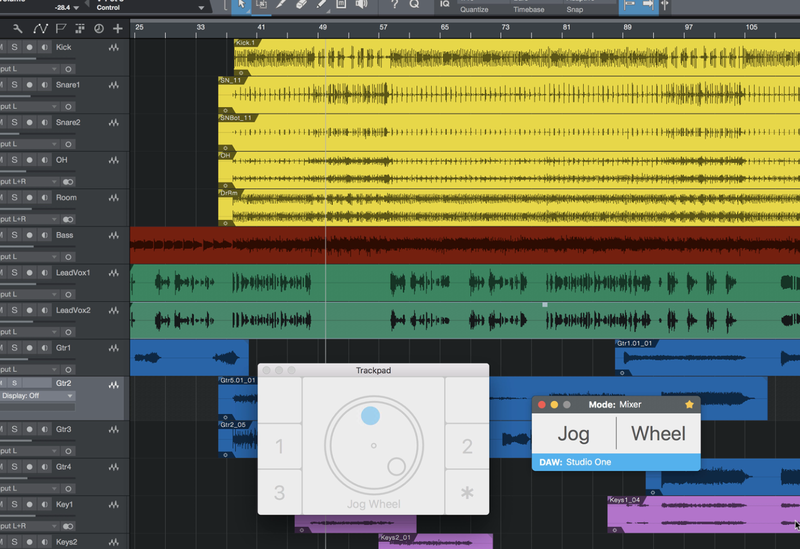
Trackpad as a jog wheel in Presonus Studio One
Custom shortcuts with BetterTouchTool
If your DAW lacks a better integration with the trackpad gestures, there’s a workaround: BetterTouchTool by folivora.ai. I’m not affiliated with the developer but I find it’s a fabulous app that lets you customize shortcuts for the keyboard, mouse, touch bar and of course a trackpad.
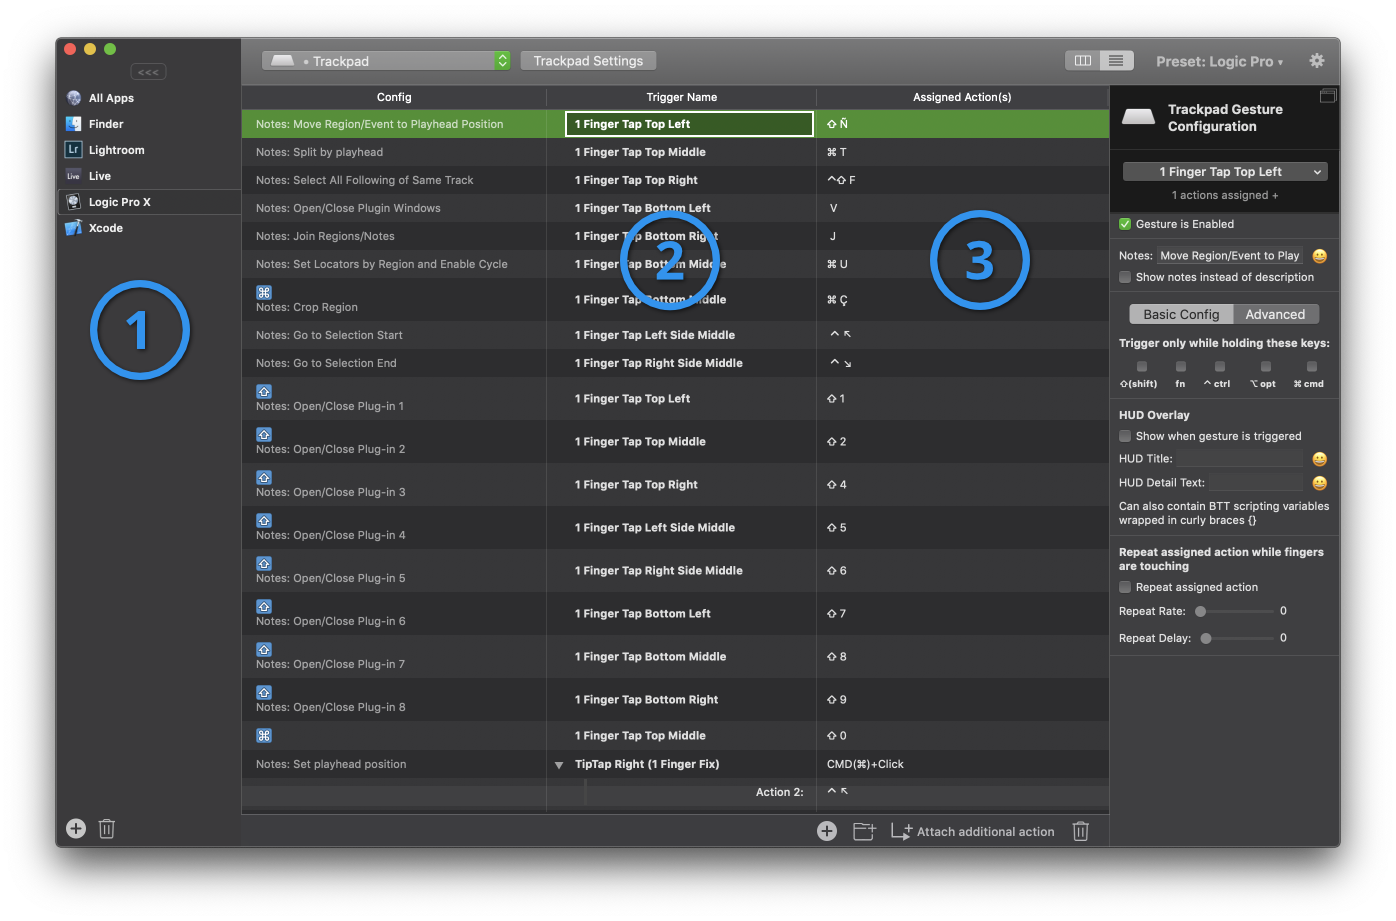
Below is the Preferences window. At the left column (1) we choose the application we want to assign shortcuts. When we add a new trigger to the table, under the column Trigger Name (2) we add a gesture and under Assigned Actions (3), the corresponding key command in the DAW. All gestures assigned will appear in the table. They can have a modifier key like ⇧ or ⌘, so the same gesture can be used for multiple commands. The only limit is how many your memory can handle.
BetterTouchTool Configuration
Music producers often require to work with two different DAWs. Assigning a gesture to the same commands in both applications (e.g. join regions) gives the opportunity for only memorize one gesture instead of two different key commands.
AudioSwift works well with BetterTouchTool as long as there isn’t a gesture assigned to All Apps at the left column (1)— this could accidentally trigger a command while using AudioSwift.
Let’s take a look to the list of trackpad gestures assigned in Logic Pro. I’ve chosen finger taps at the border of the trackpad instead of swipes or other gestures, because they’re more precise to execute and are easier to remember. There are eight possible border zones: three at the top, three at the bottom, and two at the middle. I use the ⇧ key as a modifier to have more options.
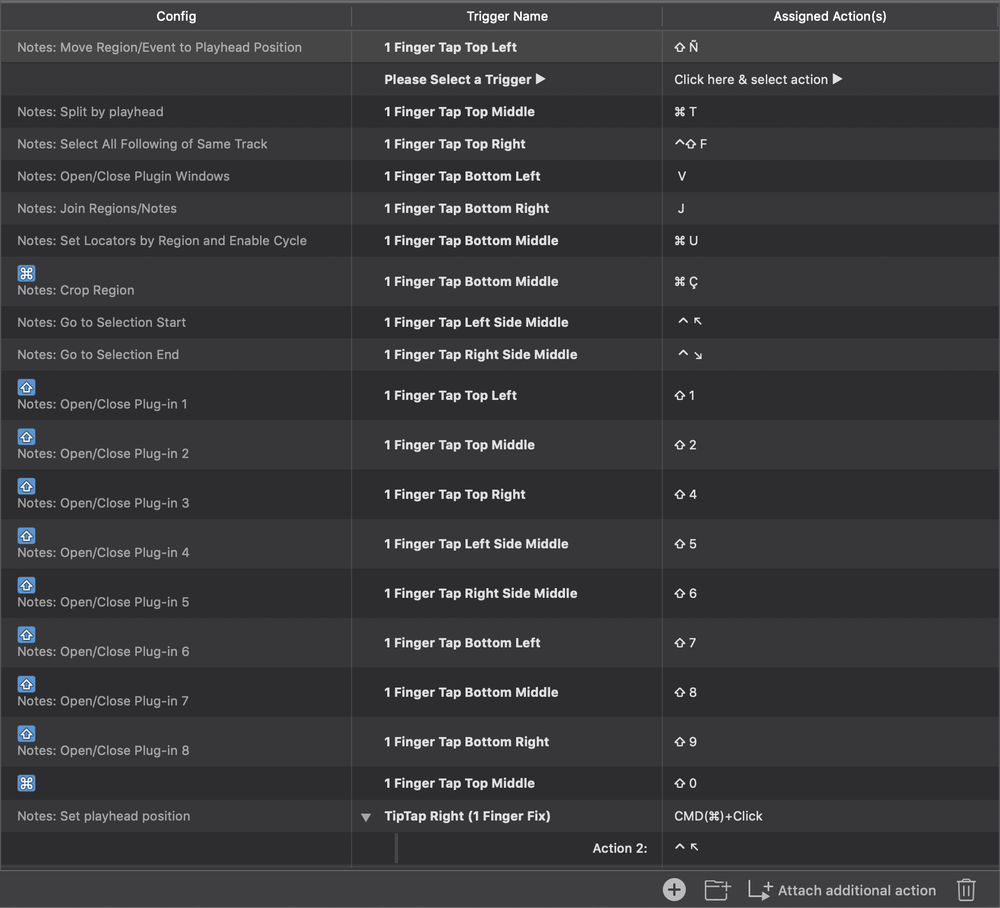
List of trackpad gestures
With simple taps I can move a region to the playhead, join regions, close all plug-in windows, set locators, etc. In Logic Pro there is the option of opening and closing each plug-in insert on a selected track using a key command. So I set the corresponding key commands in Logic Pro’s Key Commands window, and in BetterTouchTool assign a gesture to them. Now I can open a specific plug-in with a tap.
These are just examples of shortcuts you can implement in your DAW. The last one in the list is special — it triggers two actions in a sequence. TipTap Right (1 Finger Fix) is a gesture that consist on touching the trackpad with one finger and then immediately tap with the next finger available to the right. Since I normally use my right hand middle finger to move and tap with my index, I can use this gesture for something else: to set the position of the playhead by tapping anywhere in the Arrange window in Logic Pro.
Setting the playhead position in Logic Pro with a click
For Logic Pro users, we can only do this if we click in the lower half of the ruler, or ⇧+Click in an empty space of the Track area. We can also use a Marquee Tool, click and play from that position. However, setting up the playhead to a particular position by just clicking on a region is not available.
A trick I use as a workaround is apply a sequence of actions to the TipTap Right gesture. The first one is the predefined action ⌘+Click. This set the secondary tool (which in my case is always the Marque Tool), and put a thin line in the region. Then the second action is the key command for Go to Selection Start in Logic Pro or ⌃↖. (NOTE: the ↖ in compact keyboards can be found by pressing fn+← arrow.) This moves the playhead to the position where the marquee is. From there I can zoom in, edit the region or hit play. Of course this trick will work as long as the secondary tool is the Marque Tool. If it’s changed to the Fade Tool for example, it will trigger the wrong action.
You can download my Logic Pro BetterTouchTool preset from here.
Moving the playhead with a tap in Logic Pro
Try it out!
I hope you’ve enjoyed this guide and picked up some good ideas to speed up your workflow. Let me know if you have questions or tips you want to share in the comments section below. You can also contact me via email, Facebook, Twitter and Instagram. If you’d like to try out AudioSwift and BetterTouchTool, there are free trial demos available at each site.
Learn how to use your trackpad as a photo editing tool on macOS with AudioSwift and MIDI2LR.
Imagine these two scenarios — you’re a photographer that travels a lot, working with a Macbook and edting photos in Adobe Lightroom. Or you’re in your desktop computer and need to retouch hundreds of pictures from your last session, because the client wants them today. Time is money and you want to manage it well.
What if you could speed up your workflow in Lightroom without constantly reaching out the mouse pointer to change settings like exposure or contrast? Why not start using the Macbook’s trackpad or a Magic Trackpad in a different and better way?
Introducing AudioSwift
Magic Trackpad 2
OK — I confess I’m not a photographer and before I thought about writing this article, all I knew about photography was the same as any other mortal: take a picture with a phone, go to Instagram, apply a filter, and imagine I’m an artist. However, I had a similar situation to the scenarios described above when working on music production. I needed a tool to create and improve my workflow on location and in my home studio, so I developed AudioSwift.
AudioSwift for macOS is an app that lets you use a trackpad as a MIDI controller. In music production, MIDI controllers are devices widely used to make music and change parameters on screen, by sending commands known as MIDI mesages. With AudioSwift, a trackpad can send these same commands by sliding the fingers over its surface, making it easier for a user to interact with the software’s graphic interface.
I was looking around to see if this concept could also work in different applications other than music creation, like photo editing for example. The challenge was to know if a photo editing app could read MIDI messages and work with AudioSwift properly. That’s when I found out about MIDI2LR.
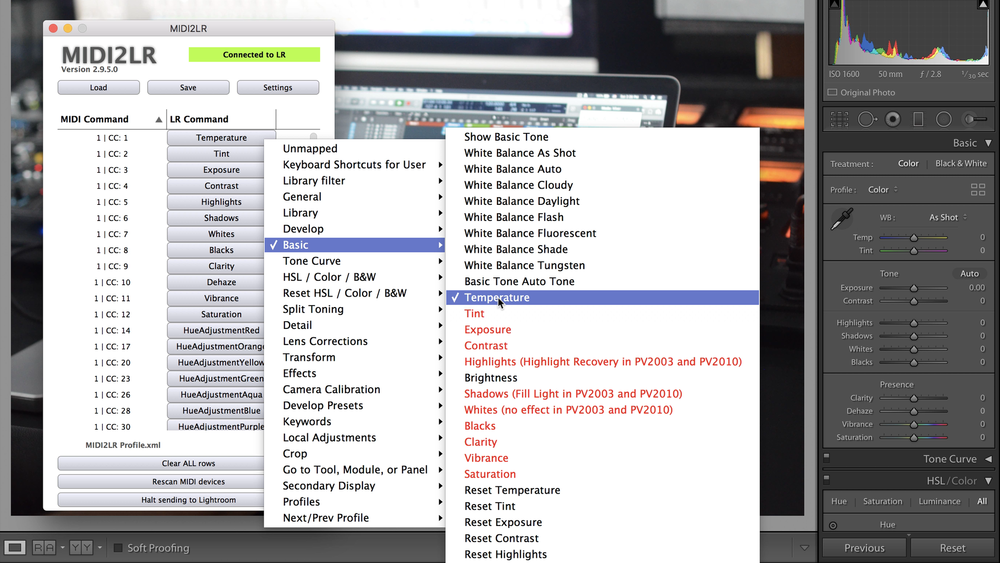
MIDI2LR Plugin
Lightroom Commands in MIDI2LR
Many photographers are using MIDI controllers to tweak their photos in Lightroom. It works by installing a free plugin called MIDI2LR, that translates MIDI messages into Lightroom commands. The user moves a knob or fader to control a Lightroom parameter without reaching out the mouse pointer, making it easier and faster to edit a bunch of photos.
So, why not use a trackpad instead of getting another physical device? A Macbook has one built in, and some photographers already work with Magic Trackpads in their desktop computers. I tried out MIDI2LR with AudioSwift and the results were fantastic — the trackpad can now tweak the same parameters in Lightroom like a MIDI controller does, without clicking and dragging each setting on screen.
How Does It Work?
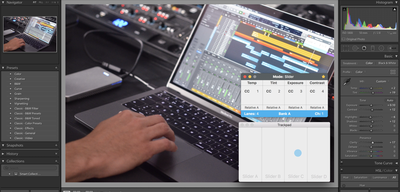
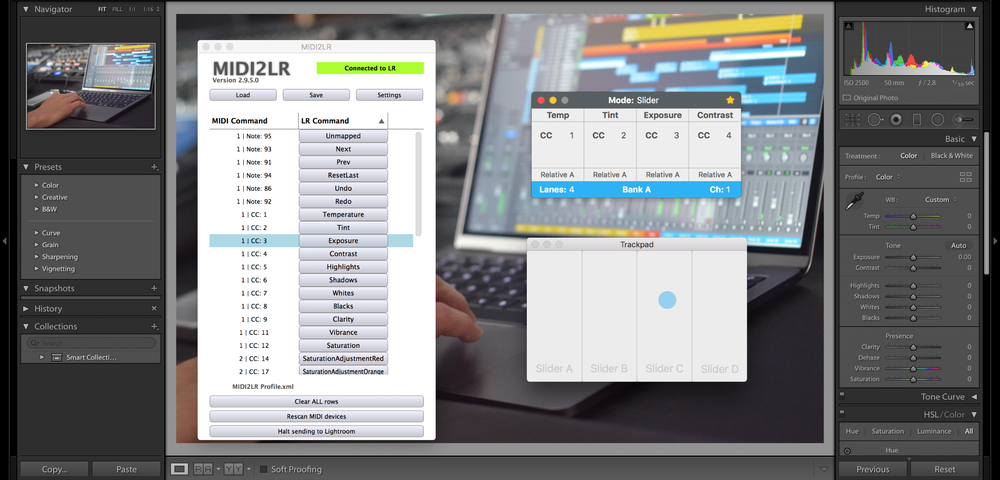
AudioSwift with MIDI2LR in Lightroom
You call AudioSwift by tapping the trackpad with a four or five fingers tap. This opens a console window, freezing the mouse pointer temporarily and taking control of the keyboard. AudioSwift devides the trackpad into 4 virtual sliders, and each one controls a Lightroom setting. The console window shows which Lightroom settings will be controlled. You start touching the trackpad’s surface up or down and the corresponding parameter will move instantly. Press the period or comma keys to jump to the next bank of 4 virtual sliders. After you finish changing the settings, press the escape key and AudioSwift will be turned off. The mouse pointer is then released.
I was able to control 36 different settings in the Lightroom Develop Module, using just a trackpad. At MIDI2LR you set up each virtual slider to a specific Lightroom command. There’s a lot of options to choose from. Once it’s configured properly, it’s very precise and intuitive.
Give It A Try!
I made a video tutorial showing step by step how to configure AudioSwift and MIDI2LR. It includes preset files so you can start working right away. I hope this information is useful to you and it really improves your workflow. If you have any question, you can contact me in the comment section below, via email, or by Twitter and Facebook.
MIDI2LR is free to download and the developer RSJaffe ask for donations. I’m not affiliated, but I strongly encourage you to donate, so the developer can continue supporting this great plugin in the future.