The current version of AudioSwift (ver 2.2.4) has been tested in Big Sur 11.0.1 (20B29) and it works fine. If you come from High Sierra or below, just know that since Mojave we need to do an extra step to run AudioSwift with macOS new versions. Just like other developers are suggesting, I wouldn’t recommend to update now if it’s not necessary. Wait until your apps and plugins are fully supported. Whenever you decide is the right time to do it, AudioSwift will run in your computer.
I don’t have access to the new Apple Silicon computers and probably won’t get one soon. I can’t tell you how AudioSwift will run on those machines; I’m guessing there shouldn’t be any issues. If you buy one in the near future, please just let me know AudioSwift is running OK.
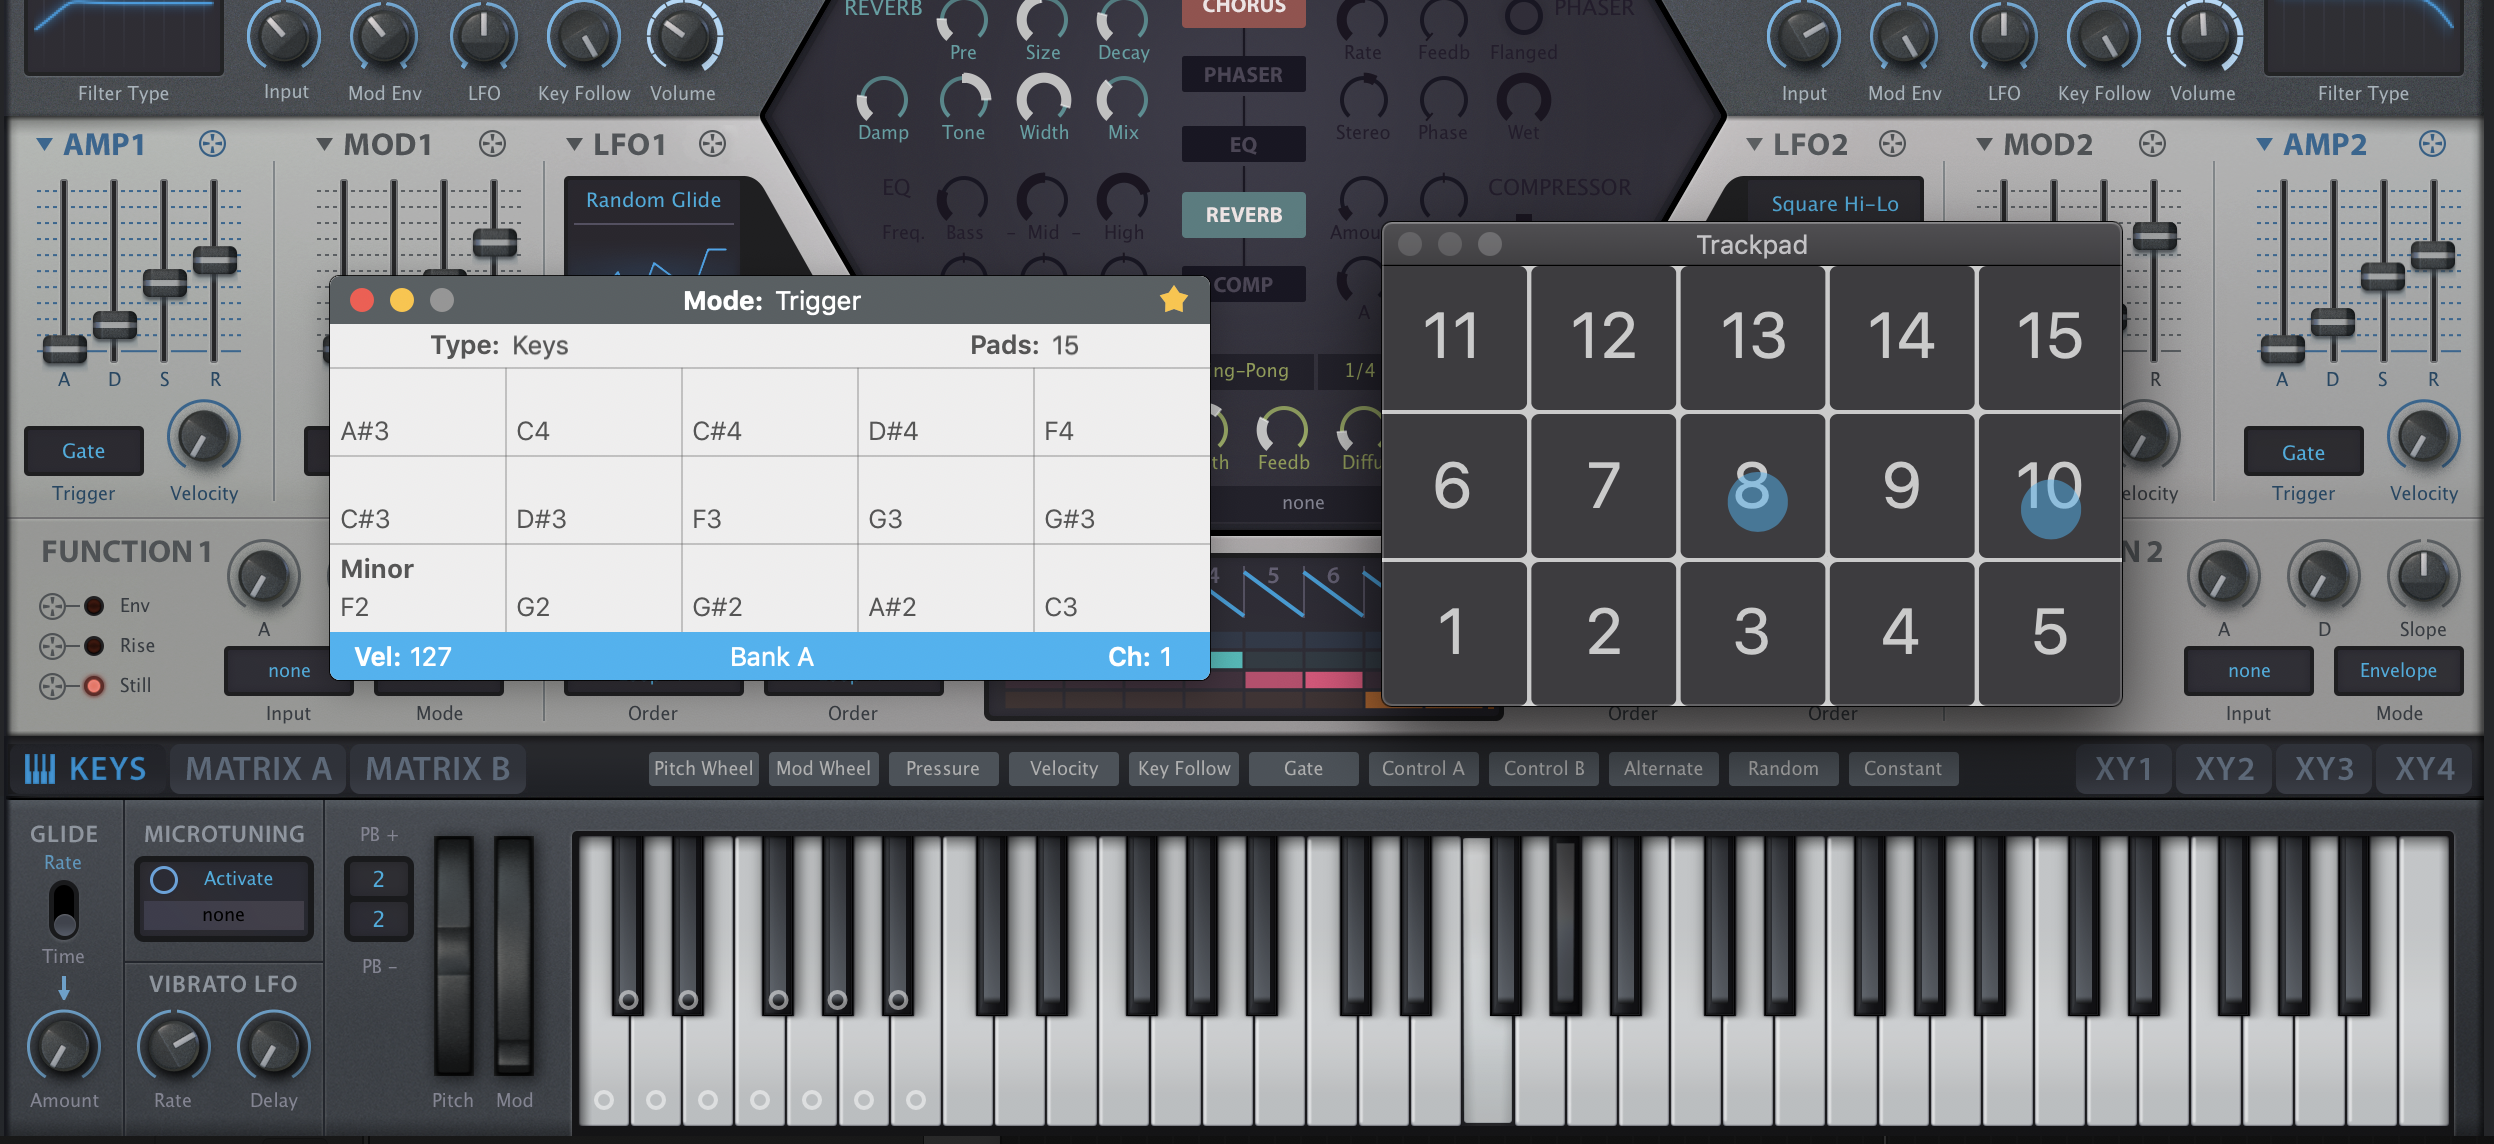
I wanted to share a quick update for AudioSwift. Following our users feedback, version 2.2.1 adds the option to lock the sustain switch in Trigger and Scale Modes using SHIFT+A or SHIFT+L. To unlock it, press again keys A or L. This will be useful for creating ambient drone sounds with the MPE controller. Check out the demo below.
AudioSwift 2.2.1 is a free update for existing users. To download it, go to ‘Check for Updates’ on the main menu or click the download link below. We’re still offering a 30% off discount for a limited time using coupon GOLDENFROG30. For more information, visit www.audioswiftapp.com
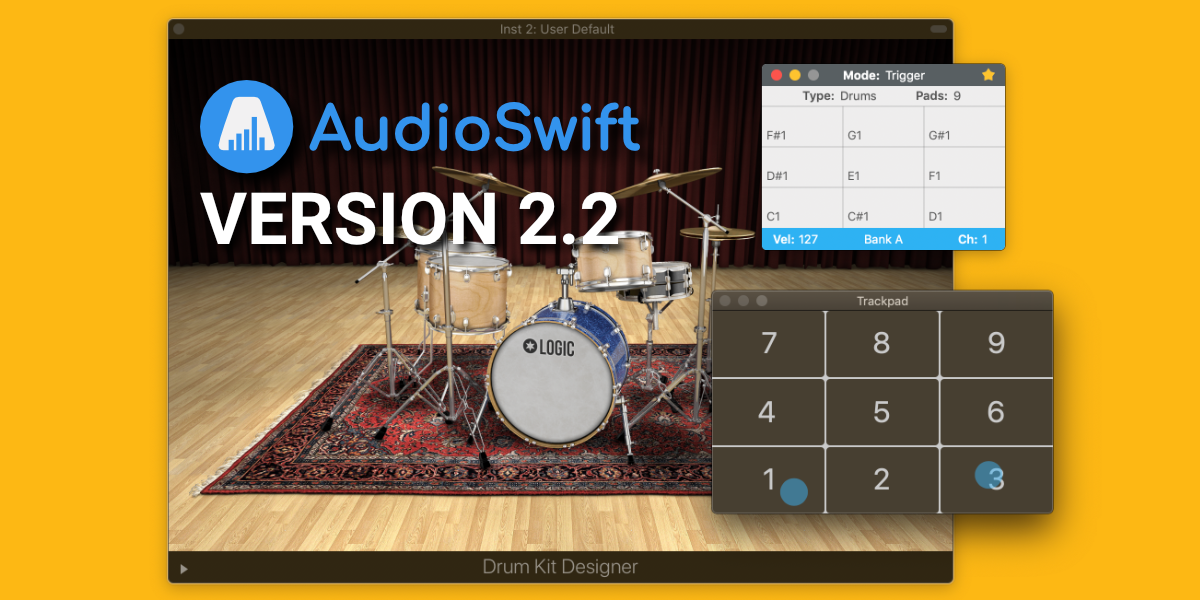
AudioSwift, the app for macOS that turns a trackpad into a MIDI controller, has been updated to version 2.2. Now the Trigger and Scale Modes are velocity sensitive. Tapping the trackpad harder or softer will change the levels of the MIDI notes. The user can also choose to use fixed velocity in the Preferences window.
This new feature, with the MIDI Polyphonic Expression (MPE) support, makes AudioSwift the perfect compact MIDI controller for mobile and desktop music producers, who can now make quick ideas using the trackpad as a creative tool.
AudioSwift version 2.2 is a free update for existing users. To download it, click ‘Check for updates’ on the main menu.
The regular price is $24 and it’s 30% off with coupon code GOLDENFROG30 for a limited time. Try the free demo at www.audioswiftapp.com.
What’s new in version 2.2?
Adds velocity sensitivity to the Trigger and Scale Mode.
Adds option to choose fixed velocity.
Fixes an issue with random false hits in Trigger Mode.
Fixes an issue with “swooping” sounds when using the MPE controller and certain plugins.
Fixes an issue that caused to not trigger Note Off messages in Trigger Mode.
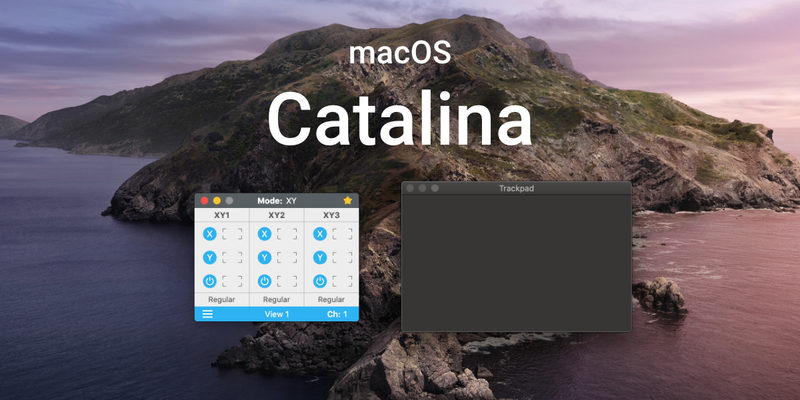
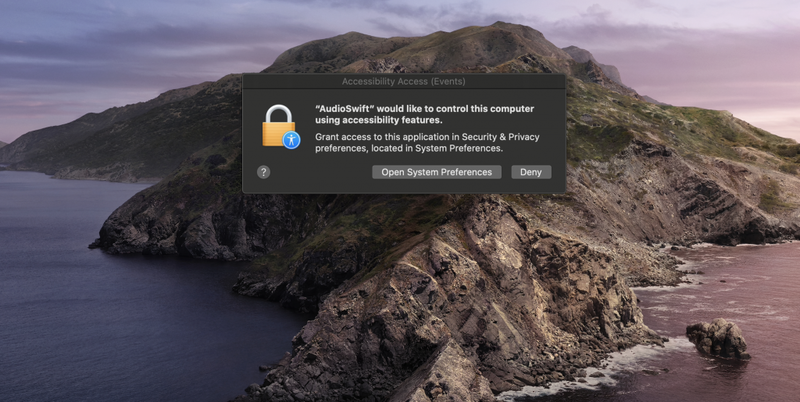
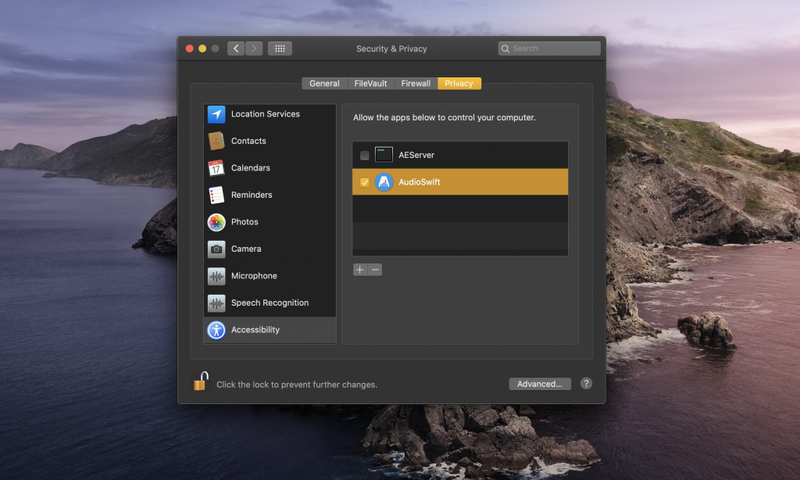
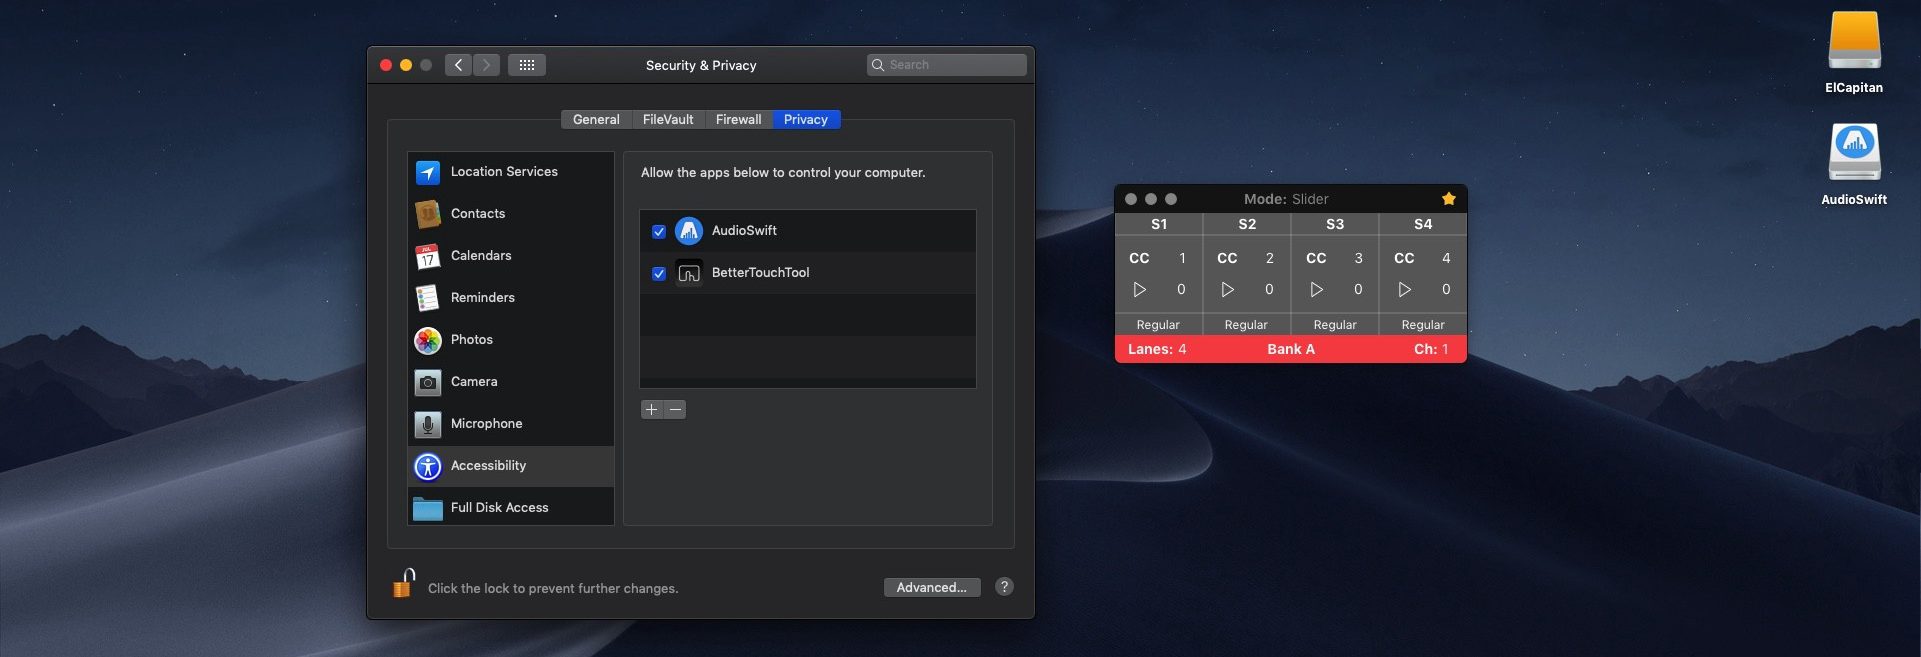
The latest version of AudioSwift is compatible with macOS 10.15 Catalina and up. It has been notarized and it is compliant to Catalina security guidelines. However, when you upgrade to Catalina or buy a new Mac, and run AudioSwift for the first time, the app will appear on the menu bar and then it will go away. Just like the previous Mojave version, macOS Catalina introduced some new security restrictions for apps like AudioSwift. To open the app, you just need to give access to AudioSwift to the security preferences on macOS, so it can monitor the trackpad gestures. Follow these steps:
When running AudioSwift for the first time, the following window will appear. Click Open System Preferences. NOTE: if this message window doesn’t appear automatically, go to the Privacy tab under System Preferences>Security & Privacy>Privacy Tab.
Accessibility Access
In the left column, go to Accessibility and add AudioSwift to the list by clicking the plus sign. You’ll need an administrator password to add it.
Security & Privacy
Once AudioSwift is added to the right column, close the window and open the app.
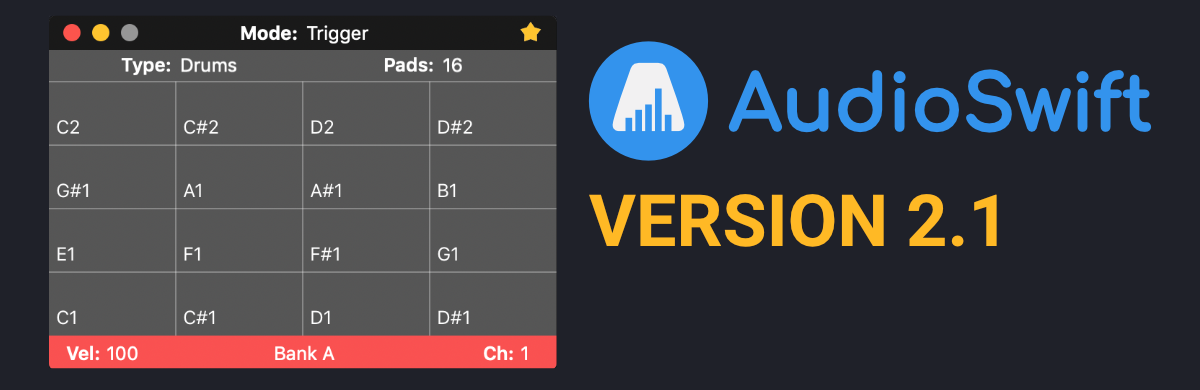
AudioSwift, the app for macOS that turns a trackpad into a MIDI controller, has been updated to version 2.1 with great features. The new design of the Trigger Mode now supports MIDI Polyphonic Expression (MPE) for multidimensional control of many parameters per note, within MPE compatible software. The trackpad becomes an ultra compact MPE controller for music production and sound design.
Users in Trigger Mode can play quick melodies in a chosen key with polyphonic expression. Horizontal and vertical movements send pitch bend and control change messages per MIDI note. This version also adds a new type called Chords that lets trigger a pad and play a chord, helping the user generate chord progressions easily.
AudioSwift version 2.1 is a free update for existing users. The regular price is $24 and it’s 30% off with coupon code GOLDENFROG30 until October 31, 2019. Try the free trial at www.audioswiftapp.com.
What’s new in version 2.1?
MPE support in Trigger Mode.
New type Chords in Trigger Mode.
Option to set scales and chords in Trigger Mode.
Adds labels in Trigger Mode.
Adds 8, 15, 16 and 20 pads configurations in Trigger Mode.
Divides the pads in banks. Up 180 configurable pads.
Option to copy, paste and reset pads and banks.
CC values are shown in real time on the Console in XY and Slider Modes.
Option to invert CC values in XY and Slider Modes.
Adds two more options to turn off AudioSwift automatically.
Adds new keyboard shortcuts.
Adds automation modes.
Updated to Swift 5 and macOS 10.14 SDK with dark mode support.
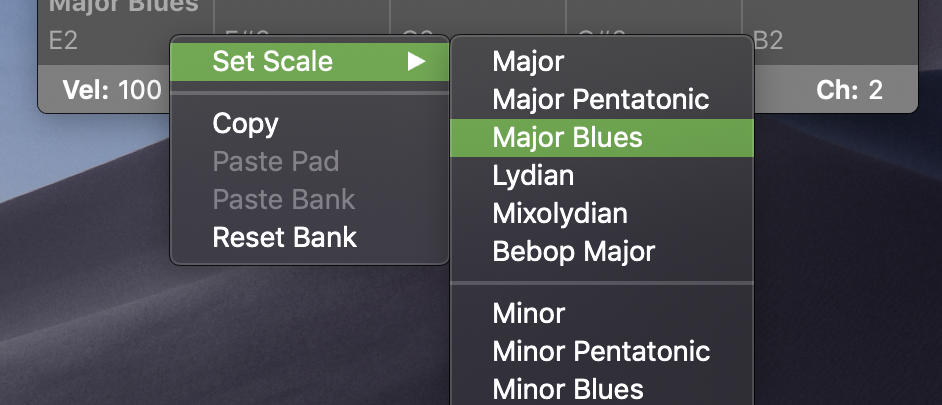
When using the Keys or Chords types in the Trigger Mode, there’s an option to build scales from any pad in the current bank. Right click the bottom right corner of the chosen pad in the Console Window — this will be the tonic note of the scale. Click Set Scales and choose one — the scale will be built upward and downward. For the list of scales I used this site as a reference. If you find a scale that isn’t constructed correctly, please let me know.
Copy, Paste & Reset
By using the right click, you can also copy and paste individual pads or all pads in a bank. Click Reset Bank to set the pads to its default values.
New Shortcuts
The keyboard shortcuts for transposing the notes in a bank have been switched. Now the keys C, V, N and M change the pads one semitone; hold ⇧ for an octave. You can also change a single note or set a scale by tapping the pad from the trackpad. While AudioSwift is on, hold ⌥ or ⌥+⇧ and tap a particular pad to change it one semitone up or down. Hold ⌃ or ⌃+⇧ and tap a pad to build a scale from there.
What’s next?
In the coming weeks I’ll be developing the Chords type. This will be the last feature I’ll add for the official 2.1.0 release if all the beta versions work well. I want to let the user set a scale and automatically create diatonic chords on each pad, that can be modified. My idea is to make the trackpad a practical device to create quick music ideas, starting with a beat, then the bass, harmony and finally a amelody. Let’s see how it goes.
UPDATE (7/12/19): New version 2.0.5 Beta has been released!
MPE or MIDI Polyphonic Expression controllers have become quite popular in music production and sound designing. They add expressiveness when playing virtual instruments by sending MIDI messages like pitch bend or control change per note, instead of global like standard MIDI controllers do.
Since I’ve been working on a new update for AudioSwift, I thought maybe I could implement this feature inside the Trigger Mode. I read the MPE specifications, followed the instructions, wrote the code, and here is the first attempt to make the trackpad a MPE controller!
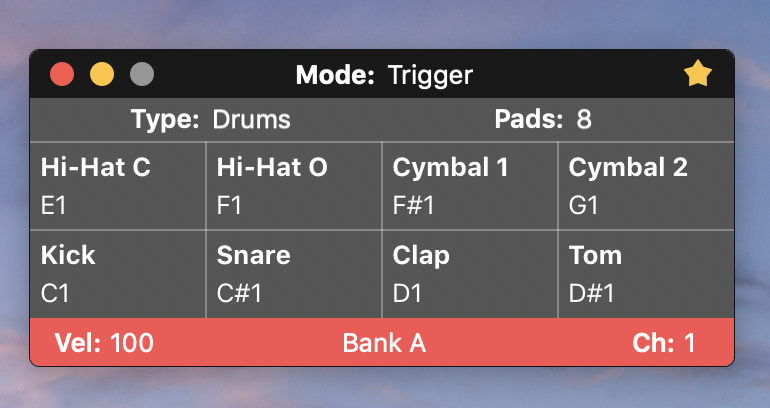
The GUI for the Trigger Mode has changed. The user can now type a label to each pad in the Console window. Use it to know which drum samples are triggered or if you want to change articulations in your virtual instruments by key switching, using Logic Pro’s Articulation Sets or Cubase’s Expression Maps.
Trigger Mode Labels
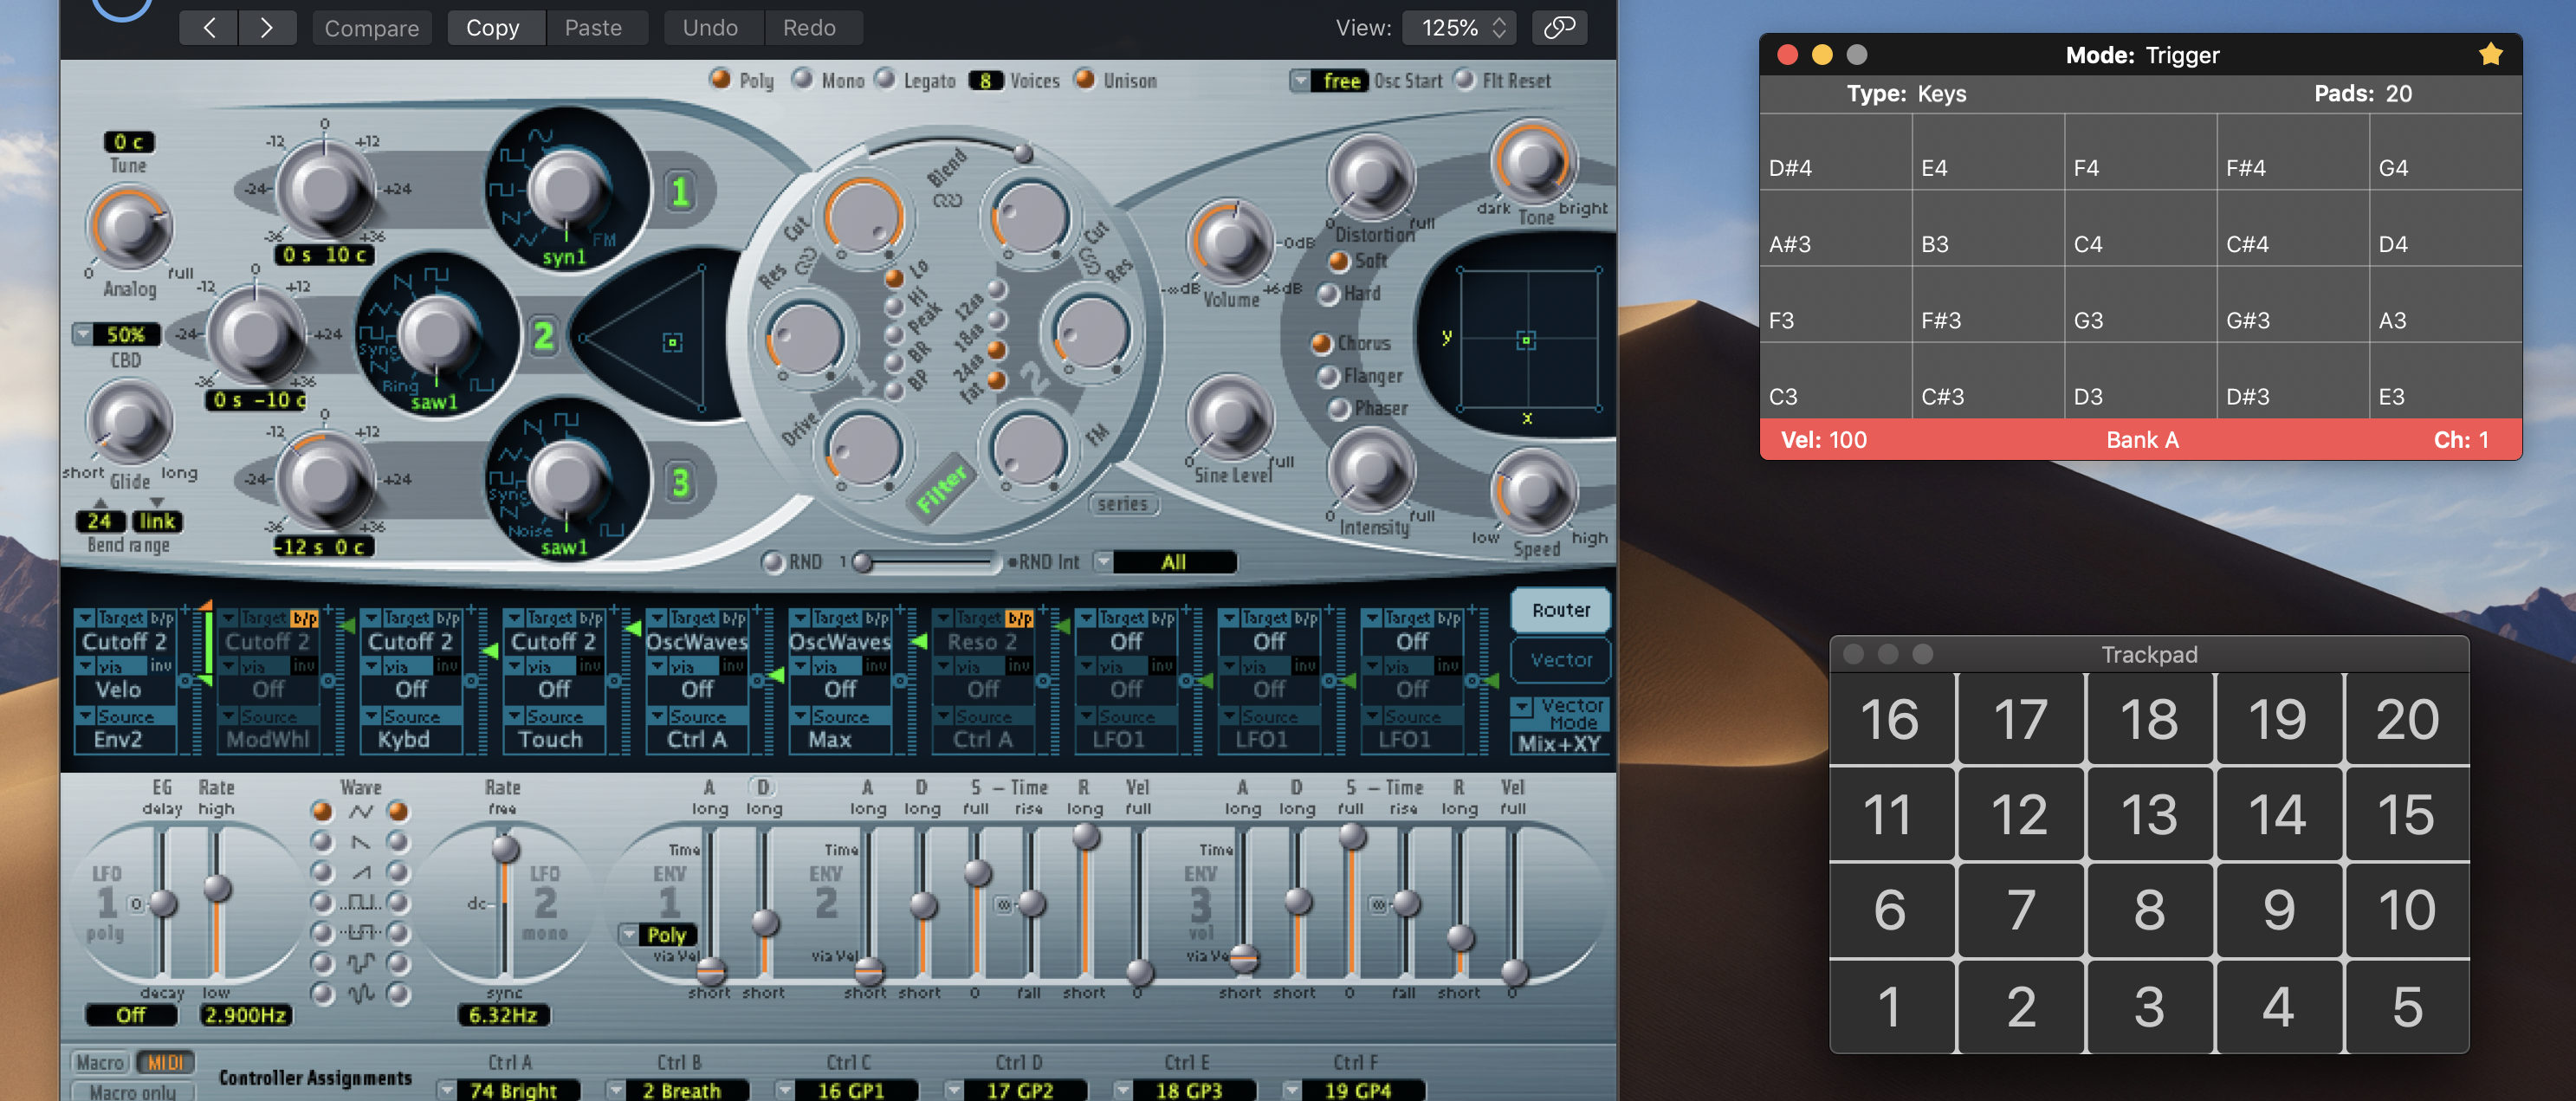
The trackpad can now be divided into 8, 15, 16 and 20 pads and depending on what you choose, between 48 and 60 pads can be set in banks per Type, for a total of 180 pads. Change the banks at the bottom of the Console or press the key shortcuts period and comma, or keys Z and X.
You’ll see that there are also three Types: Drums, Keys (with MPE support), and Chords. For the moment, Chords just plays single notes. I still need to develop this option. Use key shortcut B to switch between them.
AudioSwift with MPE Mode
In order to send MIDI messages per note, a MPE controller separates the data between MIDI channels. Then the synth or virtual instrument should be MPE compatible in order to reproduce the sounds correctly or otherwise it will work like regular MIDI. Roger Linn Design website, makers of the popular LinnStrument MPE controller has a list of recommended sounds and DAWs that are compatible and could work with AudioSwift.
AudioSwift uses MIDI channels 2, 3, and 4 to send the MIDI messages of each note, and channel 1 for global messages. Only three notes can be played in the trackpad at the same time. Although the MPE specification allows Channel Pressure per note, with the trackpad it’s impossible because the Force Touch mechanism is one through all the surface. AudioSwift will only send global Channel Pressure on channel 1.
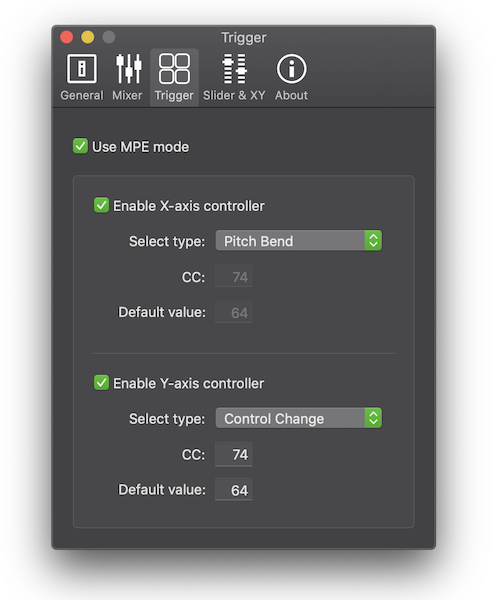
To enable MPE mode in AudioSwift, select the Trigger Mode and select Keys as the type in the Console window. Choose a number of pads for your trackpad. Then go to Preferences > Trigger Tab and click Use MPE Mode. By default, the X-axis sends Pitch Bend and the Y-axis sends CC#74 Expression, which is the standard control change number according to the MPE specification. You can change it to CC#1 instead and set a default value where the controller will return after the finger is lifted from the trackpad. In this case is 64.
Preferences > Trigger tab
I still need to add the option to let the user set the notes in a particular scale. The notes should be set manually in the meantime. However, you can transpose one octave the current bank of notes in the Console window, by using shortcuts C and V, or N and M. Press the ⇧ key with these letters to transpose them one semitone.
Logic Pro Plugins & U-He Repro-5
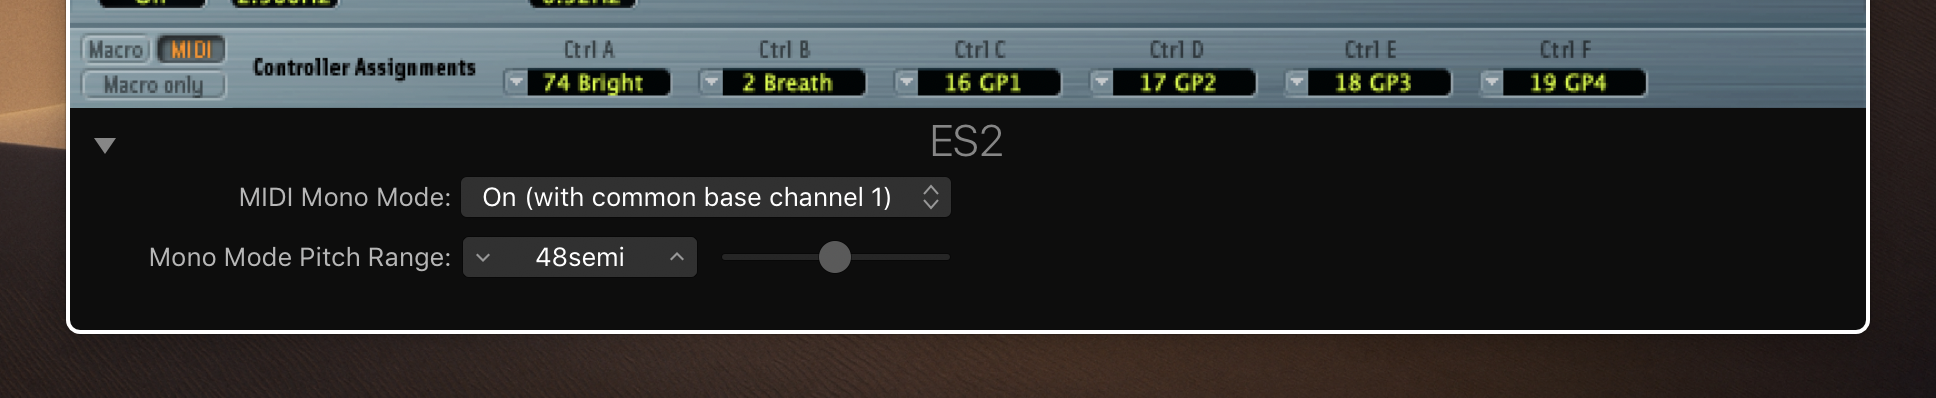
I only have Logic Pro’s stock plugins and U-He Repro-5 to test AudioSwift in MPE mode. With U-He Repro-5, it doesn’t require a special setup. With Logic Pro synths and samplers however, you need to go to the bottom of the plugin, click the triangle and select MIDI Mono Mode: On (with common base channel 1). Choose the Pitch Bend range for your instrument.
Logic Pro’s ES2 MIDI Mono Mode Setup
There are two issues that I need to figure out if they‘re caused by these plugins or by AudioSwift. With Logic Pro’s plugins, when I tried to play a note that previously had CC info on its MIDI channel, the plugins try to readjust quickly to the new CC value, causing a swooping noise. You can hear this in the first video around 0:11 when I tried to play D3. This doesn’t happen with U-He Repro-5.
However, with Repro-5 the global Channel Pressure in MIDI channel 1 doesn’t work. I don’t know if it’s because in Repro-5 the Channel Pressure and the Note On messages should be in the same MIDI channel to play the sound correctly.
Ableton Live Setup
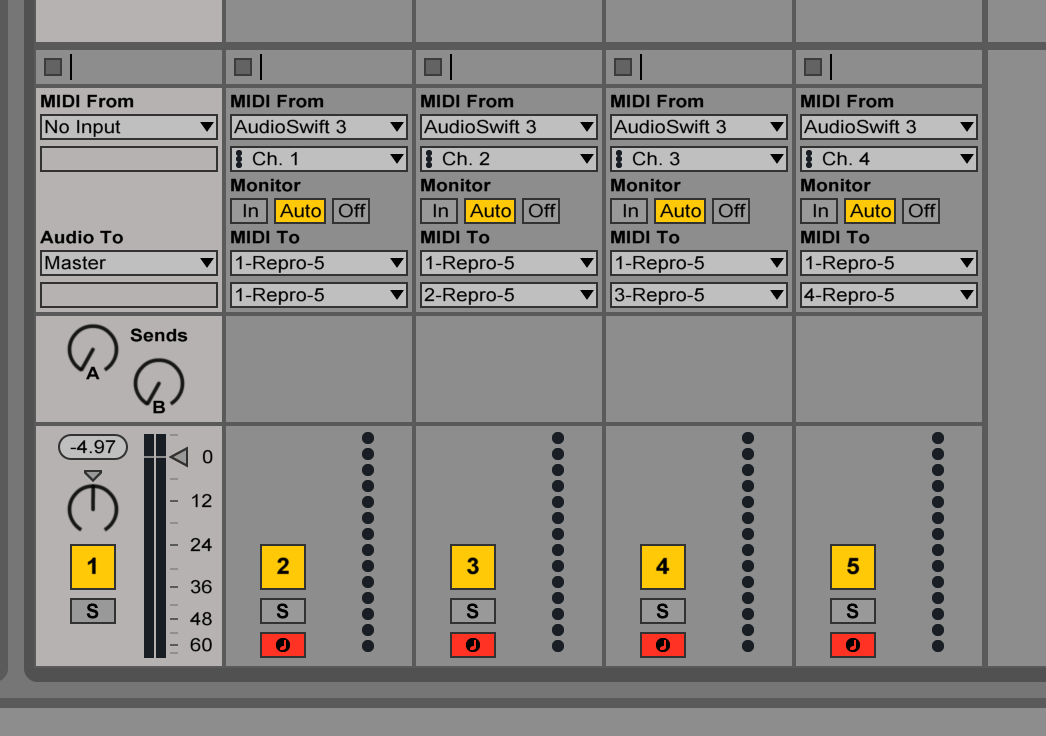
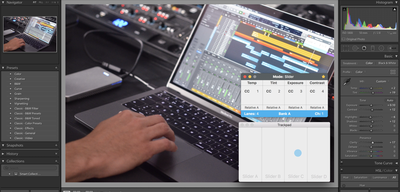
Live doesn’t support MPE but there is a workaround to make it work with MPE plugins. First, we make sure the AudioSwift 3 input is enabled at Live > Preferences > Link MIDI > MIDI Ports. Then, we are going to create five MIDI tracks in our project.
Ableton Live Setup
Track 1 will be the host for the MPE plugin. In my case, it’s U-He Repro-5. It will only play the sounds and won’t receive any MIDI input directly from the trackpad, so select No Input under MIDI From.
Track 2 will be the global master channel and will use MIDI channel 1. Tracks 3 to 5 will use MIDI channels 2 to 4 for each note. Under MIDI From, select AudioSwift 3 for all four tracks and then set each track to MIDI channels 1 to 4. See image above.
Now under MIDI To for each track, select your plugin (Repro-5 in my case.) Below set each track to a channel of the plugin (1-Repro-5, 2-Repro-5, etc.) Arm tracks 2 to 5, press record and start playing with the trackpad. The sound should come out from track 1 and the notes will be spread out over the rest of the MIDI tracks.
Play with it. Let me know how it works for you. Your feedback is really appreciated.
With the last week release of macOS 10.14 Mojave, I got a couple of questions from users about compatibility with AudioSwift 2. The current version 2.0.0 is compatible, but because of some security changes included in Mojave a lot of apps like AudioSwift 2 won’t open right away, so there are some extra steps to set it up.
You’ll need to give access to AudioSwift 2 at the security section of macOS. Go to System Preferences/Security & Privacy/Privacy tab and follow the steps from this video:
This updated video also shows some other ways of turning AudioSwift on by using the shift key, and when working with two trackpads or a trackpad plus a mouse. Maybe you could include these options in your workflow.
What About Dark Mode?
I still need to update AudioSwift’s code to be fully compatible with the new Dark Mode in Mojave. However, in the current version only the Preferences and Trackpad windows will not be in Dark Mode. The Console window can be changed between a light or dark theme by going to AudioSwift Preferences, General tab and clicking Select Console Theme.
Feedback and Reviews
I’ll appreciate any feedback you can give me about how are you using AudioSwift 2 in your workflow, which controller modes are used most often, and what would you like to see in the future. Remember you can also use AudioSwift with Adobe Lightroom if you’re into photography. You can leave your comments or reviews at Facebook, Twitter, Instagram or at KVR.
AudioSwift for macOS is an app that lets you use a trackpad as a MIDI controller.
Designed for music producers and photographers, with AudioSwift you can control virtual instruments in your digital audio workstation or edit photos faster in Adobe Lightroom, all by just using simple touch gestures over the trackpad.
Here is how it works — call AudioSwift by using a four or five fingers tap. A console window appears on screen taking control of the mouse pointer and keyboard. Start touching the trackpad to control a parameter and when you finish, hit the escape key to turn AudioSwift off.
Five Controller Modes
AudioSwift comes in five controller modes depending on what you want to control:
Slider — divides the trackpad into 4 virtual sliders that send either CC or Pitch Bend MIDI messages.
XY — control many parameters at the same time using one, two or three fingers.
Mixer — designed to speed up your mixing workflow. Control two faders at the same time, panning, sends, use the trackpad as a jog wheel, and write automation.
Trigger — tap your fingers over the trackpad to make beats or launch audio clips.
Scale — play notes in a selected key.
Switch between controllers easily by just pressing keyboard shortcuts, or by using the Touch Bar in compatible Macbooks. Trackpads with Force Touch support can be used to send after touch MIDI messages, also known as channel pressure.
What’s new in Version 2?
AudioSwift in Adobe Lightroom
New Slider Mode with 12 configurable virtual sliders.
New XY Mode design with 5 views and 30 configurable controllers.