UPDATED – AUGUST 10, 2025. For this tutorial, I’m using Krotos Studio version 2.1.2 and AudioSwift 2.3.8 Beta for macOS. Please download the latest AudioSwift Beta before continuing.
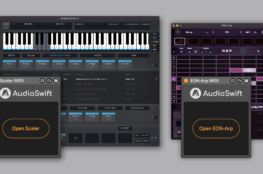
Krotos Studio is a sound FX plugin that comes with two XY pads to control the sound design. We can use a trackpad with AudioSwift for macOS to move both XY pads in real time. In this tutorial, we’re going to explain two methods to map Krotos Studio parameters to the trackpad.
If you’re new to AudioSwift, please check out this tutorial for installation and overview.
Method 1 – Krotos Studio MIDI CC Assignments
The latest Krotos Studio version 2.1.2 added MIDI CC assignments capabilities for controls and XY pads inside the software. We can map the X and Y axes to AudioSwift CC’s using Krotos Studio MIDI Learn feature. For this first method we’re going to use Pro Tools as an example but it should work with any DAW.
Watch Demo 1 with Pro Tools
MIDI Mapping Process with AudioSwift
Since we are going to use AudioSwift in XY Mode, make sure the AudioSwift port 3 is enabled in the DAW. For Pro Tools, check Pro Tools > Setup > MIDI > MIDI Input Devices. Then, create an Instrument track and insert the Krotos Studio plugin. Make sure to click the arm record button on the track in order to receive MIDI messages from the trackpad.

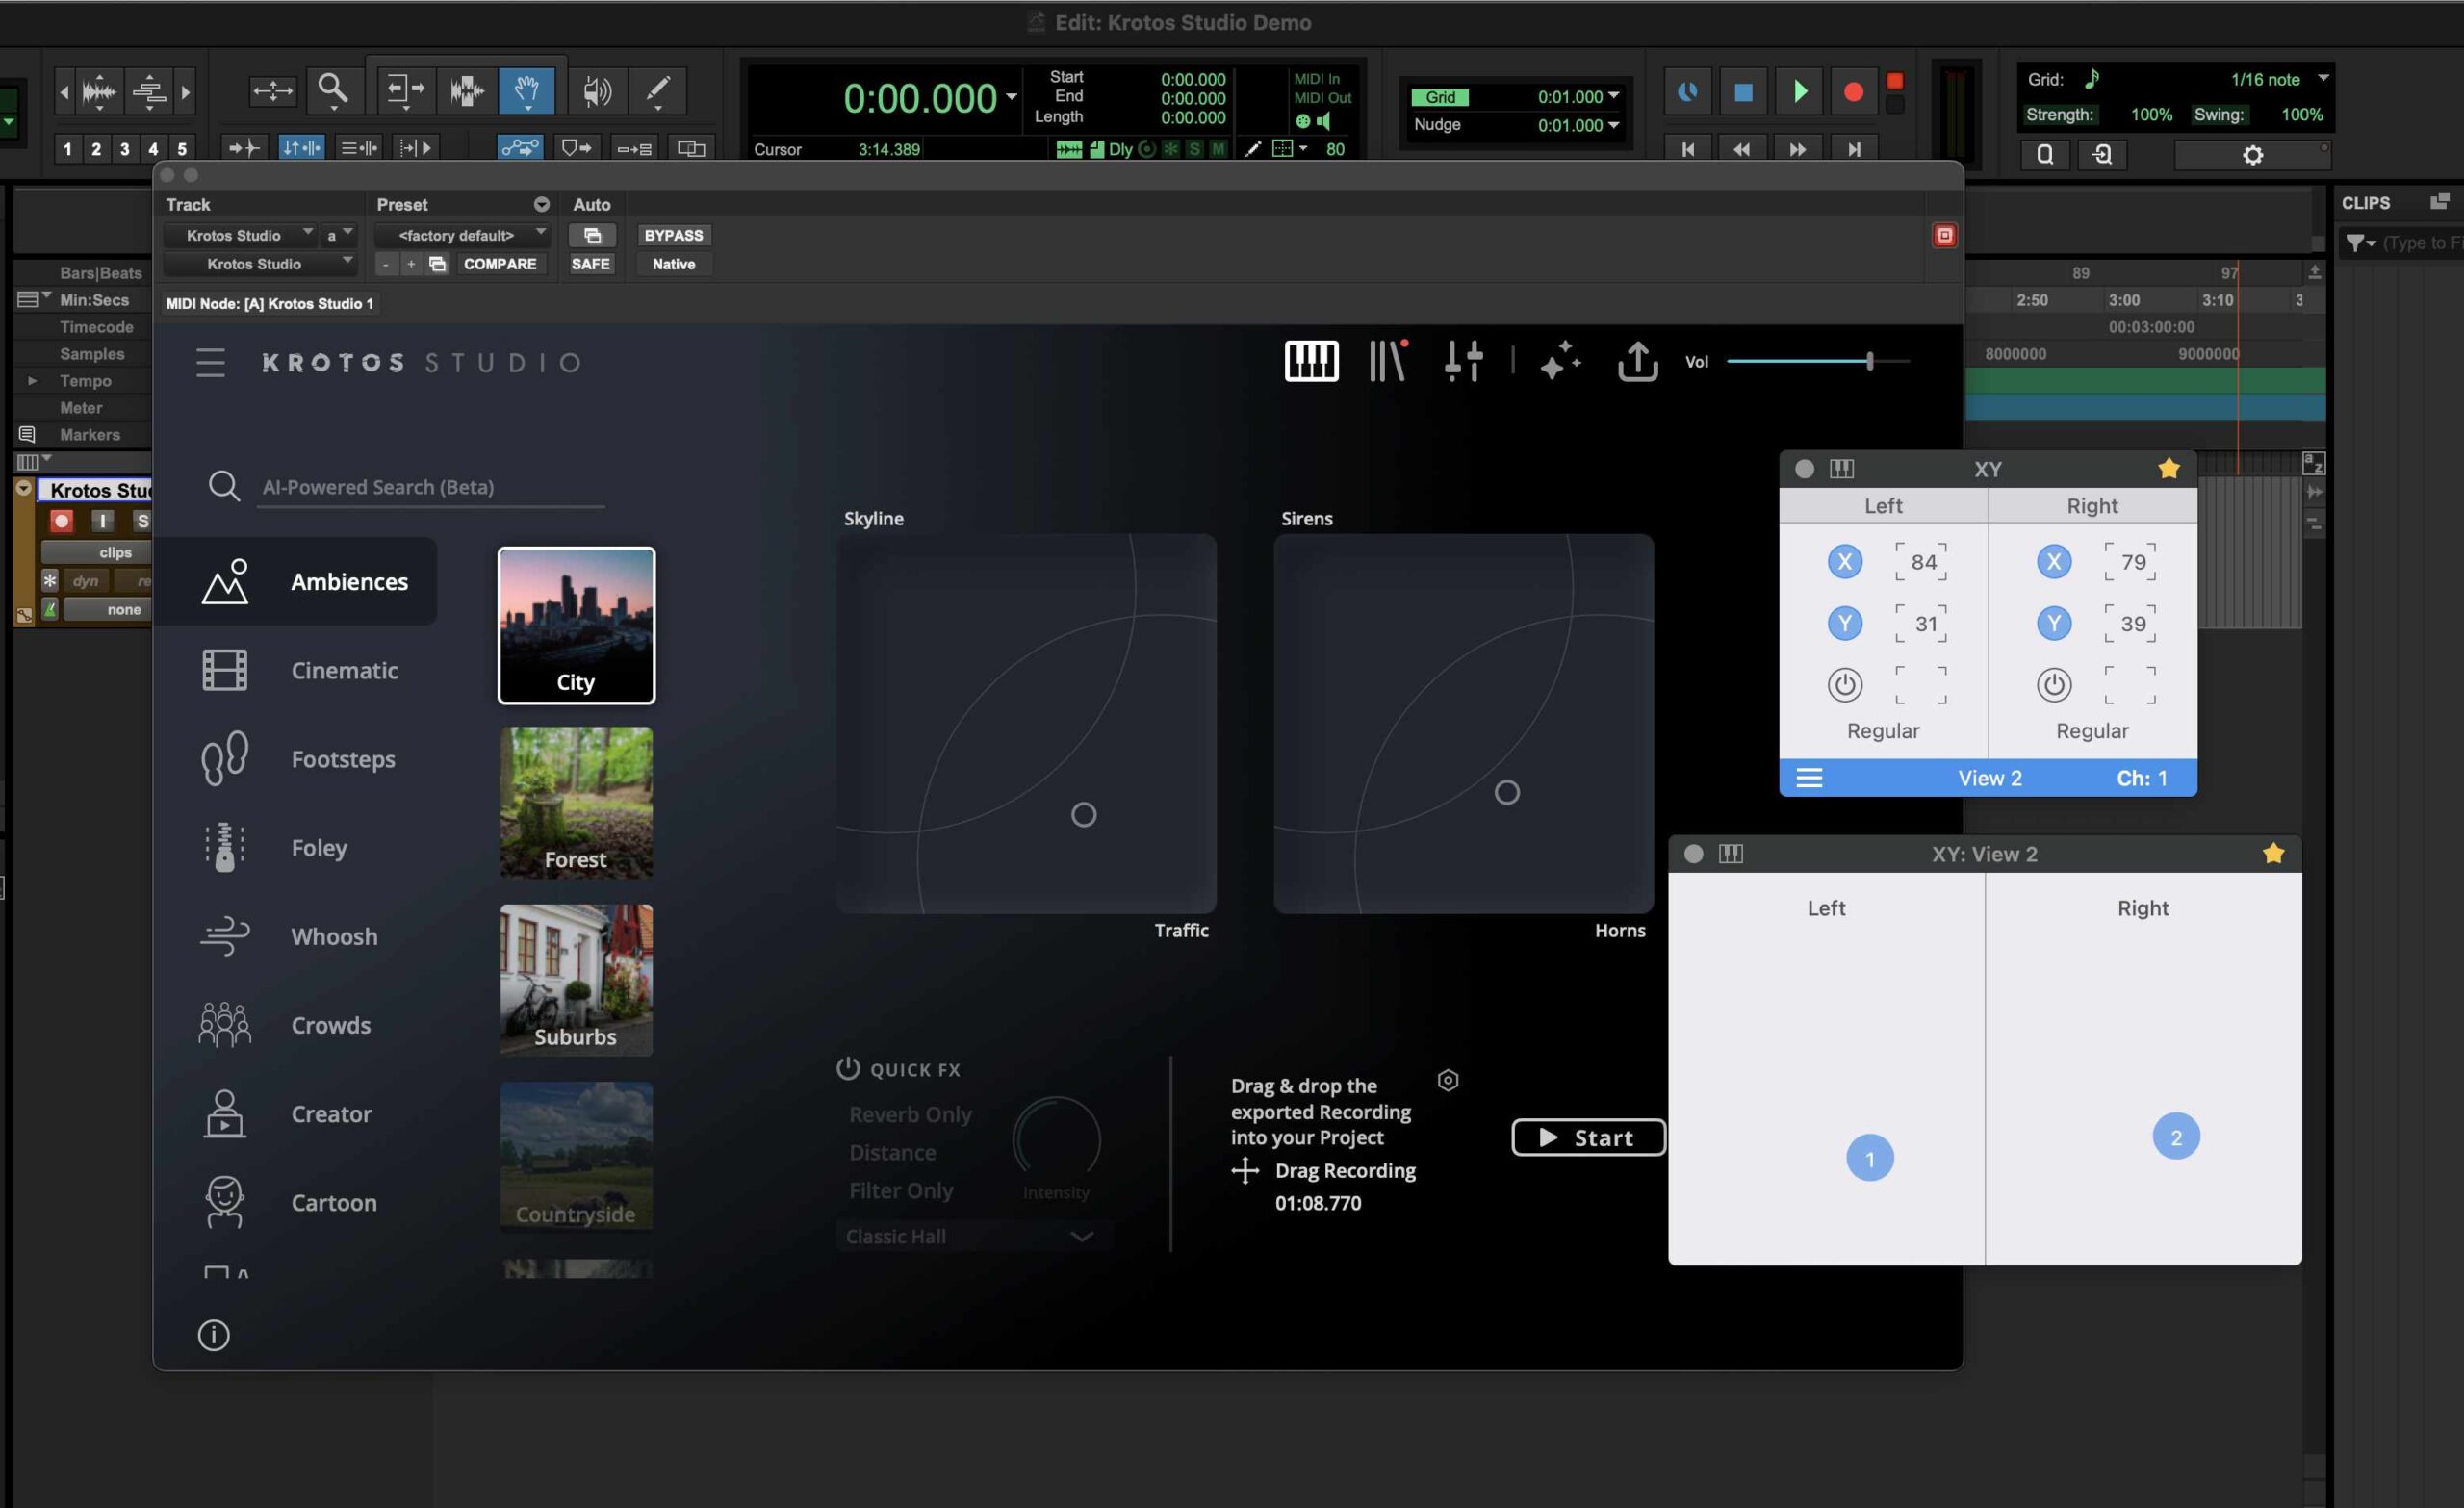
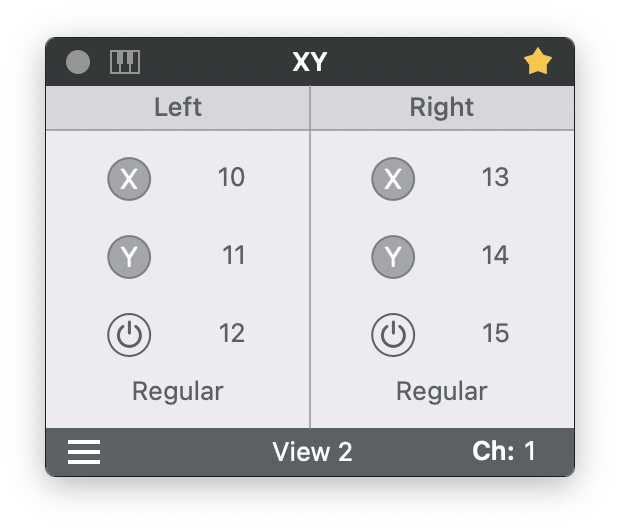
In the AudioSwift Console window, select XY Mode and View 2 to divide the trackpad into 2 XY pads. Choose the CC numbers you want to use for each axis. Enable the X and Y buttons for the left and right XY Pads. Set both formats to Regular. We’re only going to use the XY axes and not the switch buttons, so disable them. It should look like this:
We need to map each parameter one at a time. In Krotos Studio, right click the left XY pad dot and click MIDI Learn X Axis CC#. In this example, we are in the preset Ambiences – City in Krotos Studio.

Krotos Studio is now waiting to receive a MIDI message from the trackpad from the X axis of the left XY pad. Follow these steps to send MIDI from the trackpad:
- Turn on AudioSwift with a five/four finger tap gesture on the trackpad.
- Keep pressing the CONTROL key to lock the horizontal movements (X axis).
- With only one finger touching the trackpad, move your finger horizontally over the left XY pad.
- Turn off AudioSwift by pressing the Escape key. The X axis in Krotos Studio should now be mapped to the CC number for the left X axis of the trackpad. In this example is CC10.
To map the Y axis, let’s repeat the steps from above but with the left Y axis. First go to Krotos Studio again, right click the left XY pad dot but now this time select MIDI Learn Y Axis CC#. Then repeat the steps but vertically:
- Turn on AudioSwift with a five/four finger tap gesture on the trackpad.
- Keep pressing the SHIFT key to lock the vertical movements (Y axis).
- With only one finger touching the trackpad, move your finger vertically over the left XY pad.
- Turn off AudioSwift by pressing the Escape key. The Y axis in Krotos Studio should now be mapped to the CC number for the left Y axis of the trackpad. In this example is CC11.
Now both X and Y left axes should be enabled to the correspondent CC numbers. Just right click the left XY dot again in Krotos Sto double check the mapping.

Repeat the process above for the right XY pad.
Test the Trackpad
Now Krotos Studio is ready to be tested with the trackpad. With the track selected and with the arm record button enabled. Click the start button in Krotos Studio to start recording. Turn on AudioSwift with a five/four finger tap gesture and start moving the left XY pad on the trackpad and then the right XY pad.
Tips for Method 1
The MIDI mappings can be saved if you save the preset as a user preset inside Krotos Studio. Next time you load the user preset, its MIDI mappings will be there. The MIDI mappings will work only for that particular sound you chose. If you change to another factory preset from either the same category of sounds or other, all the mappings that were in the previous preset will be deleted.
The buttons for start recording the sounds can’t be MIDI mapped from inside Krotos Studio. They don’t appear available for MIDI Learn. To start a sound you’ll need to press a MIDI note if you have a MIDI keyboard available and keep pressing the key (or use a sustain pedal). Release the key, and the recording will stop.
If you don’t have a MIDI keyboard available, you can use the MIDI Keys available in the latest AudioSwift Beta Version. When AudioSwift is active, there’s a MIDI keys feature using the computer keyboard (just like the ones that come built in DAWs). To activate it, click the MIDI Keys icon in the top left corner of the AudioSwift Console Window or press CMD + K. To sustain the note so you can use both hands on the trackpad, play the note and then press SHIFT + Tab. This will lock the sustain. To stop the note press the Tab key again to release the sustain.

Method 2 – DAW MIDI Learn Function
For this method we’re going to use the MIDI Learn feature built in the DAW to do all the mapping. This method works with any DAW that has MIDI assignments features. For this example, we’re going to use Ableton Live.
Watch Demo 2 with Ableton Live
Selecting Krotos Studio Parameters in Ableton Live
Insert a VST or AU version of Krotos Studio in a track and select one of the presets in a category. In this example, we chose the preset Ambiences – City. We need to be able to see the parameters of Krotos Studio in Ableton Live in order to map them. The parameters names can vary between presets, and that’s why it’s important to first choose the preset before continuing with the mapping. Go to the plugin device, click the top left triangle to expand the device and click Configure.

IMPORTANT: don’t change between presets in Krotos Studio while the Configure button is enabled. Now click the left XY pad in Krotos Studio and the XY parameters will appear with a green color under the Configure button in the Ableton Live device (labeled XYPad_0 posX and posY in this example). Then, click the right XY pad to add those parameters and also click the Start button. Disable the Configure button. At the end there should be 5 parameters added like this:

MIDI Mapping Process with AudioSwift
Since we are going to use AudioSwift in XY Mode, make sure the AudioSwift port 3 is enabled in Ableton Live > Settings > Link, Tempo & MIDI > Remote column.

In the AudioSwift Console window, select XY Mode and View 2 to divide the trackpad into 2 XY pads. Choose the CC numbers you want to use for each axis. Enable only the X and Y buttons for the left and right XY Pads and leave disabled the switch buttons for the moment. Set both formats to Regular.
We need to map each parameter one at a time. Let’s start with the left X axis. Follow these steps to send MIDI from the trackpad:
- In Ableton Live, press CMD + M to enable the MIDI Map feature. The parameters will turn purple and they are waiting to receive a MIDI message from the trackpad.
- Look for the first X parameter (labeled XYPad_0 posX) under the Configure button and click it.
- Turn on AudioSwift with a five/four finger tap gesture on the trackpad.
- Keep pressing the CONTROL key to lock the horizontal movements (X axis).
- With only one finger touching the trackpad, move your finger horizontally over the left XY pad.
- Turn off AudioSwift by pressing the Escape key. The X axis in Krotos Studio should now be mapped to the CC number for the left X axis of the trackpad. In this example is CC10 on MIDI channel 1 (labeled 1/10 in the image below).

To map the Y axis, let’s repeat the steps from above but with the left Y axis:
- In Ableton Live, the MIDI Map feature should still be enabled (parameters in purple).
- Click now the Y parameter in the device (labeled XYPad_0 posY).
- Turn on AudioSwift with a five/four finger tap gesture on the trackpad.
- Keep pressing the SHIFT key to lock the vertical movements (Y axis).
- With only one finger touching the trackpad, move your finger vertically over the left XY pad.
- Turn off AudioSwift by pressing the Escape key. The Y axis in Krotos Studio should now be mapped to the CC number for the left Y axis of the trackpad. In this example is CC11 on MIDI channel 1 (labeled 1/11 in the device).
For the Start button in Krotos Studio (labeled Master Autoplay in the device under Configure), follow these steps:
- In the AudioSwift Console, disable both left X and Y buttons and now enable the third left switch button.
- Click the Master Autoplay parameter in the Ableton Live Device.
- Turn on AudioSwift with a five/four finger tap gesture on the trackpad.
- With only one finger touching the trackpad, touch the left XY pad.
- Turn off AudioSwift by pressing the Escape key. The Start button in Krotos Studio should now be mapped to the CC number for the left switch button. In this example is CC12 on MIDI channel 1 (labeled 1/12 in the device).
- Enable again the left X and Y buttons in the AudioSwift Console. The three left buttons should stay enabled.
Repeat the process above for the right XY pad, except the steps for the Start button. Only the left XY pad will trigger the Start button. Keep the right XY pad switch button disabled in the AudioSwift Console. At the end all parameters should be mapped like this in the Ableton Live device.

Test the Trackpad
Disable the MIDI Map switch in Ableton Live by pressing again CMD + M. Now Krotos Studio is ready to be tested with the trackpad. With the track selected and with the arm record button enabled. Turn on AudioSwift with a five/four finger tap gesture and start moving the left XY pad on the trackpad and then the right XY pad.

Tips for Method 2
Notice that if you lift the left XY pad the sound stops. Maybe you don’t like this behavior with this preset. Just disable the left switch button in the AudioSwift Console and instead, start the sound in Krotos Studio by clicking the Start button.To start a sound you can also press a MIDI note if you have a MIDI keyboard available and keep pressing the key (or use a sustain pedal). Release the key, and the recording will stop.
If you don’t have a MIDI keyboard available, you can use the MIDI Keys available in the latest AudioSwift Beta Version. When AudioSwift is active, there’s a MIDI keys feature using the computer keyboard (just like the one that comes built in DAWs). To activate it, click the MIDI Keys icon in the top left corner of the AudioSwift Console Window or press CMD + K. To sustain the note so you can use both hands on the trackpad, play the note and then press SHIFT + Tab. This will lock the sustain. To stop the note press the Tab key again to release the sustain.
If you switch to another preset in Krotos Studio, maybe the XY pads will be switched in position, or the parameters won’t be mapped at all. Some presets have knobs instead of XY pads. In this case, for the new selected preset, you’ll need to repeat the process with the Configure button to add the missing parameters and map them to the AudioSwift Console. You could map them to the same CC numbers, use another MIDI channel, or use another view in the XY mode with different CC numbers.
Some presets (like Whoosh – Hybrid) don’t have a Start button. Instead, the sound is triggered when its XY pad is clicked (parameter labeled onClick). You need to map this parameter to a different CC number in the AudioSwift Console with the switch button. Otherwise if you use the same CC number as Start, the onClick parameter will be triggered but also the Start button of other presets, causing no sound at all. This happened in my tests.
Once you added all parameters, you could save Krotos Studio as a preset inside Ableton Live, so the parameters list will appear again when you load the plugin in a different project. This will save you time. However, this doesn’t save the MIDI mapping in Ableton Live (unless you save the project as a template). You’ll need to do the MIDI mapping process again.
Sometimes when doing the MIDI mapping, Ableton Live sets the CC numbers as relative MIDI instead of absolute MIDI. You’ll notice this behavior if you use the trackpad and the parameters jump all over the place. To change this, press again CMD + M and click the parameter. At the bottom right you’ll see the mode. Make sure Absolute is selected. In the AudioSwift Console select between Regular or Absolute format and choose the behavior you prefer for the trackpad MIDI controller.